The Big Picture: Core Concepts Every Beginner Must Know
Before we dive into the nitty-gritty, let’s establish a solid foundation. Understanding these four core concepts will give you the framework to understand everything that follows.
What Is 3D Rendering?
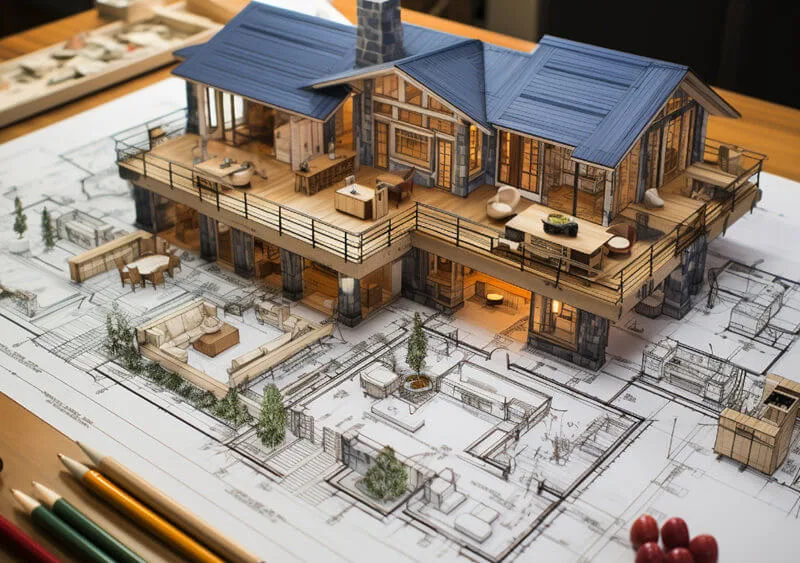
At its heart, 3D rendering is the process of using computer software to generate a two-dimensional (2D) image from a three-dimensional (3D) digital scene. Think of it as being a professional photographer in a virtual world. You build your subject (the 3D model), arrange the lights, pick your camera angle, and then “take the picture.” The computer then calculates how everything should look, and the final photograph is your 3D render. This allows you to create images of anything you can imagine, from a skyscraper that hasn’t been built to a fantastical creature, all with stunning realism.
What is the difference between 3D Modeling and 3D Rendering?
This is the most common point of confusion for beginners, but the distinction is simple and crucial. The two concepts are distinct parts of the overall creation process.
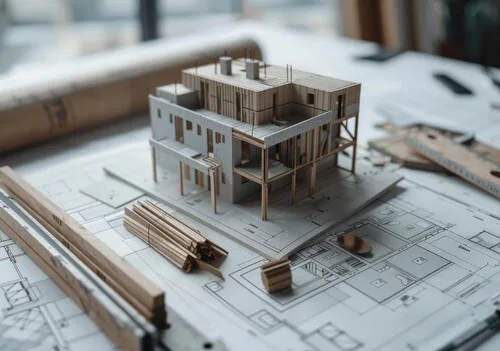
- 3D Modeling is the process of creating the three-dimensional object itself. It’s like being a digital sculptor. Using specialized software, an artist builds the object’s shape and structure out of virtual points, lines, and faces. The final output of this stage is the 3D model.
- 3D Rendering is what happens *after* the model is built. It’s the process of turning that 3D model into a final 2D image by adding materials, lighting, and atmosphere. It’s the final step that brings the model to life.
In short: Modeling is building the sculpture. Rendering is taking the photo of the sculpture.
What is CGI and is it the same as 3D rendering?
You’ll often hear these terms used interchangeably, but they have slightly different meanings. CGI, which stands for Computer-Generated Imagery, is the broad, all-encompassing term for any image or visual content created using computer software. This includes everything from the special effects in a blockbuster movie to the animated logo on a website.
3D rendering is a specific *type* of CGI. It refers directly to the process of creating visuals from a 3D model. So, while all 3D renders are CGI, not all CGI comes from a 3D render (for example, 2D digital paintings are also CGI).
What is a 3D Scene?
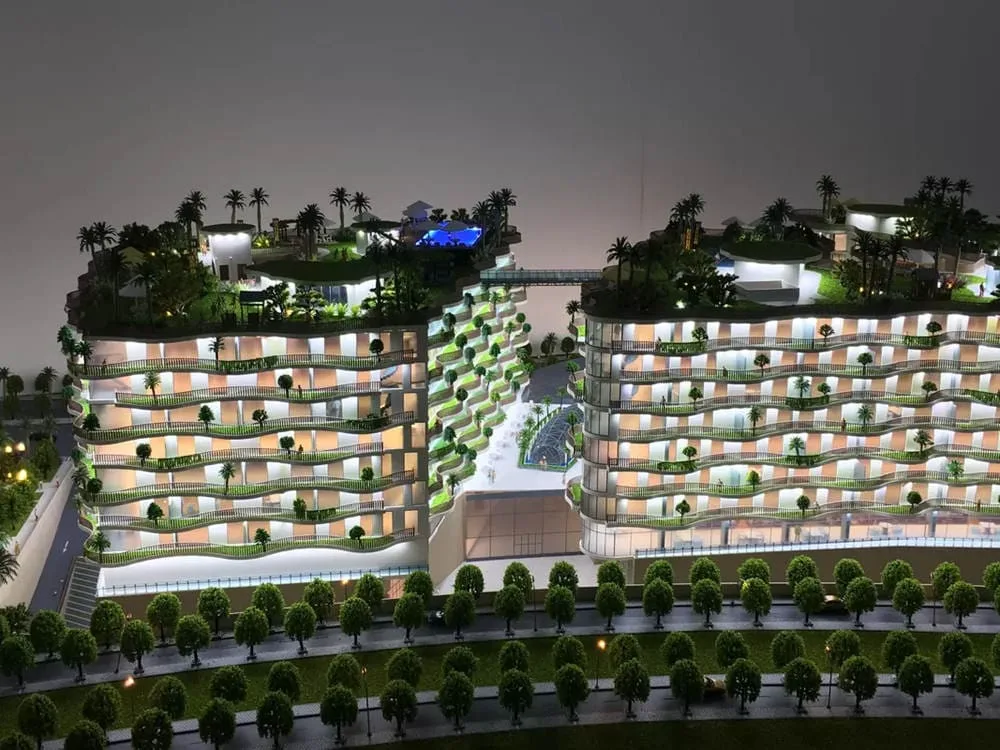
A 3D scene is the complete virtual environment where your render takes place. It’s more than just the main 3D model you’re showcasing. A 3D scene includes:
- All 3D models (the main subject, furniture, trees, background elements).
- The light sources (digital suns, lamps, etc.).
- The virtual cameras that define the viewpoints.
- The atmospheric effects (like fog or haze).
It’s the entire “digital photo studio” or “movie set” that you construct before hitting the render button.
The Building Blocks: A Deep Dive into 3D Modeling Terminology
Every 3D object, no matter how complex, is built from a few simple components. Understanding this digital “DNA” is the first step to mastering the language of 3D modeling.
The Atoms of 3D: Vertex, Edge, and Polygon
These three elements are the absolute foundation of almost every 3D model you’ll ever encounter.
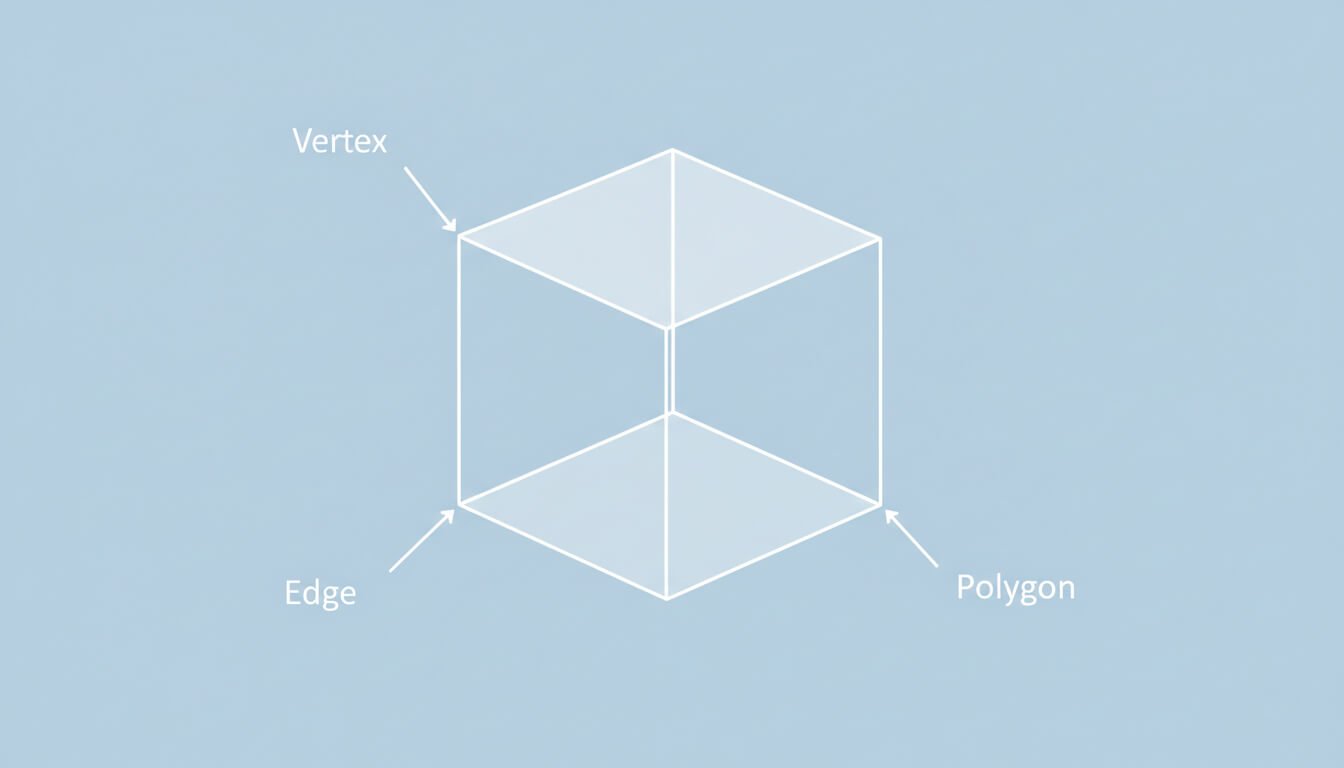
- Vertex (plural: Vertices): This is the simplest component—a single point in 3D space, defined by X, Y, and Z coordinates. Think of it as a corner.
- Edge: This is a straight line that connects two vertices.
- Polygon (or Face): This is a flat surface created by connecting three or more edges in a closed loop. Polygons are the visible surfaces of your model.
Understanding Polygon Types: Triangle vs. Quad vs. Ngon
Not all polygons are created equal. The number of sides a polygon has is incredibly important for how the model behaves.
- Triangle (Tri): A polygon with three sides. This is the simplest possible polygon and the fundamental shape that all other polygons are broken down into by render engines and game engines.
- Quad: A polygon with four sides. Quads are the preferred polygon type for most modelers, especially for objects that need to bend or deform (like characters), because they create clean, predictable surface flows.
- Ngon: A polygon with five or more sides. Ngons can be useful during the modeling process for flat surfaces, but they can cause problems with shading, texturing, and animation. They are usually converted to quads or tris before the final export.
Defining the Form: Mesh, Geometry, and Topology
These terms are often used interchangeably, but they refer to distinct concepts.
- Mesh: The entire collection of all the vertices, edges, and polygons that make up a single 3D object. It’s the complete “skeleton” and “skin” of your model.
- Geometry: This refers to the overall shape and structure of the model. When someone talks about the “geometry,” they’re talking about the object’s form.
- Topology: This is one of the most important concepts in modeling. Topology refers to the *flow* and arrangement of the polygons across the model’s surface. Good topology means the polygons are arranged in a clean, efficient, and logical way that supports the model’s shape and allows it to deform realistically when animated. Bad topology can lead to ugly visual artifacts and animation problems.
What is the difference between High Poly and Low Poly models?
This is a fundamental concept, especially in game development and real-time applications. The “poly” refers to the polygon count of a model.
- High Poly: A model with a very high number of polygons (from hundreds of thousands to millions). This allows for incredible surface detail and smooth curves. High poly models are used for cinematic characters, digital sculptures, and movies, but they are too performance-intensive for most real-time applications.
- Low Poly: A model with a much lower, optimized number of polygons. Low poly models are designed to run efficiently in real-time environments like video games. They often rely on clever texturing techniques (which we’ll cover next) to look more detailed than they actually are.
Common 3D Modeling Techniques Explained
- Polygonal Modeling: The most common method of 3D modeling, where artists directly manipulate the vertices, edges, and faces of a mesh to build their object.
- Digital Sculpting: A more intuitive and artistic technique, similar to working with real clay. The artist uses brush-based tools to push, pull, pinch, and smooth a high-density mesh. This is the preferred method for creating organic characters and creatures, primarily using software like ZBrush.
- NURBS Modeling: Stands for Non-Uniform Rational B-Spline. This is a mathematical method for creating perfectly smooth curves and surfaces. It’s less common for artistic work but is heavily used in industrial design, engineering, and automotive design where precision is critical.
The Art of the Surface: Texturing & Shading Terminology
A 3D model without materials is just a gray sculpture. The texturing and shading stage is where an object gets its color, its finish, and its personality. This is where you make metal look like metal and wood look like wood.
Material vs. Texture vs. Shader: What’s the Difference?
This trio of terms can be confusing, but here’s a simple breakdown:
- Material: This is the overall description of what a surface *is*. For example, you might create a “Rough Oak Wood” material or a “Scratched Copper” material.
- Texture (or Texture Map): This is a 2D image file (like a JPEG or PNG) that is applied, or “mapped,” onto the 3D model to provide surface detail. For our “Rough Oak Wood” material, one texture map would provide the wood grain color, and another might define the bumpy texture.
- Shader: This is the underlying computer program or set of calculations that tells the render engine *how* the material should react to light. It takes the texture maps as inputs and calculates the final appearance, including shininess, transparency, and color.
What is PBR (Physically Based Rendering)?
PBR is the modern industry standard for creating hyper-realistic materials. Instead of artists faking how a material should look, a PBR workflow aims to simulate the real-world physical properties of light interacting with a surface. Artists control straightforward properties like base color, metallic, and roughness. The result is materials that look correct and realistic under any lighting condition, making the entire process more predictable and efficient.
What is UV Mapping and UV Unwrapping?
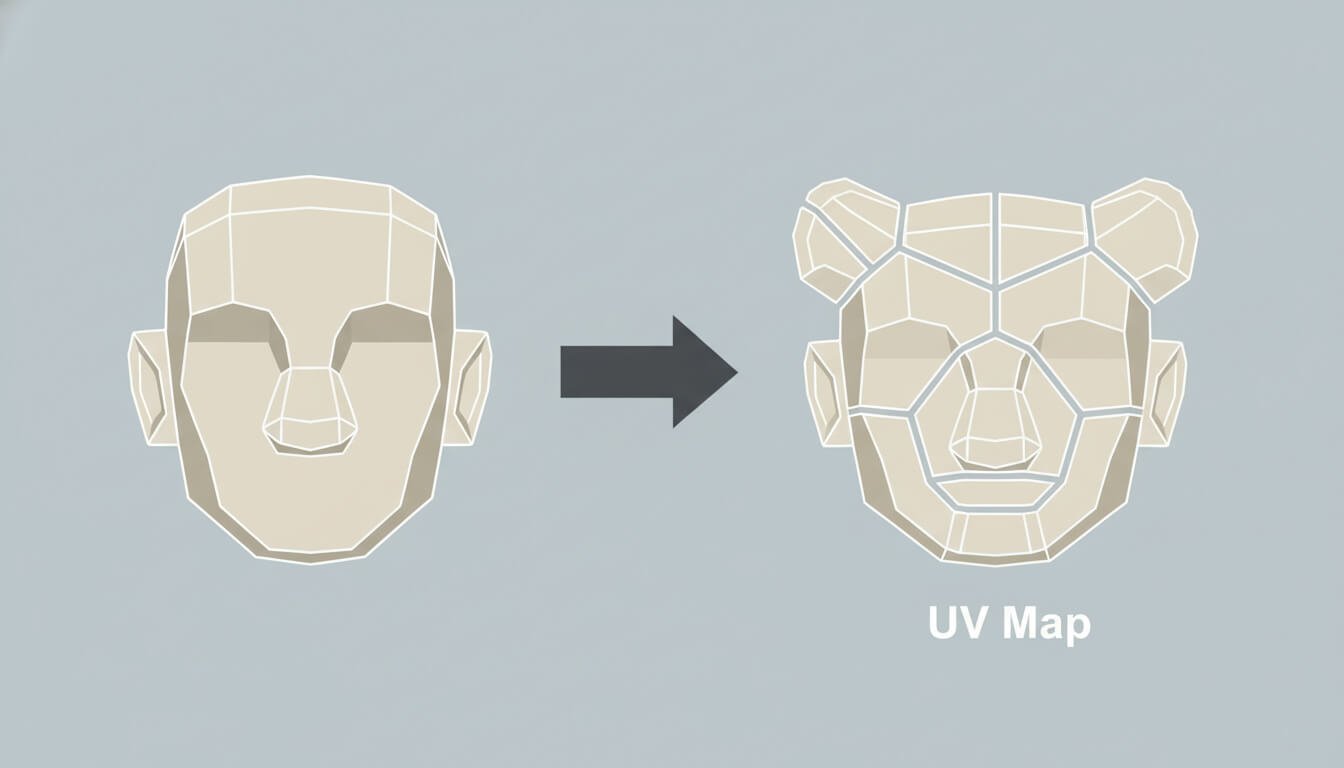
This is one of the most crucial—and often most confusing—steps in the texturing process. To apply a 2D texture image to a 3D model, the computer needs a guide that tells it how to wrap the image around the object. This guide is the UV Map.
The best analogy for UV unwrapping is imagining you have a cardboard box. To paint a detailed picture on it, you would first cut it along the seams and lay it flat. You’d paint your picture on the flattened cardboard, and then fold it back into a box.
In 3D, that process of “flattening” the 3D model into a 2D layout is called UV Unwrapping. The resulting 2D representation is the UV map. The ‘U’ and ‘V’ simply refer to the axes of the 2D texture space, just as ‘X’, ‘Y’, and ‘Z’ refer to the axes of the 3D model space.
A Glossary of Essential Texture Maps
A modern PBR material is usually made up of several different texture maps working together. Here are the most important ones you’ll encounter:
- Diffuse / Albedo Map: This is the base color of the material. It’s a flat image of the object’s color, without any lighting or shadow information.
- Roughness Map: This is a grayscale map that controls how rough or smooth a surface is, which determines how blurry or sharp its reflections are. White areas are rough (like concrete), while black areas are smooth and shiny (like a mirror).
- Normal Map: These are the distinctive purple-and-blue maps that create the illusion of fine surface detail—like pores, wrinkles, or scratches—without adding any extra polygons to the model. They do this by telling the render engine how to shade the surface as if the detail were really there.
- Displacement / Height Map: Unlike a normal map, which is just an illusion, a displacement map actually pushes and pulls the vertices of the model’s geometry at render time. This creates real, physical detail that can cast shadows and change the model’s silhouette. It’s more realistic but much more performance-intensive.
- Ambient Occlusion (AO) Map: This grayscale map adds soft, subtle contact shadows to the crevices and recessed areas of a model. It adds a sense of depth and realism by simulating where ambient light would have a harder time reaching.
What is Texture Baking?
Texture baking is the process of transferring surface details from one model to another in the form of a texture map. Its most common use is to “bake” the details from a high-poly model onto a normal map, which can then be applied to a low-poly model. This is the core technique that allows characters and objects in video games to look incredibly detailed while maintaining high performance.
Setting the Mood: Lighting & Rendering Terminology
Lighting is the soul of a 3D render. It dictates the mood, reveals the form, and transforms a simple scene into something cinematic and evocative. Understanding the language of light is crucial for any artist.
Types of Lights in a 3D Scene
Most 3D software provides a set of digital lights that mimic their real-world counterparts.
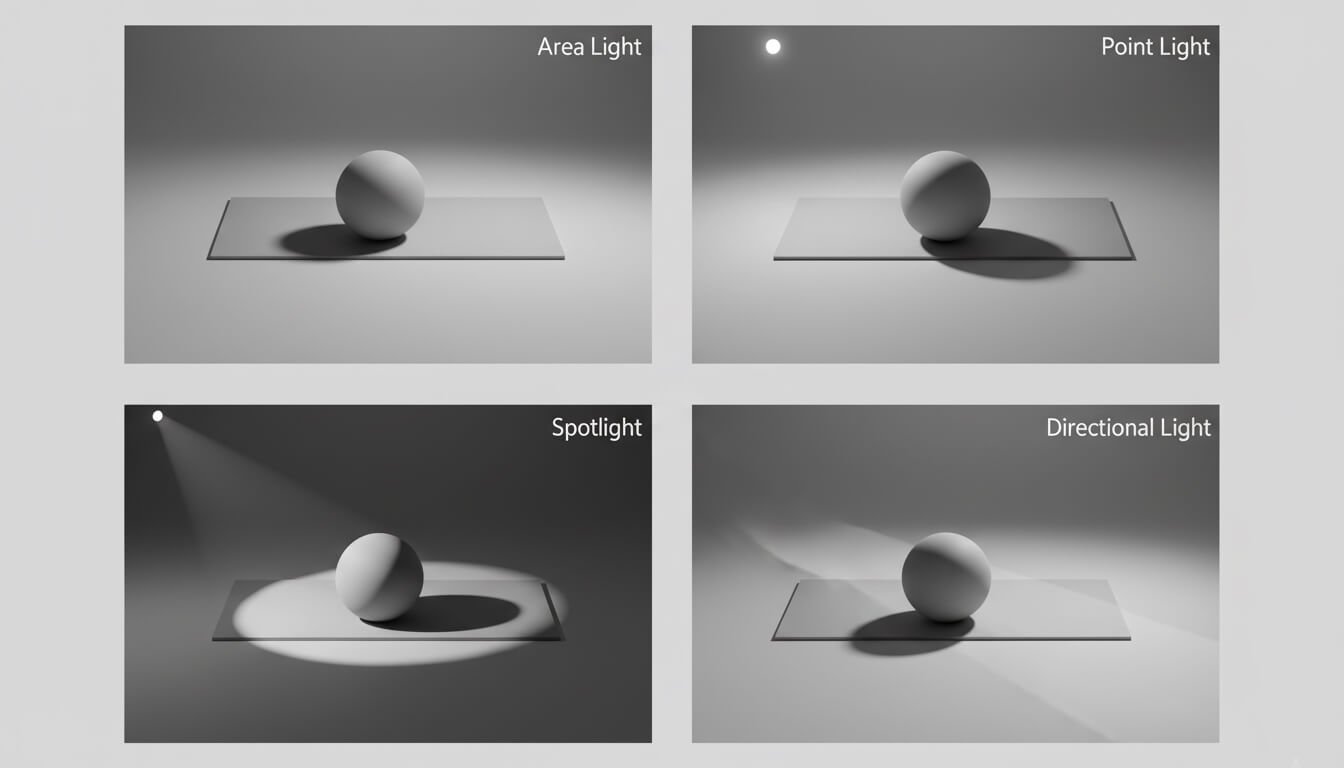
- Area Light: Simulates a light source with a surface area, like a photographer’s softbox or a fluorescent ceiling panel. Because of their size, they produce soft, diffused shadows.
- Point Light: Simulates a bare light bulb, emitting light equally in all directions from a single, infinitely small point. This creates sharp, well-defined shadows.
- Spotlight: Simulates a real-world spotlight or flashlight. It emits a cone of light in a specific direction, allowing you to focus illumination on a particular area.
- Directional Light: Simulates a very distant light source, like the sun. All its light rays travel in a single, parallel direction. Its position in the scene doesn’t matter, only its rotation.
Essential Lighting Techniques and Concepts
- Global Illumination (GI): This is arguably the most important concept for achieving photorealism. GI is the simulation of indirect, or bounced, light. In the real world, light doesn’t just come from the source; it bounces off every surface, filling shadows and creating a natural, luminous feel. Render engines that use GI produce dramatically more realistic results.
- HDRI (High Dynamic Range Image): This is a special, 360-degree panoramic photograph that contains a huge range of light intensity data. In 3D, an HDRI can be used to light an entire scene. The render engine uses the light information captured in the photo to illuminate the 3D models, resulting in incredibly realistic and nuanced lighting that perfectly matches the environment in the photo.
- Hard vs. Soft Shadows: The softness of a shadow is determined by the size of the light source relative to the object casting the shadow. A small light source (like the sun from our perspective) creates hard, sharp-edged shadows. A large light source (like an overcast sky or a big area light) creates soft, diffused shadows.
Key Rendering Concepts
- Render Engine: This is the specific software or plugin that performs the complex calculations to create the final image from your 3D scene. Examples include V-Ray, Corona, Cycles, and Arnold.
- Ray Tracing vs. Path Tracing: These are advanced rendering techniques that simulate the physics of light. Ray Tracing traces the path of light rays from the camera into the scene. Path Tracing is a more advanced and computationally intensive form of ray tracing that traces the light paths for many more bounces, which is the foundation of almost all modern photorealistic offline render engines.
- Render Pass (or AOV): An AOV (Arbitrary Output Variable) is an individual component of the final rendered image that is saved as a separate file. For example, you can render out just the reflections, just the shadows, or just the lighting. The purpose is to give the artist maximum flexibility during the final Compositing stage.
Bringing it to Life: Animation & Rigging Terminology
Animation is the process of creating the illusion of movement. In 3D, this involves manipulating objects or characters over time, a process made possible by a digital skeleton known as a rig.
The Basics of 3D Animation
- Frame: A single still image in a video sequence.
- Keyframe: A marker on the timeline that defines a specific pose, position, or property of an object at a specific moment in time. The software automatically calculates the “in-between” frames to create smooth motion between keyframes.
- Timeline: The user interface element that visually represents time, allowing artists to place and edit keyframes.
- Frame Rate (FPS): Stands for Frames Per Second. This determines how many still images are displayed every second to create the illusion of motion. Common standards are 24 FPS for film, 30 FPS for broadcast video, and 60+ FPS for video games.
What is Rigging? The Digital Skeleton
- Rigging: This is the technical process of creating a controllable digital skeleton inside a 3D model. The rig is what allows an animator to pose and move a character.
- Joint (or Bone): The individual, hierarchical components of the digital skeleton.
- Skinning (or Weight Painting): This is the crucial process of binding the 3D model’s mesh (the “skin”) to the rig’s joints. The artist “paints weights” to define how much influence each joint has on the surrounding vertices, ensuring the model deforms smoothly and naturally when the rig is moved.
Understanding Kinematics: IK vs. FK
Animators use two main methods to control a chain of joints, like an arm or a leg.
- Forward Kinematics (FK): In FK, you animate by rotating each joint in the chain sequentially, from parent to child. For example, you rotate the shoulder, then the elbow, then the wrist to position the hand. It’s direct and simple.
- Inverse Kinematics (IK): In IK, you animate by moving the endpoint of the chain (like the hand or foot), and the software automatically calculates how the other joints in the chain (like the elbow and shoulder) should bend to reach that position. This is often more intuitive for actions like a character planting their feet on the ground.
Tools of the Trade: Software You’ll Hear Mentioned
As you dive deeper, you’ll hear the names of various software tools repeated. Here’s a quick who’s who of the industry’s most common applications, many of which you can learn more about from expert channels like FlippedNormals.
3D Modeling & Animation Suites
- Blender: The free and open-source powerhouse that can do almost everything, from modeling and sculpting to rendering and animation.
- Autodesk 3ds Max: A long-time industry standard, especially dominant in architectural visualization and game asset creation.
- Autodesk Maya: The industry standard for character animation and visual effects (VFX) in the film and television industry.
Specialized Sculpting Software
- ZBrush: The undisputed king of digital sculpting, used for creating hyper-detailed characters, creatures, and organic models.
Render Engines
- V-Ray & Corona Renderer: The leading commercial offline render engines for achieving photorealism, especially popular in architecture and product visualization. Both are developed by Chaos.
- Arnold: A powerful offline renderer, also from Autodesk, widely used in the VFX and animation industry for its stability and quality.
Real-Time Engines
- Unreal Engine & Unity: The two dominant game engines that have been widely adopted for interactive architectural visualization, virtual production, and real-time animation.
- D5 Render, Twinmotion, & Enscape: A trio of user-friendly real-time renderers designed specifically for the architecture, engineering, and construction (AEC) industry, known for their speed and ease of use.
The Language of Delivery: Common 3D File Formats
Once your 3D model is complete, you need a way to save and share it. 3D file formats are the containers for your model’s data, and choosing the right one is essential for collaboration.
What is the difference between proprietary and neutral file formats?
- Proprietary (or Native) Formats: These are formats specific to one software, like
.blendfor Blender,.maxfor 3ds Max, or.c4dfor Cinema 4D. They save all the software-specific data perfectly but can’t be opened by other programs. - Neutral (or Interchange) Formats: These are designed to be a universal language, allowing you to move 3D data between different software applications.
A Glossary of Essential Interchange Formats
| Format | Full Name | Primary Use Case | Key Characteristic |
|---|---|---|---|
| OBJ (.obj) | Wavefront Object | Sharing static (non-animated) models | Simple, universal, and reliable for geometry. |
| FBX (.fbx) | Filmbox | Transferring models with animation and rigs | The industry standard for animation and game assets. |
| STL (.stl) | Stereolithography | 3D Printing | Represents shape only, with no color or material data. |
| glTF / GLB (.gltf, .glb) | GL Transmission Format | Web and Augmented Reality (AR) | The “JPEG of 3D”—highly optimized for real-time loading. For more info, check the Khronos Group’s official page. |
Conclusion: Why This Vocabulary Matters
Learning the language of 3D can seem daunting, but as we’ve journeyed from the humble vertex to complex rendering concepts, it becomes clear that this vocabulary is the bedrock of creation and collaboration in the digital world. Understanding these terms isn’t about becoming a technical guru; it’s about empowering your creativity.
When an architect can clearly ask a CG artist for “softer shadows from the area light” or “a higher roughness value on the concrete material,” the entire process becomes more efficient and the final result is closer to the original vision. When a client understands the difference between a low-poly draft and a high-poly final, they appreciate the complexity and value of the artist’s work. This shared language bridges the gap between imagination and execution.
Knowing the terminology will streamline your communication, save countless hours of revisions, and ultimately give you the confidence to bring your most ambitious ideas to life.
Feeling more confident with 3D terminology? What’s the one term that used to confuse you the most? Share your thoughts in the comments below!
Frequently Asked Questions (FAQ)
How long does a 3D render take?
This is the classic “how long is a piece of string?” question. A render can take anywhere from a fraction of a second to several days. The time depends on many factors: the complexity of the scene, the resolution of the image, the desired quality, the render engine being used (real-time vs. offline), and the power of your computer’s hardware.
Is 3D rendering hard to learn?
It has a definite learning curve, but it’s more accessible now than ever before. While mastering the technical intricacies of a program like 3ds Max can take years, modern, user-friendly software like D5 Render or Twinmotion allows beginners to create beautiful images in a matter of hours. The artistic principles—like good composition, color theory, and lighting—are often harder to master than the software’s buttons.
Is GPU rendering better than CPU rendering?
Neither is definitively “better”—they are different tools for different jobs. GPU rendering is incredibly fast and is the engine behind all real-time applications. CPU rendering is traditionally slower but can handle more complex scenes and massive amounts of data with greater stability. Many modern offline renderers, like V-Ray, now offer a “hybrid” mode that uses both at the same time.
What computer do I need for 3D rendering?
For serious 3D work, a powerful computer is a must. Here are the key components to prioritize:
- CPU (Processor): A processor with a high number of cores and threads (like an AMD Ryzen 9 or Intel Core i9) is crucial for CPU rendering and overall performance.
- GPU (Graphics Card): A modern, powerful graphics card from NVIDIA (like an RTX 30-series or 40-series) is essential for real-time rendering and GPU acceleration.
- RAM (Memory): 32GB is a good starting point for most work. For complex professional scenes, 64GB or even 128GB is recommended.
Do I need to learn post-production software like Photoshop?
Absolutely. Almost no professional render you see is straight out of the 3D software. Post-production in a program like Adobe Photoshop is a critical final step. It’s used for color grading, adjusting contrast, adding atmospheric effects like fog, inserting 2D people, and compositing different render passes to achieve a final, polished, artistic image.
What is a render farm?
A render farm is a large network of computers (a computer cluster) built specifically to handle the demands of rendering. When you have a massive animation that would take months to render on your single machine, you can send it to a commercial render farm. They distribute the work across hundreds of their computers, completing the job in a fraction of the time for a fee. It’s a powerful resource for meeting tight deadlines.