Τι ακριβώς είναι η τρισδιάστατη εξωτερική απόδοση?
Ένας θεμελιώδης ορισμός: Περισσότερα από μια όμορφη εικόνα
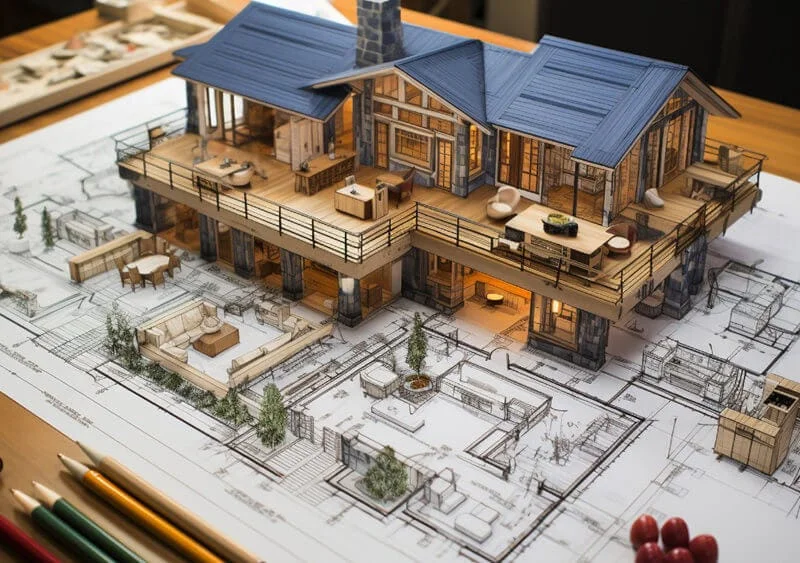
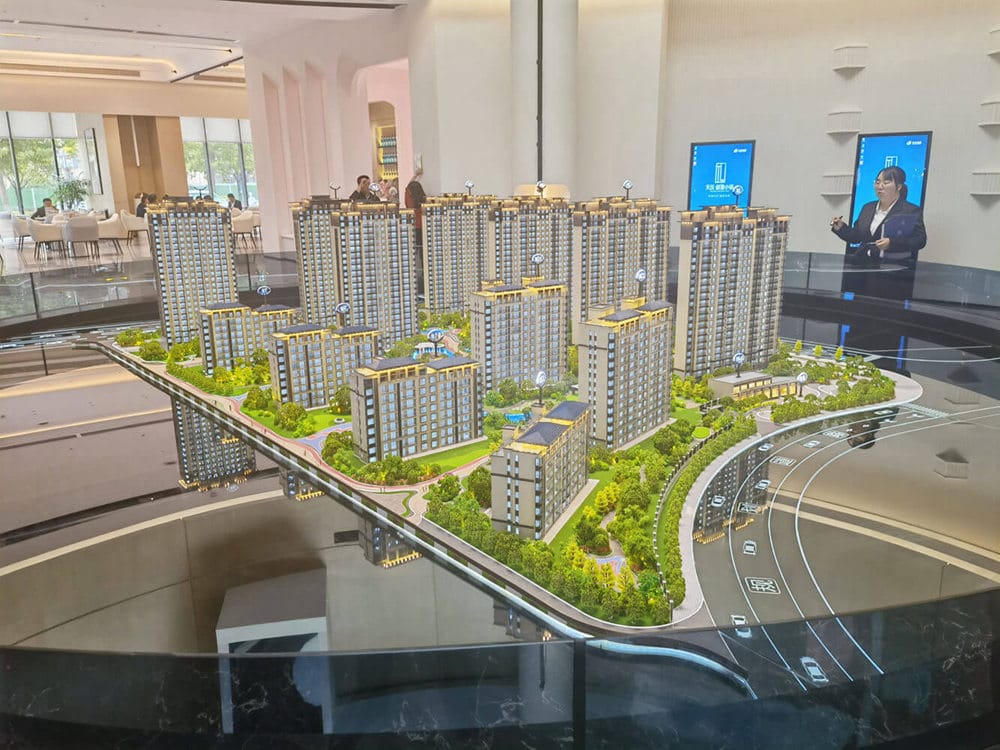
Ετσι, τι λέμε όταν λέμε “3D εξωτερική απόδοση”? Στον πυρήνα του, είναι μια ψηφιακή διαδικασία που μοιάζει κάπως μαγική. Σκεφτείτε έναν 3D καλλιτέχνη ως ψηφιακό φωτογράφο για κτίρια που δεν έχουν κατασκευαστεί ακόμη. Ξεκινούν με τα ακατέργαστα δεδομένα -τα αρχιτεκτονικά σχέδια και όψεις- και χρησιμοποιούν εξειδικευμένο λογισμικό υπολογιστή για να κατασκευάσουν ένα τρισδιάστατο ψηφιακό μοντέλο του εξωτερικού του κτιρίου και του περιβάλλοντος του. Τότε, μέσω μιας υπολογιστικής διαδικασίας, αυτό το τρισδιάστατο μοντέλο μεταμορφώνεται σε ρεαλιστικό, δισδιάστατη εικόνα ή κινούμενη κινούμενη εικόνα.
Αλλά είναι πολύ περισσότερα από ένα απλό ψηφιακό στιγμιότυπο. Μια εξαιρετική απόδοση αποτυπώνει την αλληλεπίδραση φωτός και σκιάς, η υφή του τούβλου και της πέτρας, οι αντανακλάσεις στο ποτήρι, και τον τρόπο που η δομή κάθεται μέσα στο τοπίο της. Ξεπερνά την απλή αναπαράσταση για να δημιουργήσετε ένα
απτή οπτική εμπειρία— αυτό που προκαλεί συγκίνηση, επικοινωνεί έναν τρόπο ζωής, και κάνει τον άκτιστο κόσμο να νιώθει αληθινός.
Οι τρεις κύριοι τύποι εξωτερικών αποδόσεων
Ενώ ο φωτορεαλισμός είναι ο πιο κοινός στόχος, 3Το D rendering είναι μια ευέλικτη μορφή τέχνης. Το στυλ που θα επιλέξετε εξαρτάται από το στάδιο και τον σκοπό του έργου. Ας αναλύσουμε τους τρεις κύριους τύπους που θα συναντήσετε.
- Φωτορεαλιστική απόδοση: Αυτός είναι ο χρυσός κανόνας της βιομηχανίας. Ο απώτερος στόχος εδώ είναι να δημιουργήσετε μια εικόνα τόσο λεπτομερή και ζωντανή που να μην διακρίνεται από μια πραγματική φωτογραφία. Οι καλλιτέχνες κατασκευάζουν σχολαστικά κάθε λεπτομέρεια, από τις ανεπαίσθητες καιρικές συνθήκες σε μια ξύλινη δοκό μέχρι τον τρόπο που οι λεπίδες του γρασιδιού πιάνουν το φως του ήλιου. Αυτό το στυλ είναι απαραίτητο για το τελικό υλικό μάρκετινγκ, εξασφάλιση εγκρίσεων πελατών, και παρουσίαση στα ρυθμιστικά συμβούλια όπου ο ρεαλισμός και η ακρίβεια είναι πρωταρχικής σημασίας.
- Μη Φωτορεαλιστική απόδοση (NPR): Μερικές φορές, ο υπερρεαλισμός δεν είναι ο στόχος, ιδιαίτερα στα αρχικά στάδια του σχεδιασμού. Το NPR προσφέρει μια πιο καλλιτεχνική, εννοιολογικό στυλ που μπορεί να μοιάζει με πίνακα ακουαρέλας, ένα σκίτσο με μολύβι, ή ένα τεχνικό σχέδιο. Αυτή η προσέγγιση είναι ιδανική για τη μετάδοση μιας γενικής ιδέας ή σχεδιαστικής πρόθεσης χωρίς να κολλάτε σε συγκεκριμένες επιλογές υλικών. Διατηρεί την εστίαση στη φόρμα και τη μάζα, επιτρέποντας έναν πιο ρευστό και δημιουργικό διάλογο σχεδιασμού.
- Απόδοση σε πραγματικό χρόνο: Φανταστείτε να περπατάτε μέσα στο σχέδιό σας και να αλλάζετε το χρώμα του τοίχου ή την ώρα της ημέρας με το πάτημα ενός κουμπιού. Αυτή είναι η δύναμη της απόδοσης σε πραγματικό χρόνο. Χρησιμοποιώντας τεχνολογία παρόμοια με αυτή στα σύγχρονα βιντεοπαιχνίδια, λογισμικό όπως Αχυρώνας, Ενσωματωμένος, και Twinmotion επιτρέπει την άμεση οπτικοποίηση. Αυτό είναι ένα παιχνίδι αλλαγής για διαδραστικές συνεδρίες σχεδιασμού με πελάτες, επιτρέποντας γρήγορες επαναλήψεις και καθηλωτικές εμπειρίες, συμπεριλαμβανομένης της εικονικής πραγματικότητας (VR) περιηγήσεις.
Γιατί η 3D εξωτερική απόδοση είναι απαραίτητο εργαλείο? Τα απαράμιλλα οφέλη
Η υιοθέτηση της τρισδιάστατης απόδοσης δεν είναι μόνο να συμβαδίζεις με τις τάσεις; Πρόκειται για το ξεκλείδωμα μιας σειράς ισχυρών πλεονεκτημάτων που επηρεάζουν άμεσα το τελικό αποτέλεσμα και την επιτυχία ενός έργου. Ας διερευνήσουμε γιατί αυτή η τεχνολογία έχει γίνει ένα απαραίτητο πλεονέκτημα στο σύγχρονο αρχιτεκτονικό τοπίο και το τοπίο ακινήτων.
Ξεκλείδωμα πρωτοφανούς οπτικοποίησης και διαύγειας
Ένα παραδοσιακό σχέδιο είναι ένας αφηρημένος χάρτης γραμμών και αριθμών, συχνά ανεξήγητο σε κανέναν χωρίς τεχνική κατάρτιση. 3Οι αποδόσεις D καταρρίπτουν αυτό το εμπόδιο. Μεταφράζουν πολύπλοκα αρχιτεκτονικά σχέδια σε μια καθολική οπτική γλώσσα που μπορεί να καταλάβει ο καθένας. Ένας πελάτης, ένας επενδυτής, ή ένα μέλος του συμβουλίου της κοινότητας μπορεί να καταλάβει αμέσως την κλίμακα, αφή, και τελική εμφάνιση ενός έργου, την εξάλειψη της ασάφειας και την προώθηση μιας κοινής, καθαρό όραμα από την πρώτη μέρα.
Οδήγηση καλύτερης λήψης αποφάσεων και βελτίωσης του σχεδιασμού
Τι θα γινόταν αν μπορούσατε να εντοπίσετε ένα ελάττωμα σχεδιασμού πριν τοποθετηθεί ένα μόνο τούβλο? Με τρισδιάστατη απόδοση, μπορείς. Οι αρχιτέκτονες και οι σχεδιαστές μπορούν να δημιουργήσουν ένα ψηφιακό δίδυμο του έργου τους, επιτρέποντάς τους να πειραματιστούν ελεύθερα. Μπορούν να δοκιμάσουν διαφορετικά υλικά, δείτε πώς μια αλλαγή στην τοποθέτηση παραθύρων επηρεάζει το φυσικό φως, ή οραματιστείτε πώς ένας νέος συνδυασμός χρωμάτων αλλάζει τον χαρακτήρα του κτιρίου—όλα χωρίς πραγματικό κόστος. Αυτή η ικανότητα επανάληψης και βελτίωσης σε έναν εικονικό χώρο οδηγεί σε πιο στοχαστικό, ακριβής, και τελικά καλύτερα σχέδια.
Επίτευξη σημαντικής εξοικονόμησης χρόνου και κόστους
“Η ικανότητα εντοπισμού ελαττωμάτων σχεδιασμού νωρίς στη διαδικασία είναι ζωτικής σημασίας για την ελαχιστοποίηση των σφαλμάτων και τη μείωση της ανάγκης για δαπανηρές αναθεωρήσεις κατά την κατασκευή.”
Εδώ η αξία της απόδοσης γίνεται πεντακάθαρη. Κάθε ζήτημα που εντοπίζεται στην ψηφιακή φάση είναι μια δαπανηρή σειρά αλλαγής που αποφεύγεται κατά την κατασκευή. Αποτρέποντας τα λάθη πριν συμβούν, 3Η οπτικοποίηση μειώνει άμεσα τα απόβλητα υλικών, ελαχιστοποιεί τις καθυστερήσεις κατασκευής, και προστατεύει τον προϋπολογισμό του έργου. Σε ορισμένες περιπτώσεις, Η βελτιωμένη σαφήνεια και ελκυστικότητα έχει αποδειχθεί ότι ενισχύει τα ερωτήματα των αγοραστών κατά όσο 30% και οδηγούν σε σημαντικά ταχύτερα ποσοστά πώλησης για νέες εξελίξεις.
Ένα Powerhouse για το Μάρκετινγκ, Εμπορικός, και Έγκριση Έργου
Στη σημερινή ανταγωνιστική αγορά, δεν μπορείς να πουλήσεις ένα όνειρο με ξερά σχέδια. 3Τα D renderings είναι η κινητήρια δύναμη του σύγχρονου αρχιτεκτονικού μάρκετινγκ.
- Επανάσταση στο μάρκετινγκ ακινήτων: Τα υψηλής ποιότητας γραφικά δεν είναι πλέον πολυτέλεια; είναι προσδοκία. Οι αποδόσεις δημιουργούν συναρπαστικό περιεχόμενο για ιστότοπους, φυλλάδια, μέσα κοινωνικής δικτύωσης, και διαφημιστικές πινακίδες. Επιτρέπουν στους προγραμματιστές να ξεκινήσουν ισχυρές καμπάνιες προπώλησης πολύ πριν ολοκληρωθεί η κατασκευή. Μια συναρπαστική μελέτη περίπτωσης είναι η Skyline Tower στη Νέα Υόρκη, που χρησιμοποίησε φωτορεαλιστικές αποδόσεις για προπώληση $223 μονάδων αξίας εκατομμυρίων πριν ολοκληρωθεί το κτίριο. Αυτή είναι η δύναμη της πώλησης ενός υλικού, οπτικοποιημένο μέλλον.
- Εξορθολογισμός εγκρίσεων: Η παρουσίαση μιας ζωντανής απόδοσης σε μια επιτροπή σχεδιασμού ή μια ομάδα επενδυτών είναι πολύ πιο πειστική από το να τους δείξετε γραμμικά σχέδια. Η οπτική διαύγεια ευθυγραμμίζει τις προσδοκίες, απαντά σε ερωτήσεις πριν τεθούν, και οικοδομεί εμπιστοσύνη στη βιωσιμότητα του έργου. Αυτό εξομαλύνει τον δρόμο για την εξασφάλιση αδειών, χρηματοδότηση, και συμμετοχή ενδιαφερομένων, οδηγώντας σε υψηλότερα ποσοστά έγκρισης έργων.
Ενεργοποίηση αποτελεσματικής προσαρμογής και τοπικής προσαρμογής
Ένα κτίριο δεν υπάρχει στο κενό. Πρέπει να μιλήσει στο περιβάλλον του και στο κοινό του. 3Η απόδοση D το καθιστά δυνατό με απίστευτη ακρίβεια. Για παράδειγμα, στην ποικιλόμορφη ινδική αρχιτεκτονική αγορά, Οι renderers μπορούν να ενσωματώσουν απρόσκοπτα παραδοσιακά σχεδιαστικά στοιχεία όπως το περίτεχνο *jaalis* ή τις αρχές του Vastu Shastra. Μπορούν να δοκιμάσουν τοπικά υλικά όπως ψαμμίτη ή τικ για να δουν πώς φαίνονται στο τοπικό κλίμα. Αυτό το επίπεδο προσαρμογής διασφαλίζει ότι το τελικό έργο έχει βαθιά απήχηση με τις πολιτιστικές και αισθητικές προτιμήσεις της αγοράς-στόχου του.
Ποιος ωφελείται από την τρισδιάστατη εξωτερική απεικόνιση?
Ο αντίκτυπος της τρισδιάστατης εξωτερικής απόδοσης εκτείνεται σε ολόκληρο το οικοσύστημα κατασκευής και ανάπτυξης. Είναι ένα πολυεπιστημονικό εργαλείο που παρέχει μοναδικά, πλεονεκτήματα που αλλάζουν το παιχνίδι σε ένα ευρύ φάσμα επαγγελματιών και ενδιαφερομένων.
Ένα πολυθεματικό παιχνίδι-αλλαγή
Αρχιτέκτονες & Σχεδιαστές
Για αρχιτέκτονες και σχεδιαστές, 3Το D rendering είναι ένα ψηφιακό sandbox για δημιουργικότητα. Είναι το απόλυτο εργαλείο για εξερεύνηση σχεδιασμού, επιτρέποντάς τους να ξεπεράσουν τα όρια και να πειραματιστούν με φόρμες, υλικά, και φως με τρόπους που προηγουμένως ήταν αδύνατον. Είναι επίσης η κύρια συσκευή επικοινωνίας τους, μεταφράζοντας το περίπλοκο όραμά τους σε εκπληκτικό, εύκολη στην κατανοητή παρουσίαση που εντυπωσιάζει τους πελάτες και δημιουργεί μια ισχυρή, πλούσιο σε οπτικά χαρτοφυλάκιο.
Προγραμματιστές Ακινήτων & Διαφημιστές
Οι προγραμματιστές και οι έμποροι ζουν και αναπνέουν από την ικανότητά τους να πουλήσουν ένα όραμα. 3Η απόδοση D είναι το πιο ισχυρό τους πλεονέκτημα. Τους δίνει τη δυνατότητα να δημιουργήσουν συναρπαστικές εκστρατείες μάρκετινγκ και να ξεκινήσουν τις προπωλήσεις πολύ πριν ξεκινήσουν, εξασφάλιση κρίσιμου κεφαλαίου πρώιμου σταδίου. Για αυτούς, οι αποδόσεις δεν είναι απλώς εικόνες; είναι επενδυτικά εργαλεία που προσελκύουν αγοραστές, δικαιολογούν την premium τιμολόγηση, και να προσφέρει υψηλότερη απόδοση επένδυσης.
Κατασκευαστικές Εταιρείες & Οικοδόμοι
Καταγής, η σαφήνεια είναι το παν. Οι κατασκευαστές και οι κατασκευαστικές εταιρείες χρησιμοποιούν τρισδιάστατες απεικονίσεις για καλύτερο σχεδιασμό και συντονισμό έργων. Βλέποντας ένα λεπτομερές μοντέλο του τελικού προϊόντος, μπορούν να προβλέψουν πιθανές κατασκευαστικές προκλήσεις, βελτιστοποίηση της κατανομής πόρων, και αποφυγή δαπανηρών επιτόπιων σφαλμάτων. Παρέχει μια σαφή οπτική αναφορά που βοηθά στη διαχείριση των προσδοκιών των πελατών και διασφαλίζει ότι ολόκληρη η ομάδα χτίζει προς τον ίδιο στόχο.
Πολεοδόμοι & Δήμοι
Όταν σχεδιάζετε ένα νέο κοινοτικό κέντρο ή μια ανάπτυξη μεγάλης κλίμακας, η οπτικοποίηση των επιπτώσεών του είναι απαραίτητη. Οι πολεοδόμοι χρησιμοποιούν τρισδιάστατες αποδόσεις για να δουν πώς ένα νέο έργο θα ταιριάζει στον υπάρχοντα ιστό της πόλης. Αυτά τα γραφικά είναι κρίσιμα για δημόσιες διαβουλεύσεις, επιτρέποντάς τους να κοινοποιούν με σαφήνεια τις προτεινόμενες αλλαγές στην κοινότητα και να συλλέγουν ενημερωμένα σχόλια, ενθάρρυνση της διαφάνειας και της συνεργασίας.
Ιδιοκτήτες σπιτιού
Για ένα άτομο που σχεδιάζει το σπίτι των ονείρων του, η διαδικασία μπορεί να είναι τρομακτική. 3Η απόδοση D το απομυθοποιεί. Επιτρέπει στους ιδιοκτήτες σπιτιού να δουν το μελλοντικό τους σπίτι να ζωντανεύει, πάρτε αποφάσεις με αυτοπεποίθηση για τα πάντα, από χρώματα πλαισίων μέχρι στυλ παραθύρων, και επικοινωνούν με απόλυτη σαφήνεια το προσωπικό τους όραμα στον αρχιτέκτονα και τον κατασκευαστή τους. Μετατρέπει ένα αφηρημένο όνειρο σε ορατό, συναρπαστική πραγματικότητα.
Από το προσχέδιο στον φωτορεαλισμό: Αποκαλύφθηκε η διαδικασία 3D εξωτερικής απόδοσης
Η δημιουργία μιας εκπληκτικά ρεαλιστικής τρισδιάστατης απόδοσης είναι μια εξελιγμένη διαδικασία που συνδυάζει την τεχνική ακρίβεια με το καλλιτεχνικό όραμα. Είναι ένα ταξίδι με πολλά διαφορετικά στάδια, κάθε κτίριο πάνω στο τελευταίο για να μεταμορφώσει μια απλή ιδέα σε οπτικό αριστούργημα. Ας περπατήσουμε σε αυτό το ταξίδι βήμα προς βήμα.
| Βήμα |
Δράση |
Σκοπός & Βασικά Εργαλεία |
| 1 |
Συγκέντρωση πληροφοριών |
Συγκεντρώστε όλα τα αρχεία του έργου (σχεδιαγράμματα, ΠΑΛΗΑΝΘΡΩΠΟΣ, προδιαγραφές υλικού) να δημιουργήσει γερές βάσεις και να αποτρέψει τις αναθεωρήσεις. |
| 2 |
3D Μοντελοποίηση |
Κατασκευάστε την ψηφιακή δομή με ακριβή κλίμακα και γεωμετρία. Εργαλεία: Αυτόματο, Σκίτσο, Ερεθίζω, 3ds max. |
| 3 |
Υφή & Υλικά |
Εφαρμόστε ζωντανές επιφάνειες (τούβλο, ποτήρι, ξύλο) στο μοντέλο του ρεαλισμού. Εργαλεία: Υφές PBR, χάρτες shader. |
| 4 |
Σύνθεση Σκηνής |
Προσθέστε πλαίσιο με τον εξωραϊσμό, άνθρωποι, και οχήματα για τη δημιουργία ενός αξιόπιστου περιβάλλοντος. |
| 5 |
Φωτισμός |
Ρυθμίστε φυσικές και τεχνητές πηγές φωτός για να καθορίσετε τη διάθεση, βάθος, και ρεαλισμός. Εργαλεία: ουρανοί HDRI, εικονικός ήλιος/λάμπες. |
| 6 |
Απόδοση |
Ο υπολογιστής δημιουργεί την τελική εικόνα 2D από όλα τα τρισδιάστατα δεδομένα. Εργαλεία: Ακτινογραφία, Στέμμα, Αχυρώνας. |
| 7 |
Μετα-επεξεργασία |
Βελτιώστε την τελική εικόνα με διόρθωση χρώματος και εφέ για γυαλιστερό, επαγγελματική εμφάνιση. Εργαλεία: Φωτοστέφανο, ΣΕΙΡΗΤΙ. |
Ένα ταξίδι βήμα προς βήμα από τη σύλληψη στη δημιουργία
Βήμα 1: Συγκέντρωση πληροφοριών & Ενημέρωση έργου
Κάθε εξαιρετική απόδοση ξεκινά με εξαιρετικές πληροφορίες. Αυτό το θεμελιώδες στάδιο έχει να κάνει με τη συλλογή του “συστατικά.” Η ομάδα απόδοσης συλλέγει κάθε κομμάτι σχετικής τεκμηρίωσης από τον πελάτη, συμπεριλαμβανομένων των αρχιτεκτονικών σχεδίων (σχεδιαγράμματα, Αρχεία CAD), υψομετρικά σχέδια, σχέδια τοπίου, και υλικές προδιαγραφές. Κρίσιμα, ζητούν επίσης εικόνες αναφοράς που μεταφέρουν την επιθυμητή διάθεση, στυλ, και ατμόσφαιρα. Μια σαφής και λεπτομερής σύνοψη σε αυτό το στάδιο είναι ο μοναδικός καλύτερος τρόπος για να αποφευχθούν οι χρονοβόρες και δαπανηρές αναθεωρήσεις στη συνέχεια.
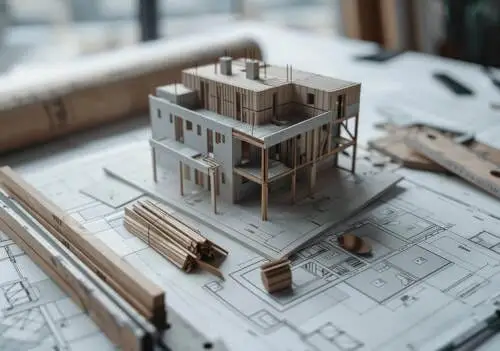
Βήμα 2: 3D Μοντελοποίηση – Χτίζοντας τον Ψηφιακό Σκελετό
Με τα σχέδια στο χέρι, οι τρισδιάστατοι καλλιτέχνες αρχίζουν να κατασκευάζουν τον ψηφιακό σκελετό του κτιρίου. Χρησιμοποιώντας εξειδικευμένο λογισμικό όπως
Αυτόματο, Σκίτσο, Ερεθίζω, ή
3ds max, χτίζουν σχολαστικά τη γεωμετρία της κατασκευής. Αυτή είναι μια εργασία προσανατολισμένη στην ακρίβεια όπου κάθε τοίχος, παράθυρο, πόρτα, και η γραμμή οροφής δημιουργείται στην ακριβή κλίμακα και τις αναλογίες που καθορίζονται στα σχέδια. Το αποτέλεσμα είναι καθαρισμός, τρισδιάστατο μοντέλο χωρίς υφή—ένας κενός καμβάς έτοιμος για τα καλλιτεχνικά του στρώματα.
Βήμα 3: Υφή & Εφαρμογή Υλικού – Αναπνέοντας ζωή σε επιφάνειες
Εδώ το μοντέλο αρχίζει να νιώθει αληθινό. Οι καλλιτέχνες εφαρμόζουν υλικά και υφές σε κάθε επιφάνεια του τρισδιάστατου μοντέλου. Αυτό δεν αφορά μόνο την προσθήκη ενός “χρώμα τούβλου”; πρόκειται για την προσομοίωση των πραγματικών ιδιοτήτων του υλικού. Χρησιμοποιούν προηγμένες τεχνικές και χάρτες υφής υψηλής ανάλυσης (σαν χάρτες ανωμαλιών για τραχύτητα, χάρτες αντανάκλασης για γυαλάδα, και χάρτες μετατόπισης για τρισδιάστατο βάθος) για να φαίνεται το τούβλο χονδροειδές, το γυαλί φαίνεται αντανακλαστικό, και το ξύλο μοιάζει με κόκκους. Για κορυφαίο ρεαλισμό, συχνά χρησιμοποιούν πόρους από επαγγελματικές βιβλιοθήκες όπως
Πολύγωνο ή
Texture Haven.
Βήμα 4: Σύνθεση Σκηνής & Ρύθμιση περιβάλλοντος – Ρύθμιση της Σκηνής
Ένα κτίριο είναι τόσο πιστευτό όσο ο κόσμος που κατοικεί. Σε αυτό το βήμα, Οι καλλιτέχνες κατασκευάζουν το περιβάλλον περιβάλλον για να δώσουν το πλαίσιο του έργου. Αυτό περιλαμβάνει:
- Εξωραϊσμός: Προσθήκη τρισδιάστατων μοντέλων δέντρων, λουλούδια, γρασίδι, και χαρακτηριστικά νερού.
- Συνοδεία: Τοποθέτηση τρισδιάστατων μοντέλων ανθρώπων (συχνά αποκαλείται “φολίδες”), αυτοκίνητα, και έπιπλα δρόμου για να προσθέσετε ζωή και αίσθηση κλίμακας.
- Περίχωρα: Μοντελοποίηση παρακείμενων κτιρίων ή χρήση φωτογραφικών πινακίδων για την τοποθέτηση του έργου στην πραγματική του θέση.
Βήμα 5: Φωτισμός – Γλυπτική με Φως και Σκιά
Ο φωτισμός είναι αναμφισβήτητα το πιο κρίσιμο καλλιτεχνικό στοιχείο στην τρισδιάστατη απόδοση. Υπαγορεύει τη διάθεση, αναδεικνύει αρχιτεκτονικά χαρακτηριστικά, και δημιουργεί την ψευδαίσθηση του βάθους. Οι καλλιτέχνες θα δημιουργήσουν ένα εικονικό σύστημα φωτισμού που συχνά περιλαμβάνει:
- Φυσικό Φως: Ένας εικονικός ήλιος τοποθετημένος για να προσομοιώνει μια συγκεκριμένη ώρα της ημέρας (Π.χ., το μακρύ, απαλές σκιές αργά το απόγευμα ή το φωτεινό, άμεσο φως του μεσημεριού).
- Φως του Ουρανού: Συχνά επιτυγχάνεται χρησιμοποιώντας μια εικόνα υψηλού δυναμικού εύρους (Hdri), που είναι μια φωτογραφία 360 μοιρών που τυλίγεται γύρω από τη σκηνή, χύτευση ρεαλιστική, αποχρώσεις φωτός και αντανακλάσεις.
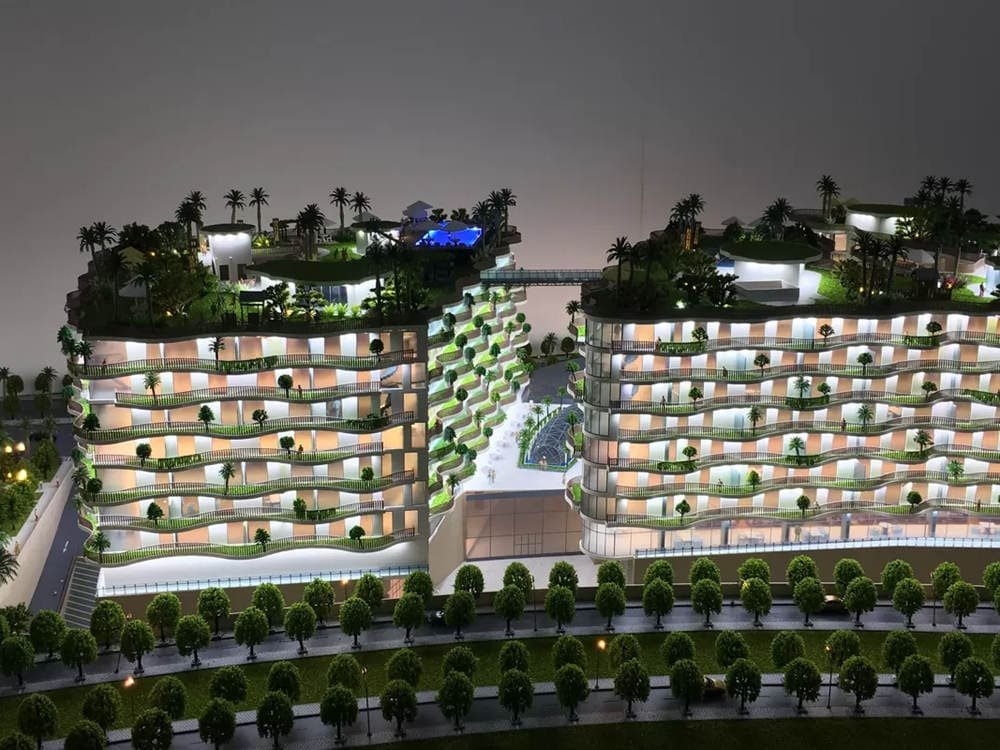
- Τεχνητό φώς: Τοποθέτηση εικονικών φώτων στο εσωτερικό του κτιρίου, στη βεράντα, ή ως λαμπτήρες δρόμου για να δημιουργήσετε ένα ζεστό, ελκυστική λάμψη για βραδινές σκηνές ή σκηνές λυκόφωτος.
Βήμα 6: Απόδοση – Η υπολογιστική κορύφωση
Μόλις μοντελοποιηθούν όλα, υφή, και αναμμένο, ήρθε η ώρα να “τραβήξτε τη φωτογραφία.” Η μηχανή απόδοσης—πανίσχυρο λογισμικό όπως
Ακτινογραφία, Στέμμα, ή
Αχυρώνας— παίρνει όλα τα τρισδιάστατα δεδομένα στη σκηνή και εκτελεί εκατομμύρια υπολογισμούς για να προσδιορίσει πώς το φως αναπηδά από κάθε επιφάνεια. Δημιουργεί την τελική 2D εικόνα, pixel-pixel. Αυτή η διαδικασία μπορεί να είναι υπολογιστικά εντατική, διαρκεί από λίγα λεπτά έως πολλές ώρες, ανάλογα με την πολυπλοκότητα της σκηνής, την επιθυμητή ανάλυση, και τη δύναμη του υλικού του υπολογιστή.
Βήμα 7: Μετα-επεξεργασία – Το τελικό πολωνικό
Το ακατέργαστο προϊόν σπάνια είναι το τελικό προϊόν. Το τελευταίο βήμα είναι η μετα-επεξεργασία, όπου η εικόνα που αποδίδεται εισάγεται σε ένα πρόγραμμα επεξεργασίας εικόνας όπως
Adobe Photoshop. Εδώ, οι καλλιτέχνες εκτελούν τις τελευταίες τροποποιήσεις και βελτιώσεις, σαν επαγγελματίας φωτογράφος που αγγίζει μια φωτογραφία. Αυτό μπορεί να περιλαμβάνει προσαρμογή της ισορροπίας χρωμάτων και της αντίθεσης, ακονίζοντας λεπτομέρειες, προσθέτοντας ατμοσφαιρικά εφέ όπως μια ανεπαίσθητη ομίχλη ή μια έκρηξη φακού, και σύνθεση σε επιπλέον στοιχεία για να δημιουργήσετε ένα τέλεια γυαλισμένο, υποβλητικός, και επαγγελματική τελική εικόνα.
Η Τέχνη της Σύνθεσης: Mastering του 10 Βασικές γωνίες κάμερας

Σε τρισδιάστατη απόδοση, η κάμερα είναι το πινέλο σας. Η γωνία που επιλέγετε δεν είναι απλώς μια τεχνική ρύθμιση; είναι μια ισχυρή συσκευή αφήγησης. Το πού τοποθετείτε την εικονική σας κάμερα καθορίζει τι βλέπει ο θεατής, αυτό που νιώθουν, και τι μήνυμα λαμβάνουν για το έργο. Ένα ενιαίο κτίριο μπορεί να φαίνεται φιλόξενο και σε ανθρώπινη κλίμακα από μία οπτική γωνία, και μνημειώδες και δέος από άλλο. Η κυριαρχία αυτών των απόψεων είναι το κλειδί για τη δημιουργία μιας συναρπαστικής οπτικής αφήγησης που προβάλλει ένα σχέδιο με τον καλύτερο δυνατό τρόπο.
Ένας ολοκληρωμένος οδηγός για τις πιο αποτελεσματικές εξωτερικές όψεις
Ας εξερευνήσουμε τις δέκα πιο αποτελεσματικές γωνίες κάμερας και πώς να τις χρησιμοποιήσετε στρατηγικά για να πείτε τη μοναδική ιστορία του έργου σας. Κάθε άποψη εξυπηρετεί διαφορετικό σκοπό, από τη δημιουργία μιας προσωπικής σύνδεσης μέχρι την επίδειξη ενός μεγάλου οράματος.
1. Η όψη στο επίπεδο των ματιών (Street View)
Η Ανθρώπινη Προοπτική. Αυτή είναι η πιο συγγενής και ευρέως χρησιμοποιούμενη γωνία, τοποθετημένο σε ύψος περίπου 1.8 μέτρα (6 πόδια) να προσομοιώσει πώς ένα άτομο θα έβλεπε φυσικά το κτίριο.
- Σκοπός: Για να δημιουργήσετε ένα άμεσο, προσωπική σχέση με τον θεατή. Κάνει τον χώρο να αισθάνεται προσιτός και αληθινός.
- Περίπτωση χρήσης: Ιδανικό για κατοικίες, εμπορικές βιτρίνες, και οποιοδήποτε υλικό μάρκετινγκ που έχει σχεδιαστεί για να βοηθήσει τους πιθανούς αγοραστές να οραματιστούν τον εαυτό τους στο ακίνητο.
2. Η θέα στην πρόσοψη (Μπροστινή όψη)
Η κλασική πρώτη εντύπωση. Αυτή είναι μια ευθεία λήψη που αποτυπώνει το μπροστινό μέρος του κτιρίου. Είναι καθαρό, επίσημος, και άμεση.
- Σκοπός: Να αναδεικνύεται καθαρά και όμορφα το πρωταρχικό αρχιτεκτονικό στυλ, συγκρατήσει την έκκληση, και βασικά σχεδιαστικά στοιχεία όπως η κύρια είσοδος και τα μοτίβα παραθύρων.
- Περίπτωση χρήσης: Απαραίτητο για επίσημες εικόνες χαρτοφυλακίου, καταχωρήσεις ακινήτων, και οποιαδήποτε παρουσίαση όπου πρέπει να εδραιωθεί η ταυτότητα του πυρήνα του σχεδιασμού.
3. Η Πίσω Όψη
Το Ιδιωτικό Ιερό. Ενώ το μέτωπο είναι για το κοινό, η πίσω όψη δείχνει το ιδιωτικό καταφύγιο του κτηρίου.
- Σκοπός: Για να τονίσετε τις ανέσεις και τα χαρακτηριστικά του τρόπου ζωής, όπως ένα μεγάλο αίθριο, μια αστραφτερή πισίνα, καταπράσινους κήπους, ή ένα άνετο τζάκι.
- Περίπτωση χρήσης: Είναι ζωτικής σημασίας για το μάρκετινγκ κατοικιών με επίκεντρο τον τρόπο ζωής, βοηθώντας τους αγοραστές να φανταστούν τον προσωπικό και οικογενειακό τους χρόνο.
4. Η Ανυψωμένη Προοπτική (Ημιεναέρια)
Η συμφραζόμενη άποψη. Λήψη από ελαφρώς υπερυψωμένη θέση, Αυτή η γωνία δείχνει το κτίριο και το άμεσο περιβάλλον του.
- Σκοπός: Για να δείξουμε πώς η δομή ενσωματώνεται με την τοποθεσία της, συμπεριλαμβανομένου του εξωραϊσμού, δρόμους, και κοντινούς εξωτερικούς χώρους. Παρέχει μια καλύτερη αίσθηση της διάταξης του ακινήτου από μια λήψη στο ύψος των ματιών.
- Περίπτωση χρήσης: Ιδανικό για συγκροτήματα αρχοντικών, σπίτια σε μεγάλα οικόπεδα, και έργα όπου ο σχεδιασμός τοπίου είναι βασικό σημείο πώλησης.
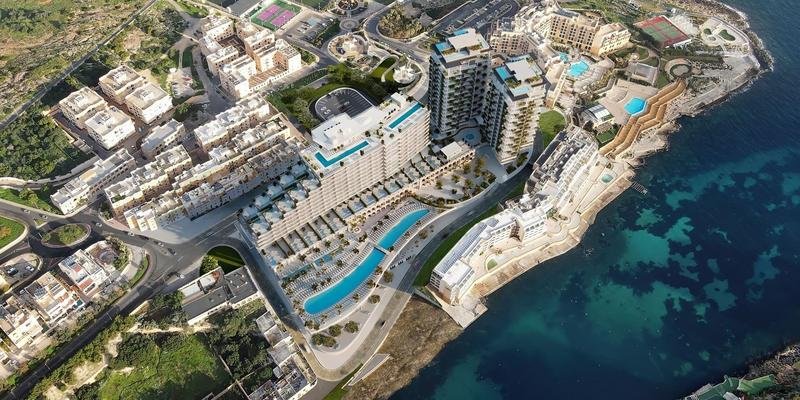
5. Η Αεροφωτογραφία (Bird’s Eye View)
Η προοπτική του Master Plan. Αυτή είναι μια λήψη υψηλού επιπέδου που κοιτάζει από ψηλά, συχνά από μεγάλο ύψος.
- Σκοπός: Για να παρουσιάσετε το πλήρες εύρος και την κλίμακα ενός μεγάλου έργου. Αποκαλύπτει τη διάταξη ολόκληρου του ιστότοπου, τη σχέση του με τα γειτονικά ακίνητα, και τη σύνδεσή του με υποδομές όπως δρόμοι και πάρκα.
- Περίπτωση χρήσης: Απαραίτητο για τοπικά σχεδιασμένες κοινότητες, μεγάλες εμπορικές ή βιομηχανικές εξελίξεις, και πολεοδομικές παρουσιάσεις στους δημοτικούς φορείς.
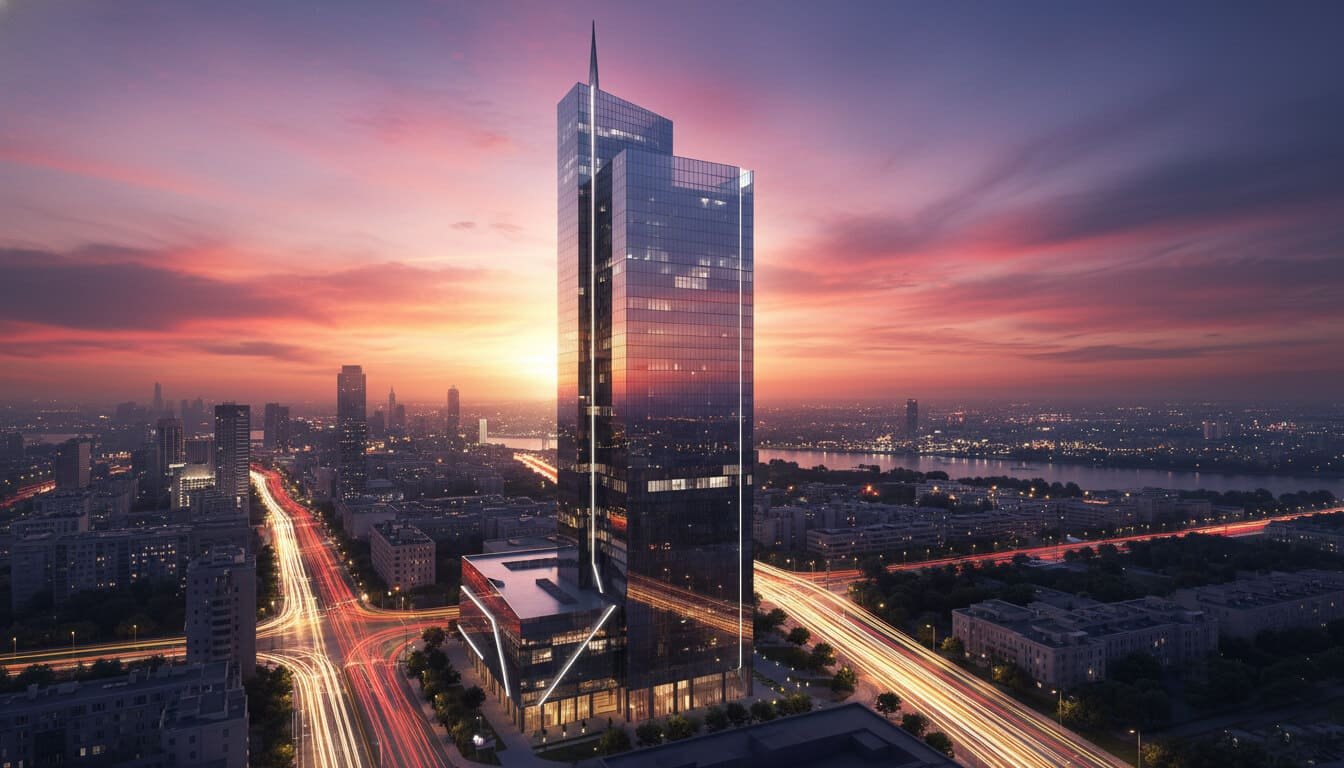
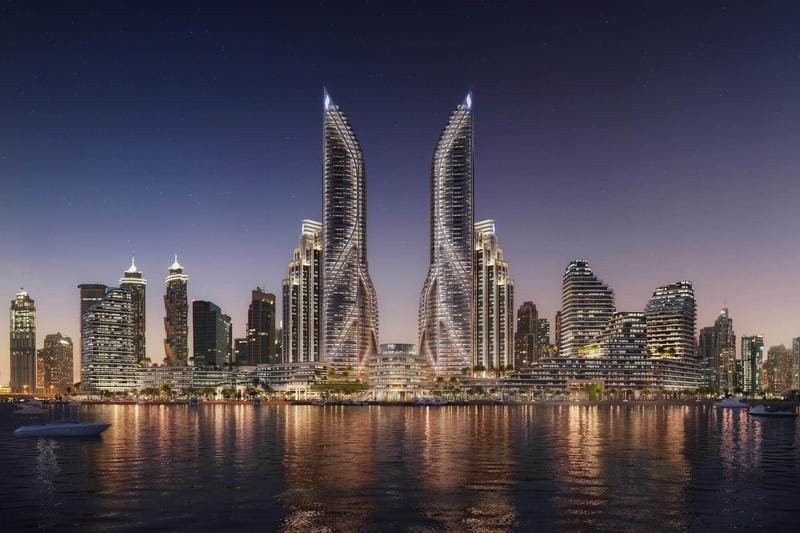
6. The Worm’s Eye View
Η Ηρωική Προοπτική. Τραβήχτηκε από πολύ χαμηλή γωνία κοιτώντας ψηλά, αυτή η άποψη δημιουργεί ένα ισχυρό, δραματικός, και επιβλητικό αποτέλεσμα.
- Σκοπός: Για να τονίσουμε το μεγαλείο, στα ύψη, και καθετότητα. Κάνει το κτίριο να αισθάνεται μνημειακό και προκαλεί δέος.
- Περίπτωση χρήσης: Αγαπημένο για προβολή ουρανοξυστών, ψηλά μνημεία, και εταιρικά κεντρικά γραφεία όπου είναι επιθυμητή η εντύπωση κυριαρχίας και κύρους.
7. Η Κοντινή Προβολή (Λήψη λεπτομέρειας)
Η προοπτική του τεχνίτη. Αυτή η προβολή μεγεθύνεται για να εστιάζει σε συγκεκριμένα, περίπλοκες λεπτομέρειες του σχεδιασμού και της κατασκευής.
- Σκοπός: Για την ανάδειξη της ποιότητας των υλικών, η δεξιοτεχνία της κατασκευής, και μοναδικά αρχιτεκτονικά χαρακτηριστικά όπως προσαρμοσμένη μεταλλοτεχνία, περίπλοκη λιθοδομή, ή κουφώματα υψηλής ποιότητας.
- Περίπτωση χρήσης: Απαραίτητο για το μάρκετινγκ πολυτελών ακινήτων, έγγραφα προδιαγραφών, και πείθοντας τους πελάτες για την υψηλή ποιότητα του έργου.
8. Η πλάγια όψη
Η Διαστατική Προοπτική. Αυτή η γωνία παρέχει μια ολοκληρωμένη ματιά στο βάθος του κτιρίου, αναλογίες, και μορφή.
- Σκοπός: Να αποκαλύψει τη σχέση μεταξύ διαφορετικών τμημάτων του ακινήτου, πλευρικές εισόδους βιτρίνας, και να κατανοήσουν καλύτερα την τρισδιάστατη μάζα του κτιρίου.
- Περίπτωση χρήσης: Χρήσιμο για σύνθετα αρχιτεκτονικά σχέδια και για την παροχή ενός πιο ολοκληρωμένου συνόλου απόψεων σε ένα χαρτοφυλάκιο έργων.
9. Η προβολή σμίκρυνσης
Το Περιβαλλοντικό Πλαίσιο. Βήμα πίσω ακόμη περισσότερο από μια εναέρια θέα, αυτό το πλάνο τοποθετεί το κτίριο στο ευρύτερο περιβάλλον του.
- Σκοπός: Για να δείξει τη μοναδική τοποθεσία του ακινήτου και τη σχέση του με το γύρω τοπίο, είτε πρόκειται για έναν γοητευτικό δεντρόφυτο δρόμο, ένα συναρπαστικό ορεινό σκηνικό, ή μια γαλήνια ακτογραμμή.
- Περίπτωση χρήσης: Εξαιρετικά αποτελεσματικό για ιδιοκτησίες προορισμού ή αναπτύξεις όπου η ίδια η τοποθεσία είναι πρωταρχικό χαρακτηριστικό.
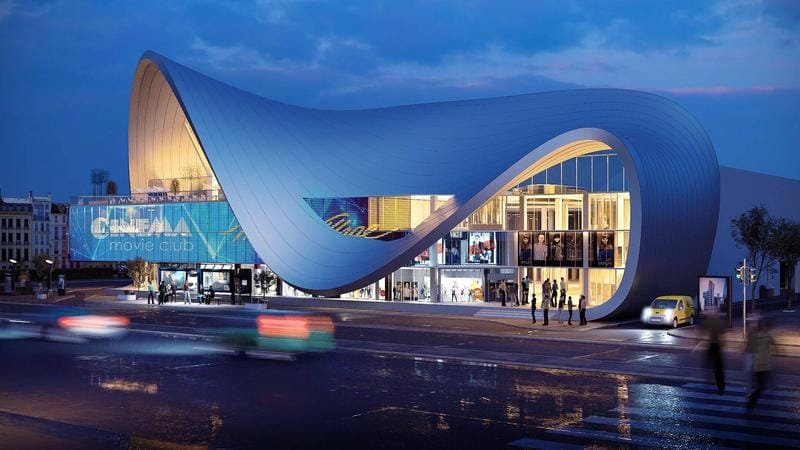
10. Η ελαφρά αλλαγή γωνίας
Η Δυναμική Προοπτική. Μια λεπτή μετατόπιση από μια τέλεια ευθεία προβολή μπορεί να κάνει τη διαφορά.
- Σκοπός: Για να προσθέσετε βάθος, διάσταση, και οπτικό ενδιαφέρον. Μια μικρή γωνία μπορεί να αποκαλύψει αρχιτεκτονικές λεπτομέρειες που μπορεί να χαθούν σε ένα διαμέρισμα, μετωπική βολή, κάνοντας την εικόνα πιο δυναμική και ελκυστική.
- Περίπτωση χρήσης: Μια έξυπνη επιλογή για να κάνετε την τυπική πρόσοψη ή την πίσω όψη λιγότερο άκαμπτη και πιο ελκυστική και καλλιτεχνική.
Επίτευξη Υπερρεαλισμού: Προηγμένες τεχνικές για εντυπωσιακά οπτικά

Η μετάβαση από μια καλή απόδοση σε μια αξέχαστη έγκειται στις λεπτομέρειες. Είναι οι λεπτές αποχρώσεις και οι καλλιτεχνικές πινελιές που ξεγελούν το ανθρώπινο μάτι για να πιστέψει ότι αυτό που βλέπει είναι πραγματικό. Ο υπερρεαλισμός δεν αφορά μόνο την τεχνική ακρίβεια; πρόκειται για την αποτύπωση των τέλειων ατελειών του πραγματικού κόσμου. Ας βουτήξουμε στις προηγμένες τεχνικές που χρησιμοποιούν οι καλλιτέχνες για να ανεβάσουν τη δουλειά τους στο επόμενο επίπεδο.
Είναι Όλα στις Λεπτομέρειες: Μετακίνηση από το καλό στο αξέχαστο
Κατακτώντας το φως και την ατμόσφαιρα
Το φως είναι η ψυχή μιας απόδοσης. Δεν είναι μόνο ο φωτισμός; είναι θέμα διάθεσης, συγκίνηση, και ρεαλισμός.
- Η Θέση του Ήλιου: Η θέση του ήλιου είναι μια κρίσιμη επιλογή. Το τραγανό, Το μεσημεριανό φως υψηλής αντίθεσης μπορεί να μεταφέρει ενέργεια και διαύγεια, καθιστώντας το ιδανικό για εμπορικά έργα. Αντίθετα, το χαμηλό, ζεστός, και απαλό φως του “χρυσή ώρα” (αμέσως μετά την ανατολή ή πριν από τη δύση του ηλίου) δημιουργεί μακρά, απαλές σκιές και μια αίσθηση ηρεμίας και ζεστασιάς, ιδανικό για σκηνές κατοικίας.
- Η απόχρωση των σκιών: Οι ερασιτεχνικές αποδόσεις έχουν συχνά σκιές σκληρές και αφύσικα μαύρες. Στην πραγματικότητα, οι σκιές γεμίζουν με αναπήδηση, φως του περιβάλλοντος από τον ουρανό και τις γύρω επιφάνειες. Οι επαγγελματίες καλλιτέχνες διασφαλίζουν ότι οι σκιές έχουν μια λεπτή μπλε απόχρωση σε ένα καθαρό, ηλιόλουστη μέρα, που προσθέτει ένα σημαντικό στρώμα ρεαλισμού. Το κλειδί είναι να τα διατηρήσετε απαλά και φυσικά, όχι υπερβολικά θεατρικό.
- Ατμοσφαιρικές Επιδράσεις: Ο αέρας γύρω μας δεν είναι ποτέ απόλυτα καθαρός. Προσθέτοντας διακριτικά ατμοσφαιρικά εφέ όπως μια ελαφριά ομίχλη στην απόσταση (βάθος πεδίου), μια απαλή ομίχλη ένα δροσερό πρωί, ή το λαμπερό αποτέλεσμα μιας λάμψης του φακού όταν δείχνει προς τον ήλιο μπορεί να αυξήσει δραματικά την αξιοπιστία και τη διάθεση μιας σκηνής.
Η δύναμη του πλαισίου και της αφήγησης
Ένα κτίριο είναι απλώς μια κατασκευή μέχρι οι άνθρωποι να του δώσουν ζωή. Η προσθήκη περιβάλλοντος μετατρέπει μια απόδοση από μια απλή απεικόνιση σε ιστορία.
| Τεχνική |
Σκοπός |
Βέλτιστη πρακτική |
| Συμπεριλαμβανομένων των ανθρώπων (Συνοδεία) |
Για να προσθέσετε μια αίσθηση κλίμακας, ζωή, και συγκίνηση. Βοηθά τους θεατές να οραματιστούν τον εαυτό τους στο χώρο. |
Δημιουργήστε μια αφήγηση. Αντί για τυχαία τοποθέτηση, δείξτε μια οικογένεια που ασχολείται με την κηπουρική ή παιδιά που παίζουν για να μεταφέρουν α “φιλική προς την οικογένεια” αφή. Βεβαιωθείτε ότι ταιριάζουν με τα δημογραφικά στοιχεία και ότι δεν συνωστίζονται ή αποσπούν την προσοχή από την αρχιτεκτονική. |
| Προσθήκη οχημάτων & Ζώα |
Να κάνει τη σκηνή να νιώθει δυναμική και ζωντανή. Προσθέτει ένα άλλο επίπεδο ρεαλισμού και πλαισίου. |
Ταιριάξτε τα οχήματα με το περιβάλλον (Π.χ., πολυτελή αυτοκίνητα για μια πολυτελή βίλα, ποδήλατα για μια φιλική προς το περιβάλλον κοινότητα). Ζώα όπως τα πουλιά στον ουρανό ή ένα κατοικίδιο στην αυλή μπορούν να προσθέσουν μια νότα ζεστασιάς. |
| Βοτανικά Στοιχεία |
Να πλαισιώσει το κτίριο, προσθέστε χρώμα, και δημιουργήστε βάθος. |
Χρησιμοποιήστε ένα μείγμα 2D βλάστησης στο παρασκήνιο και εξαιρετικά λεπτομερών 3D δέντρων και φυτών στο προσκήνιο. Η ποικιλία των χρωμάτων και των τύπων της χλωρίδας μπορεί να δημιουργήσει μια εκπληκτική αίσθηση στρωματοποίησης και νατουραλισμού. |
Ο στόχος είναι να δημιουργηθεί ένα αξιόπιστο οικοσύστημα γύρω από το κτίριο. Για παράδειγμα, μια απόδοση μιας προαστιακής γειτονιάς ζωντανεύει όταν βλέπεις μια γυναίκα να κάνει τζόκινγκ στο πεζοδρόμιο, παιδιά που παίζουν σε ένα γκαζόν, και κάποιος που χαλαρώνει σε ένα αίθριο. Αυτές οι μικρές ιστορίες συνδυάζονται για να δημιουργήσουν ένα ισχυρό, πολυεπίπεδη αφήγηση της κοινότητας, άνεση, και ασφάλεια.
Τελειοποίηση Υλικών και Ατελειών
Ο πραγματικός κόσμος δεν είναι άψογος, και οι αποδόσεις σας δεν πρέπει να είναι. Είναι οι λεπτές ατέλειες που πουλάνε την ψευδαίσθηση της πραγματικότητας.
- Αντανακλάσεις γυαλιού: Τα παράθυρα είναι τα μάτια ενός κτιρίου. Σε κακή απόδοση, μπορούν να φαίνονται σαν επίπεδα, νεκρές επιφάνειες. Σε ένα υπέροχο, είναι ζωντανοί με ρεαλιστικούς στοχασμούς. Θα πρέπει να αντικατοπτρίζουν με ακρίβεια τον ουρανό, γύρω δέντρα, και κοντινά κτίρια. Αυτό όχι μόνο φαίνεται αληθινό, αλλά προσθέτει και απίστευτο βάθος και πολυπλοκότητα στην εικόνα.
- Η Ομορφιά της Ατέλειας: Τίποτα δεν ουρλιάζει “απομίμηση” σαν μια τέλεια στολή, ψηφιακά καθαρή επιφάνεια. Για να πετύχουμε τον υπερρεαλισμό, οι καλλιτέχνες προσθέτουν σκόπιμα λεπτές ατέλειες:
- Καιρικές συνθήκες: Ένα ελαφρύ ξεθώριασμα ή λεκέ σε ξύλο ή τούβλο.
- Επιφανειακές Παραλλαγές: Ελαφρώς ανομοιόμορφες πέτρες πεζοδρομίων ή ένα διακριτικό εξόγκωμα σε τσιμεντένιο τοίχο.
- Συντρίμμια: Μερικά πεσμένα φύλλα σε ένα μονοπάτι ή λίγη σκόνη σε μια γωνία.
Αυτές οι μικρές λεπτομέρειες σπάνε την ψηφιακή τελειότητα και πείθουν τον εγκέφαλο του θεατή ότι η σκηνή είναι αυθεντική.
Η Επιχείρηση της Οπτικοποίησης: Τιμολόγηση, Απόδοση επένδυσης, και Επιλογή παρόχου

Η κατανόηση της επιχειρηματικής πλευράς της τρισδιάστατης απόδοσης είναι εξίσου σημαντική με την εκτίμηση της τέχνης. Πόσο πρέπει να κοστίζει? Ποια είναι η πραγματική απόδοση αυτής της επένδυσης? Και πώς θα βρείτε τον κατάλληλο σύντροφο για να ζωντανέψει το όραμά σας? Ας απομυθοποιήσουμε τις οικονομικές και υλικοτεχνικές πτυχές της προμήθειας υπηρεσιών παροχής υψηλής ποιότητας.
Απομυθοποίηση του κόστους απόδοσης 3D: Τι πρέπει να περιμένετε να πληρώσετε?
Η τιμή μιας τρισδιάστατης εξωτερικής απόδοσης μπορεί να ποικίλλει δραματικά, από τόσο λίγο όσο $99 να τελειώσει καλά $10,000 για μια ενιαία εικόνα. Αυτή η τεράστια γκάμα μπορεί να προκαλέσει σύγχυση, αλλά γενικά αντανακλά διαφορετικά επίπεδα ποιότητας, υπηρεσία, και τεχνογνωσία. Ακολουθεί μια ανάλυση των τυπικών βαθμίδων τιμολόγησης για να σας βοηθήσει να κατανοήσετε τι πληρώνετε.
| Επίπεδο τιμολόγησης |
Τυπικό κόστος ανά εικόνα |
Τι να περιμένετε |
Καλύτερος για |
| Κερκίδα 1: “Κάτω του βαρελιού” |
$99 – $200 |
Συχνά ανατίθεται σε εξωτερικούς οίκους με πολύ φθηνό εργατικό δυναμικό. Η ποιότητα μπορεί να είναι ασυνεπής, και η επικοινωνία μπορεί να είναι δύσκολη λόγω διαφορών στη γλώσσα και τη ζώνη ώρας. Προσέξτε για παραπλανητικά χαρτοφυλάκια και κρυφές χρεώσεις για αναθεωρήσεις ή εικόνες υψηλής ανάλυσης. |
Προσωπικά έργα ή σύλληψη σε αρχικό στάδιο όπου ο προϋπολογισμός είναι το απόλυτο πρωταρχικό μέλημα και η ποιότητα είναι δευτερεύουσα. Αγοραστής προσοχή. |
| Κερκίδα 2: “Βασικός / Αξία” |
$300 – $900 |
Ένα σημαντικό βήμα στην ποιότητα και τον επαγγελματισμό. Τα έργα μπορεί να εξακολουθούν να ανατίθενται σε εξωτερικούς συνεργάτες, αλλά συνήθως τα διαχειρίζεται ένας τοπικός ή άπταιστα διαχειριστής έργου. Προσφέρει καλό, καθαρά οπτικά. |
Τυπικές αποδόσεις σπιτιών κατοικιών, λαμβάνοντας έγκριση από ρυθμιστικούς φορείς, και βασικό μάρκετινγκ ακινήτων για αρχιτέκτονες, μεσίτες, και οικοδόμοι. |
| Κερκίδα 3: “Επαγγελματίας μεσαίου επιπέδου” |
$900 – $3,000 |
Αυτό είναι το γλυκό σημείο για τα περισσότερα επαγγελματικά έργα. Η ποιότητα είναι υψηλή, με εξαιρετική προσοχή στη λεπτομέρεια, φωτισμός, και υλικά. Αυτό είναι το πρότυπο για την εμπορία κατοικιών υψηλών προδιαγραφών και μεσαίας έως μεγάλης κλίμακας αναπτύξεων. |
Προγραμματιστές, αρχιτέκτονες, και σχεδιαστές που εργάζονται σε έργα που πρέπει να ξεχωρίζουν σε μια ανταγωνιστική αγορά. Η ποιότητα έχει σχεδιαστεί για να εντυπωσιάζει και να πουλάει. |
| Κερκίδα 4: “High-End / Μπουτίκ” |
$3,000 – $14,000+ |
Αυτή η βαθμίδα είναι για έργα ορόσημα όπου η αντίληψη και η επωνυμία είναι πρωταρχικής σημασίας. Τα renders είναι κορυφαίας κατηγορίας, εικαστικά, και συχνά δεν διακρίνεται από τη βραβευμένη φωτογραφία. Η εξυπηρέτηση είναι εξατομικευμένη και άκρως συνεργατική. |
Μεγάλες εταιρείες και προγραμματιστές εμπορεύονται νέους πολυώροφους πύργους, σούπερ εμπορικά κέντρα, ή πολυτελή θέρετρα. Το κόστος είναι ένα μικρό κλάσμα του προϋπολογισμού του έργου, αλλά παίζει τεράστιο ρόλο στις προπωλήσεις και το branding. |
Υπολογισμός της απόδοσης της επένδυσης (Απόδοση επένδυσης)
Ενώ το αρχικό κόστος μιας απόδοσης υψηλής ποιότητας μπορεί να φαίνεται σημαντικό, η απόδοση της επένδυσης μπορεί να είναι σημαντική. Είναι σημαντικό να σκεφτείτε πέρα από το κόστος του στοιχείου γραμμής και να λάβετε υπόψη την αξία που δημιουργεί:
- Αυξημένες Αξίες Ακινήτων: Ορισμένες μελέτες υποδεικνύουν ότι το αποτελεσματικό οπτικό μάρκετινγκ μπορεί να αυξήσει τις τελικές αξίες των ακινήτων έως 15-20%.
- Πιο γρήγορες πωλήσεις & Προπώληση: Τα συναρπαστικά γραφικά προσελκύουν περισσότερους αγοραστές και μπορούν να συντομεύσουν δραματικά τον κύκλο πωλήσεων.
- Μειωμένα έξοδα κατασκευής: Όπως συζητήθηκε, Ο εντοπισμός ζητημάτων σχεδιασμού πριν από την κατασκευή εξοικονομεί τεράστια ποσά σε παραγγελίες αλλαγής.
- Ταχύτερες Εγκρίσεις Έργων: Η σαφής επικοινωνία με τους ρυθμιστικούς φορείς μπορεί να εξοικονομήσει μήνες δαπανηρών καθυστερήσεων.
- Βελτιωμένη ικανοποίηση πελατών: Ένας χαρούμενος πελάτης που αισθάνεται ότι το όραμά του έγινε κατανοητό και υλοποιήθηκε είναι πιο πιθανό να παρέχει παραπομπές και να επαναλάβει τις εργασίες.
Πώς να επιλέξετε την καλύτερη εταιρεία απόδοσης 3D εξωτερικού χώρου
Η επιλογή του σωστού συνεργάτη απόδοσης μπορεί να κάνει ή να χαλάσει την οπτική παρουσίαση του έργου σας. Ακολουθεί μια πρακτική λίστα ελέγχου που καθοδηγεί την απόφασή σας:
- Εξετάστε κριτικά το χαρτοφυλάκιό τους: Μην κοιτάτε μόνο τις εικόνες. Μοιάζουν με έργα πραγματικών πελατών ή απλώς με μερικά εκθέματα με επένδυση χαρτοφυλακίου? Η ποιότητα ταιριάζει σταθερά με την τιμή που αναφέρουν? Έχουν εμπειρία στο συγκεκριμένο αρχιτεκτονικό σας στυλ;?
- Ελέγξτε για σχετική εμπειρία: Εάν σχεδιάζετε μια σύγχρονη αστική πρόσοψη, μια εταιρεία που δείχνει μόνο παραδοσιακά σπίτια στα προάστια μπορεί να μην ταιριάζει. Αναζητήστε εξειδίκευση που να ταιριάζει με τις ανάγκες σας.
- Αξιολογήστε τις τεχνικές τους δυνατότητες: Ρωτήστε τι λογισμικό χρησιμοποιούν. Ενώ δεν χρειάζεται να είστε ειδικός, ένα επαγγελματικό στούντιο θα πρέπει να χρησιμοποιεί βιομηχανικά πρότυπα εργαλεία όπως το 3ds Max, Ακτινογραφία, και Photoshop.
- Αξιολογήστε την Επικοινωνία και τη Διαχείριση Έργων: Υπάρχει κάποιος ειδικός διαχειριστής έργου με τον οποίο μπορείτε να μιλήσετε;? Είναι ανταποκρίνονται και είναι εύκολο να επικοινωνήσετε μαζί τους? Μια ομαλή διαδικασία είναι εξίσου σημαντική με μια καλή τελική εικόνα.
- Ρωτήστε για τις αναθεωρήσεις: Κατανοήστε τη διαδικασία αναθεώρησής τους. Πόσοι γύροι αναθεωρήσεων περιλαμβάνονται στην τιμή? Ποιο είναι το κόστος για πρόσθετες αλλαγές? Μια ευέλικτη και δίκαιη πολιτική αναθεώρησης είναι σημάδι καλού συνεργάτη.
- Αναζητήστε γνήσιες κριτικές και μαρτυρίες: Αναζητήστε κριτικές σε ιστότοπους τρίτων. Ρωτήστε εάν μπορούν να σας συνδέσουν με προηγούμενους πελάτες για αναφορά. Η αυθεντική ανατροφοδότηση είναι ανεκτίμητη.
Πλοήγηση στις προκλήσεις και Αγκαλιάζοντας το Μέλλον

Ακόμη και με προηγμένη τεχνολογία, ο δρόμος για μια τέλεια απόδοση δεν είναι πάντα ομαλή. Οι επαγγελματίες αντιμετωπίζουν κοινά εμπόδια που μπορούν να επηρεάσουν τη ροή εργασίας και την ποιότητα. Με την κατανόηση αυτών των προκλήσεων, μπορείτε να πλοηγηθείτε καλύτερα. Συγχρόνως, ο κλάδος εξελίσσεται συνεχώς, με συναρπαστικές νέες τάσεις στον ορίζοντα που υπόσχονται να κάνουν την οπτικοποίηση ακόμα πιο ισχυρή.
Κοινές προκλήσεις στην τρισδιάστατη απόδοση και πώς να τις ξεπεράσετε
Εδώ είναι μερικά από τα πιο συχνά προβλήματα που αντιμετωπίζονται στην τρισδιάστατη απόδοση και πρακτικές λύσεις για την αντιμετώπισή τους.
| Πρόκληση |
Το Πρόβλημα |
Η Λύση |
| Παρατεταμένοι χρόνοι απόδοσης |
Απόδοση ενός συμπλέγματος, Η σκηνή υψηλής ανάλυσης μπορεί να πάρει υπερβολικό χρόνο, επιβράδυνση της ροής εργασιών και καθυστέρηση παράδοσης του έργου. |
Βελτιστοποιήστε τη σκηνή αφαιρώντας περιττές λεπτομέρειες και χρησιμοποιώντας αντικείμενα διακομιστή μεσολάβησης για πολύπλοκα στοιχεία όπως δέντρα. Προσαρμόστε τις ρυθμίσεις απόδοσης για βέλτιστη ισορροπία ταχύτητας και ποιότητας. Για στενές προθεσμίες, σκεφτείτε να χρησιμοποιήσετε α αγρόκτημα απόδοσης σύννεφων για την κατανομή του υπολογιστικού φορτίου σε χιλιάδες μηχανές. |
| Μη πειστικός Ρεαλισμός |
Τα υλικά φαίνονται επίπεδα ή τεχνητά, ο φωτισμός φαίνεται αφύσικος, και η σκηνή δεν έχει το βάθος και την πολυπλοκότητα ενός πραγματικού περιβάλλοντος. |
Επενδύστε στην υψηλή ποιότητα, απόδοση με φυσική βάση (PBR) υλικά. Μελετήστε τη φωτογραφία του πραγματικού κόσμου για να κατανοήσετε πώς αλληλεπιδρά το φως με διαφορετικές επιφάνειες. Προσθέστε σκόπιμα λεπτές ατέλειες όπως βρωμιά, μουτζούρες, και οι καιρικές συνθήκες να σπάσουν το “πάρα πολύ τέλειο” ψηφιακή εμφάνιση. |
| Διαχείριση αναθεωρήσεων πελατών |
Τα συνεχή ή καθυστερημένα αιτήματα για αλλαγές μπορεί να είναι χρονοβόρα και ενοχλητικά, ειδικά σε ένα συγκρότημα, οριστική σκηνή. |
Ξεκινήστε με μια εξαιρετικά λεπτομερή και σαφή σύνοψη έργου για να ελαχιστοποιήσετε τις παρεξηγήσεις. Δομήστε το έργο με καθορισμένους γύρους ανατροφοδότησης. Για γρήγορες ρυθμίσεις, χρησιμοποιήστε μια μηχανή απόδοσης σε πραγματικό χρόνο για να δείξετε στον πελάτη τις αλλαγές διαδραστικά πριν δεσμευτεί σε έναν τελικό, μακρά απόδοση. |
| Τεχνικές δυσλειτουργίες |
Το λογισμικό μπορεί να καταρρεύσει, τα αρχεία μπορεί να καταστραφούν, και μπορεί να προκύψουν σφάλματα επεξεργασίας, που οδηγεί σε χαμένη εργασία και απογοήτευση. |
Αυτό είναι αδιαπραγμάτευτο: αποθηκεύστε την πρόοδο συχνά και σε επαναλήψεις (Π.χ., project_v01, project_v02). Εφαρμόστε ένα ισχυρό σύστημα δημιουργίας αντιγράφων ασφαλείας, χρησιμοποιώντας τόσο τοπικό όσο και αποθηκευτικό χώρο cloud για την αποφυγή καταστροφικής απώλειας δεδομένων. |
Το Μέλλον είναι Τώρα: Αναδυόμενες Τάσεις στην Εξωτερική Οπτικοποίηση
Ο κόσμος της τρισδιάστατης απόδοσης κινείται με ιλιγγιώδεις ρυθμούς. Εδώ είναι οι τάσεις που διαμορφώνουν το μέλλον του κλάδου:
- Η απόδοση σε πραγματικό χρόνο είναι το νέο πρότυπο: Η δυνατότητα να βλέπετε άμεσα αποτελέσματα υψηλής ποιότητας μεταμορφώνει τις ροές εργασίας. Οι κινητήρες σε πραγματικό χρόνο γίνονται αρκετά ισχυροί για τελικές εξόδους, επιτρέποντας ταχύτερες επαναλήψεις, περισσότερες συνεργατικές συναντήσεις πελατών, και τη δημιουργία δυναμικών κινούμενων εικόνων με ευκολία.
- Καθηλωτικές εμπειρίες με VR και AR: Η εικονική και η επαυξημένη πραγματικότητα δεν είναι πλέον καινοτομίες. Με VR, οι πελάτες μπορούν να φορέσουν ακουστικά και “περπατήστε γύρω” ένα μοντέλο πλήρους κλίμακας του μελλοντικού τους κτιρίου, αποκτώντας μια πραγματική αίσθηση του χώρου και της κλίμακας. Το AR θα επιτρέπει στους χρήστες να επικαλύπτουν ένα ψηφιακό μοντέλο σε ένα πραγματικό εργοτάξιο χρησιμοποιώντας το τηλέφωνο ή το tablet τους.
- Η άνοδος της τεχνητής νοημοσύνης (Όλα συμπεριλαμβάνονται): Η τεχνητή νοημοσύνη αρχίζει να παίζει σημαντικό ρόλο στην αυτοματοποίηση κουραστικών εργασιών. Αυτό περιλαμβάνει εργαλεία με τεχνητή νοημοσύνη που μπορούν να δημιουργήσουν ρεαλιστικές υφές από ένα απλό μήνυμα κειμένου, συμπληρώστε έξυπνα μια σκηνή με συνοδεία, ή απενεργοποιήστε μια απόδοση για να επιταχύνετε τη διαδικασία.
- Εστίαση στη βιώσιμη οπτικοποίηση: Καθώς η βιωσιμότητα γίνεται βασική αρχή στην αρχιτεκτονική, Οι αποδόσεις εξελίσσονται για να αντικατοπτρίζουν αυτό. Βλέπουμε μια αυξανόμενη τάση οπτικοποιήσεων που τονίζουν συγκεκριμένα πράσινα χαρακτηριστικά όπως τα ηλιακά πάνελ, συστήματα συλλογής βρόχινου νερού, πράσινες στέγες, και ενεργειακά αποδοτικό σχεδιασμό, αφήγηση μιας ιστορίας περιβαλλοντικής ευθύνης.
- Συναισθηματική αφήγηση: Η πιο προοδευτική τάση είναι η απομάκρυνση από την απλή επίδειξη ενός κτιρίου και η δημιουργία μιας συναισθηματικής απόκρισης. Οι μελλοντικές αποδόσεις θα επικεντρωθούν περισσότερο στην αφήγηση μιας ιστορίας για τον τρόπο ζωής, κοινότητα, ή αίσθηση ότι η αρχιτεκτονική διευκολύνει, δημιουργώντας μια βαθύτερη και πιο διαρκή σύνδεση με τον θεατή.
Σύναψη
Έχουμε ταξιδέψει σε ολόκληρο το σύμπαν της τρισδιάστατης εξωτερικής απόδοσης, από τον θεμελιώδη ορισμό του και τα βαθιά του οφέλη μέχρι την περίπλοκη βήμα προς βήμα διαδικασία δημιουργίας. Εξερευνήσαμε την καλλιτεχνική κυριαρχία των γωνιών και του φωτισμού της κάμερας, ασχολήθηκε με την τιμολόγηση και την επιλογή του σωστού δημιουργικού συνεργάτη, και κοίταξε μπροστά σε ένα μέλλον που τροφοδοτείται από την τεχνητή νοημοσύνη και την καθηλωτική πραγματικότητα. Το βασικό πακέτο είναι σαφές: 3Η D εξωτερική απόδοση είναι κάτι πολύ περισσότερο από ένα εργαλείο για τη δημιουργία όμορφων εικόνων. Είναι ένα ισχυρό, απαραίτητος κινητήρας για επικοινωνία, επίλυση προβλημάτων, εμπορία, και της αφήγησης στον σύγχρονο κόσμο της αρχιτεκτονικής και του real estate.
Η κυριαρχία αυτής της τεχνολογίας σάς επιτρέπει να γεφυρώσετε το χάσμα μεταξύ του πιο τολμηρού σας οράματος και της απτής πραγματικότητας, διασφαλίζοντας ότι κάθε ενδιαφερόμενος, από πελάτη σε κοινότητα, μπορείτε να δείτε και να πιστέψετε στο μέλλον που χτίζετε. Αγκαλιάζοντας αυτές τις τεχνικές, μπορείτε να αναβαθμίσετε τα έργα σας, αιχμαλωτίσετε το κοινό σας, και ζωντανέψτε τα αρχιτεκτονικά σας όνειρα με εντυπωσιακά, απαράμιλλη σαφήνεια και αντίκτυπο.
Συχνές ερωτήσεις
Q1: Πόσος χρόνος χρειάζεται για να δημιουργηθεί μια τυπική τρισδιάστατη εξωτερική απόδοση?
Ο απαιτούμενος χρόνος μπορεί να ποικίλλει σημαντικά ανάλογα με την πολυπλοκότητα του έργου. Μια βασική απόδοση ενός μικρού σπιτιού σε μια απλή σκηνή φωτός της ημέρας μπορεί να χρειαστεί
8-15 ώρες. Ένα μεσαίου μεγέθους εμπορικό κτίριο με πιο λεπτομερή φωτισμό θα μπορούσε να χρειαστεί
20-40 ώρες. Ένα εξαιρετικά περίπλοκο αστικό τοπίο με υψηλό ρεαλισμό και πολλές λεπτομέρειες μπορεί εύκολα να δεχτεί
100 ώρες ή περισσότερες.
Ε2: Ποιο λογισμικό είναι καλύτερο για τρισδιάστατη εξωτερική απόδοση?
Δεν υπάρχει ένα μόνο “καλύτερος” λογισμικό; Οι επαγγελματίες χρησιμοποιούν έναν συνδυασμό εργαλείων σε μια ροή εργασίας. Ο πιο συνηθισμένος συνδυασμός περιλαμβάνει:
- Πρίπλασμα: Autodesk 3ds Max, Σκίτσο, ή Revit
- Απόδοση: V-Ray ή Corona Renderer για φωτορεαλισμό; Lumion ή Enscape για απεικόνιση σε πραγματικό χρόνο.
- Μετα-επεξεργασία: Adobe Photoshop για τις τελευταίες πινελιές.
Ε3: Μπορεί η τρισδιάστατη απόδοση να αυξήσει πραγματικά τις πωλήσεις ακινήτων?
Απολύτως. Οι αποδόσεις υψηλής ποιότητας δημιουργούν μια ισχυρή συναισθηματική σύνδεση με πιθανούς αγοραστές, κάνοντας ένα ακίνητο πολύ πιο ελκυστικό. Αποτελούν τον ακρογωνιαίο λίθο των αποτελεσματικών εκστρατειών προπώλησης, που εξασφαλίζουν έσοδα πριν ολοκληρωθεί η κατασκευή. Οι μελέτες και η εμπειρία του κλάδου δείχνουν ότι αυτό μπορεί να οδηγήσει σε ταχύτερους κύκλους πωλήσεων και σε τελικές αξίες ακινήτων
μέχρι και 15-20% υψηλότερα παρά έργα που διατίθενται στο εμπόριο με παραδοσιακές μεθόδους.
Q4: Είναι καλύτερο να συμπεριλάβουμε άτομα στις αποδόσεις ή όχι?
Εξαρτάται εξ ολοκλήρου από τον στόχο της απόδοσης. Αν θέλετε να μεταδώσετε μια αίσθηση κλίμακας, ζωή, και μια συγκεκριμένη ατμόσφαιρα (Π.χ., μια πολυσύχναστη αστική πλατεία ή μια ήσυχη, οικογενειακή γειτονιά), τότε η συμπερίληψη ανθρώπων είναι απαραίτητη. Βοηθούν τον θεατή να φανταστεί τον εαυτό του στο χώρο. Ωστόσο, αν ο σκοπός είναι καθαρά να αναδείξει το παρθένο, η ίδια η ακόσμητη αρχιτεκτονική, Μπορεί να είναι πιο αποτελεσματικό να τα παραλείψετε για να διατηρήσετε την εστίαση αποκλειστικά στη μορφή και τα υλικά του κτιρίου.