Por qué elegir la impresión 3D para modelos arquitectónicos?
La evolución del modelado arquitectónico
Por edades, Los arquitectos han confiado en la elaboración de modelos a mano.. Piensa en ello como esculpir, pero con casas diminutas! Utilizando materiales como la madera, espuma, y cartón, artesanos expertos pasarían semanas, incluso meses, cortando meticulosamente, pegamento, y dando forma a estas estructuras en miniatura. mientras hermosa, Estos modelos artesanales tenían sus inconvenientes.. Consumieron mucho tiempo, habilidades especializadas requeridas, y haciendo cambios? Olvídate de eso! Un simple retoque en una fachada podría significar empezar de nuevo. Más, el costo de toda esa mano de obra y materiales podría acumularse rápidamente. Este delicado equilibrio de técnicas es algo que exploramos en nuestra guía sobre Artesanía moderna vs. Trabajo manual tradicional.
¿Cómo se hicieron los modelos arquitectónicos antes de la impresión 3D??
Antes de la impresión 3D, Los modelos estaban minuciosamente hechos a mano. Los arquitectos y maquetistas utilizarían diversas herramientas como sierras., cuchillos, y lijadoras para cortar, forma, y ensamblar materiales como:
- Madera de balsa
- Tabla de espuma
- Cartulina
- Arcilla
- Cerámico
Este proceso sustractivo y manual, aunque es capaz de producir resultados sorprendentes, era inherentemente lento y hacía que los cambios de diseño iterativos fueran extremadamente difíciles y costosos.
Ventajas de la impresión 3D sobre los métodos tradicionales
Ahora, Hablemos de por qué la impresión 3D está volcando el mundo de los modelos arquitectónicos.. Es como tener una varita mágica que puede crear estructuras complejas con el clic de un botón! Ofrece un conjunto de ventajas que abordan casi todos los puntos débiles de los métodos tradicionales..
Velocidad y eficiencia
Recuerde esas semanas o meses pasados construyendo modelos a mano? Con impresión 3D, Puedes tener listo un modelo muy detallado en sólo unas horas o unos días.. Estas increíbles máquinas pueden incluso funcionar las 24 horas del día, para que puedas comenzar a imprimir por la noche y despertarte con un producto terminado. Este increíble aumento de velocidad cambia totalmente las reglas del juego., especialmente cuando se enfrentan plazos de proyecto ajustados para presentaciones de clientes o concursos de diseño.
¿Se puede cambiar fácilmente un modelo arquitectónico impreso en 3D??
Absolutamente! Esta es una de las mayores ventajas de la impresión 3D.. Necesidad de ajustar una pared, agregar una ventana, o cambiar la línea del techo? Ningún problema! Simplemente modifique su archivo digital 3D, y ya estás listo para imprimir la nueva versión. Esto hace que sea muy fácil y rentable probar diferentes ideas., incorporar comentarios de los clientes, y perfecciona tu diseño sin desperdiciar semanas de mano de obra y materiales.
Precisión y detalle
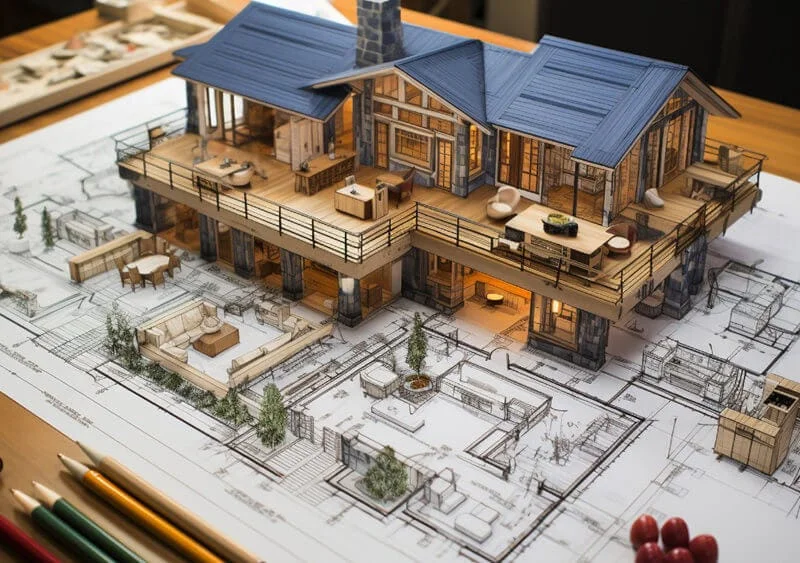
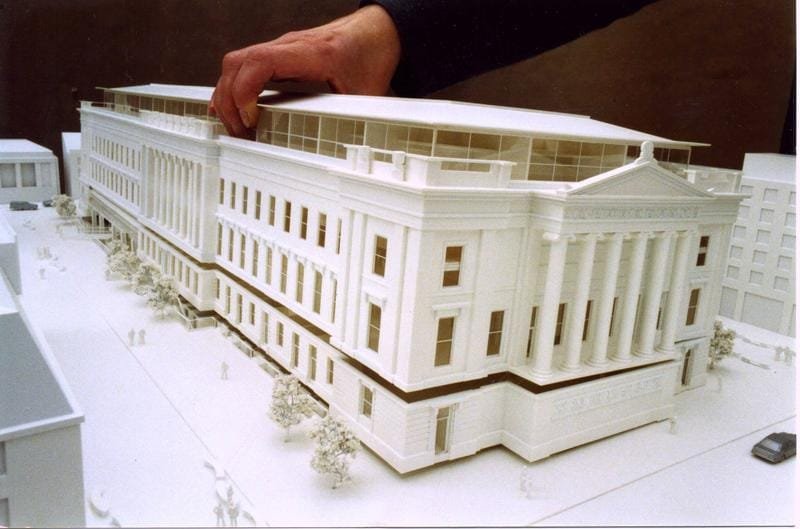
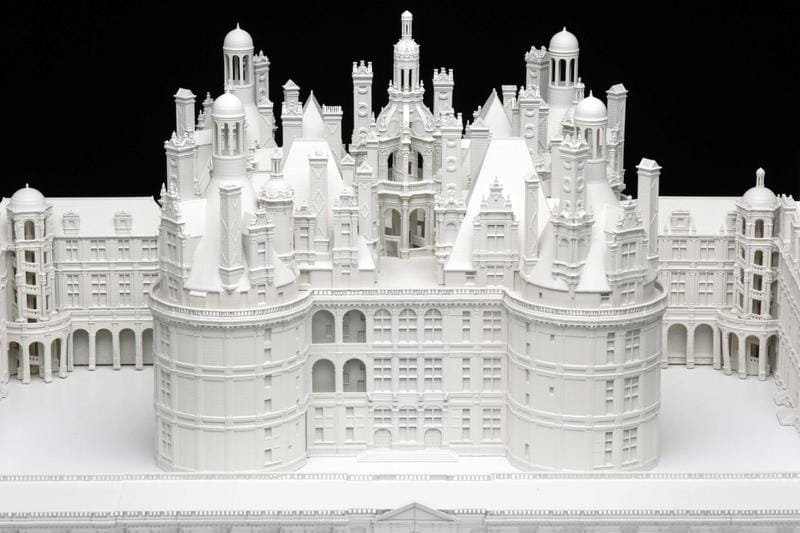
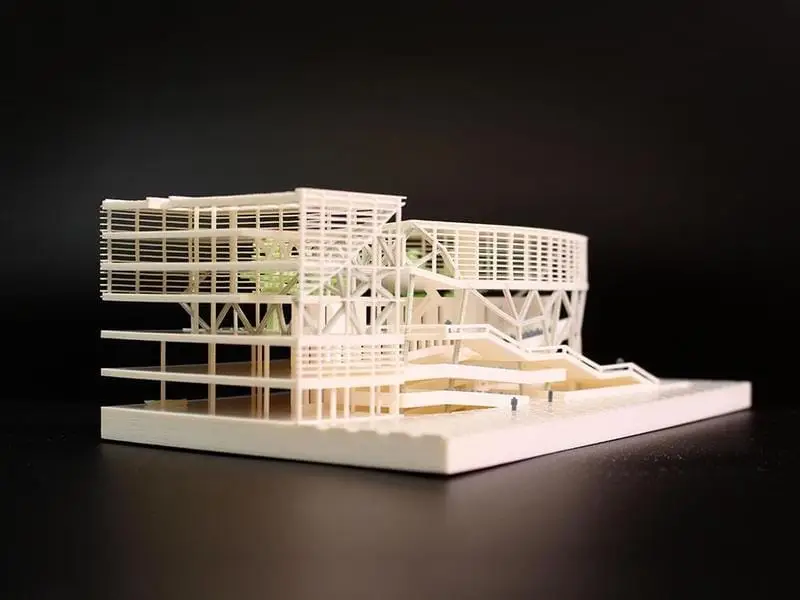
Imagina capturar cada pequeño detalle de tu diseño, desde intrincadas fachadas paramétricas hasta delicados marcos de ventanas y celosías ornamentadas. 3La impresión D lo hace posible! Con una precisión increíble (a menudo se mide en micras), estas máquinas pueden crear modelos que son perfectamente fieles a su diseño digital, hasta la característica más pequeña. Piensa en curvas complejas, formas organicas, o incluso texturas de materiales realistas, cosas que serían una verdadera pesadilla lograr con métodos tradicionales de artesanía..
Flexibilidad de diseño e iteración
Desea experimentar con diferentes diseños de techos o colocaciones de ventanas? 3D La impresión lo hace una brisa! Puede crear rápidamente múltiples versiones de su modelo., Ajustar diseños sobre la mosca, y presentar a los clientes varias opciones tangibles en paralelo. Esta es una gran ventaja para los arquitectos que desean explorar varias ideas y perfeccionar sus diseños antes de que comience la construcción.. También es fantástico para incorporar comentarios de los clientes sin la temida sensación de tener que empezar desde cero..
Rentabilidad
Si bien la inversión inicial en una impresora 3D de nivel profesional puede parecer alta, Los ahorros de costos a largo plazo son significativos. Piense en ello: mano de obra drásticamente reducida, Residuos de material mínimo (ya que es un proceso aditivo), Y la capacidad de iterar rápidamente en los diseños se suma a grandes ahorros. Más, El coste bruto de muchos materiales de impresión 3D suele ser más asequible que el de las maderas y acrílicos especializados utilizados en la fabricación de modelos tradicionales.. Para obtener un desglose completo de cómo la tecnología afecta el precio, consulte nuestra guía sobre el 5 Factores clave de los precios del modelo arquitectónico.
Comunicación y colaboración mejoradas
¿Alguna vez has intentado explicar un problema complejo?, Diseño tridimensional utilizando sólo dibujos 2D.? Puede ser difícil! Un modelo impreso en 3D facilita mucho la comunicación. Proporciona una representación tangible de su proyecto que cualquiera puede captar., Giro de vuelta, y entender intuitivamente. Este entendimiento compartido puede conducir a una mejor colaboración entre arquitectos., ingenieros, y clientes, lo que resulta en menos malentendidos y una experiencia más fluida, proceso de diseño más eficiente.
¿Cuáles son las ventajas de los modelos arquitectónicos de impresión 3D??
Aquí hay un resumen rápido de los increíbles beneficios.:
| Ventaja | Descripción |
|---|---|
| Velocidad & Eficiencia | Reduce drásticamente el tiempo de creación del modelo de semanas a horas, permitiendo la creación rápida de prototipos. |
| Precisión & Detalle | Captura diseños complejos, geometrías complejas, y características finas con alta precisión. |
| Flexibilidad de diseño | Permite una fácil, Modificaciones de bajo costo y múltiples iteraciones de diseño para perfeccionar el resultado.. |
| Rentabilidad | Reduce los costos de mano de obra y el desperdicio de material., generando importantes ahorros a largo plazo. |
| Comunicación mejorada | Mejora la comprensión y la colaboración entre todas las partes interesadas del proyecto., de clientes a constructores. |
Versatilidad del material
3La impresión D no es una solución única para todos. Tienes opciones! Desde plásticos resistentes como ABS hasta resinas transparentes y detalladas, hay una amplia gama de materiales para elegir. Esto significa que puede seleccionar el material perfecto para las necesidades específicas de su proyecto., si necesita algo duradero para un modelo estructural o algo con una impecable, Acabado suave para una pieza de presentación final.. Incluso puedes experimentar con diferentes colores y texturas para que tu modelo realmente destaque.. Exploramos este tema en detalle en nuestro Guía de materiales y acabados modelo.
Tipos de tecnologías de impresión 3D para modelos arquitectónicos
Está bien, Entonces te venden los beneficios de la impresión 3D. Pero con tantas tecnologías diferentes por ahí, ¿Cómo eliges el adecuado para tu modelo arquitectónico?? Analicemos las opciones más populares utilizadas por los profesionales..
Estereolitmicromografía (SLA)
Imagine un rayo láser que dibuja cuidadosamente su diseño en un grupo de resina líquida, endureciéndolo capa por capa meticulosa. Eso es SLA en pocas palabras! Esta tecnología utiliza un láser UV para curar, o endurecer, resina de fotopolímero líquido, Creación de modelos increíblemente detallados y precisos con superficies súper suaves. Es como la magia, Pero con la ciencia! Si necesita un modelo con detalles intrincados y un acabado impecable para una presentación a un cliente, el tipo de modelo que puede ayudarle duplica las ventas de tu propiedad—SLA es una elección fantástica. Más, Ahora hay resinas más rápidas e impresoras SLA de gran formato disponibles, haciéndolo aún más versátil. Un ejemplo de una impresora SLA de gran formato es la Formulario 3L de FormLabs.
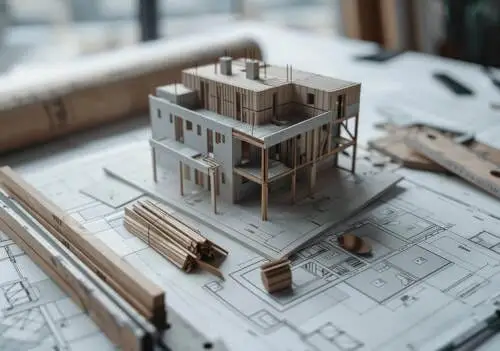
Modelado de deposición fusionada (FDM) / Fabricación de filamentos fusionados (FFF)
Piense en FDM como una tecnología de alta, pistola de pegamento caliente controlada por computadora. Funciona fundiendo y extruyendo un filamento termoplástico. (un carrete de hilo de plástico), capa sobre capa, Para construir tu modelo. Es como construir con pequeños hilos de plástico! FDM es el tipo más común y asequible de impresión 3D, lo que lo convierte en una opción popular para los arquitectos que crean modelos conceptuales en etapa inicial o modelos más grandes donde los detalles superfinos de la superficie no son la principal prioridad.. Si bien la resolución podría no ser tan alta como SLA, FDM es un caballo de batalla confiable y rentable.
Sinterización láser selectiva (SLSS)
SLS es como el primo a base de polvo de SLA. En lugar de resina líquida, Utiliza un láser de alta potencia para fusionar pequeñas partículas de polvo de polímero., Por lo general, nylon, capa por capa. Lo bueno de SLS es que el polvo no fundido circundante sostiene el modelo durante la impresión., por lo que no necesita estructuras de soporte separadas. Esto lo hace ideal para crear geometrías altamente complejas con características internas o socavados.. Más, Los modelos de nailon son resistentes y duraderos., haciéndolos adecuados para piezas funcionales o estructurales. Si necesita un modelo robusto con detalles internos intrincados, SLS podría ser el camino a seguir.
Chorro de aglutinante
Binder Jetting es el colorido del grupo! Funciona depositando un aglutinante coloreado. (como pegamento) desde un cabezal de impresión de inyección de tinta a una capa de polvo, solidificándolo. El proceso se repite capa por capa., crear un modelo a todo color directamente desde la impresora. Mientras que Binder Jetting es fantástico para crear vibrantes, modelos llamativos, tiene algunas limitaciones. Los modelos tienden a ser más porosos y quebradizos en comparación con otras tecnologías., haciéndolos más adecuados para modelos de pantalla estática en lugar de prototipos funcionales. Un fabricante líder de impresoras de binder jetting es 3Sistemas D.
¿Cuál es la mejor tecnología de impresión 3D para modelos arquitectónicos??
La verdad es, no hay sencillo “mejor” tecnología. Todo depende de sus necesidades específicas! Aquí hay una comparación rápida para ayudarlo a decidir:
| Tecnología | Resolución | Exactitud | Acabado superficial | Mejor para |
|---|---|---|---|---|
| SLA | ★★★★★ | ★★★★★ | ★★★★★ | Modelos de presentación muy detallados con superficies lisas.. |
| FDM/FFF | ★★ ☆☆☆ | ★★★★ ☆ | ★★ ☆☆☆ | Modelos conceptuales básicos, modelos de masa más grandes, iteraciones tempranas. |
| SLSS | ★★★★ ☆ | ★★★★★ | ★★★★ ☆ | Geometrías complejas con características internas., piezas estructurales duraderas. |
| Chorro de aglutinante | ★★★ ☆☆ | ★★★ ☆☆ | ★★★ ☆☆ | Modelos conceptuales o de presentación a todo color para visualización estática.. |
Una guía paso a paso para los modelos arquitectónicos de impresión 3D
Listo para convertir su visión arquitectónica en una realidad tangible en 3D impresa? Repasemos el proceso profesional., paso a paso:
Diseño y planificación conceptuales
Cada gran proyecto comienza con una base sólida. Antes de tocar su software de modelado 3D, Tómese un tiempo para hacer una lluvia de ideas, Reunir inspiración, y realmente comprende los requisitos del proyecto. ¿Cuál es el propósito del modelo?? ¿Quién es la audiencia?? ¿Cuáles son las características clave que desea destacar?? Tener una visión clara lo guiará a través de todo el proceso. Esta es la etapa en la que también empiezas a pensar en Encontrar el equilibrio perfecto de escala y detalle para tu proyecto.
Modelado 3D digital
Ahora es el momento de dar vida a su diseño en el mundo digital! Uso de diseño asistido por computadora (CANALLA) software, Creará una representación 3D detallada de su proyecto arquitectónico. Piense en ello como construir una versión virtual de su modelo, pieza por pieza.
Qué software se utiliza para diseñar modelos arquitectónicos impresos en 3D?
Hay muchas opciones excelentes por ahí, cada uno con sus propias fortalezas. Aquí hay algunas opciones populares entre los arquitectos:
- AutoCAD: Un clásico para el dibujo 2D y el diseño 3D, Ofrece un control preciso sobre las dimensiones y la geometría.
- Revit: Diseñado específicamente para la construcción de modelado de información (Bim), le permite crear estructuras 3D detalladas con datos asociados.
- Rinoceronte (Rinoceronte): Conocido por su versatilidad, Rhino es ideal para crear formas complejas y orgánicas., a menudo se usa con el complemento Grasshopper para el modelado paramétrico.
- Bosquejo: Fácil de usar e intuitivo, Es una opción popular para el modelado y la visualización de conceptos rápidos..
- Licuadora: Una poderosa herramienta de código abierto con capacidades avanzadas de escultura y representación, a menudo utilizado para modelado conceptual.
Cualquiera que sea el software que elija, Recuerde diseñar con la impresión 3D en mente. Esto significa crear “estanco” modelos (Más sobre eso a continuación) y considerando factores como el grosor de la pared y las estructuras de soporte.
Preparación de modelos para impresión 3D
Antes de que golpees eso “imprimir” botón, debe asegurarse de que su modelo digital esté listo para su debut en impresión 3D. Esto implica algunos pasos cruciales.:
Conversión de escala
La mayoría de los diseños arquitectónicos se crean en un 1:1 escala, lo que significa que representan el tamaño real del edificio.. Pero su modelo impreso en 3D probablemente será mucho más pequeño! Deberá convertir su diseño a la escala de modelo deseada., como 1:50, 1:100, o 1:200. Esto garantiza que su modelo tenga el tamaño adecuado para sus necesidades y se ajuste al volumen de construcción de su impresora..
Optimización del modelo
Aquí te conviertes en un detective de la impresión 3D, buscando cualquier problema potencial que pueda afectar el proceso de impresión. Esto es lo que debe tener en cuenta:
- voladizos: Estas son partes de su modelo que se extienden hacia afuera sin ningún soporte debajo.. Demasiado saliente puede provocar caídas o fallos en la impresión..
- Piezas no compatibles: Similar a los voladizos, Estas son áreas que no cuentan con el soporte adecuado y podrían colapsar durante la impresión..
- Complejidad excesiva: Si bien la impresión 3D puede manejar detalles intrincados, Los modelos demasiado complejos pueden ser difíciles de imprimir y pueden requerir un posprocesamiento significativo..
¿Cómo preparo mi modelo arquitectónico para la impresión 3D??
Aquí hay algunas técnicas para optimizar su modelo.:
- Dividir modelos en partes: Si su modelo es demasiado grande o complejo, considere dividirlo en más pequeños, secciones más manejables que se pueden imprimir por separado y ensamblar más tarde. Esto es especialmente importante cuando se piensa en la logística cubierta en nuestro Guía para empaquetar y transportar modelos.
- Diseño para montaje: Al dividir modelos, Piensa en cómo encajarán las piezas.. Agregar características de acoplamiento, como pestañas o ranuras entrelazadas, puede hacer que el montaje sea muy sencillo. También puede dividir modelos por costuras o por componentes individuales.
- Asegurar modelos herméticos: Esto es crucial! Un estanco (o múltiple) El modelo es como un contenedor sellado sin agujeros ni espacios en su superficie digital.. Su software de modelado 3D probablemente tenga herramientas para verificar y corregir cualquier error. Usarlos!
- Elegir un grosor de pared apropiado: Las paredes demasiado delgadas pueden ser frágiles y deformarse o romperse durante la impresión.. Asegúrese de que sus paredes sean lo suficientemente gruesas como para proporcionar integridad estructural, especialmente en la base del modelo.
Exportación de archivos
Una vez que su modelo esté optimizado, Es hora de exportarlo en un formato que su impresora 3D pueda entender. Los formatos de archivo más comunes para la impresión 3D son STL (Estereolitmicromografía) y obj (Archivo de objeto). Estos formatos describen esencialmente la geometría de la superficie de su modelo como una malla de triángulos., decirle a la impresora dónde depositar material.
 Elegir la tecnología y el material de impresión 3D adecuados
Ya hemos cubierto los diferentes tipos de tecnologías de impresión 3D., pero reiteremos los factores clave a considerar al hacer su elección:
- Requisitos detallados: ¿Qué tan complejo debe ser tu modelo?? SLA es excelente para obtener alto nivel de detalle, mientras que FDM es mejor para más grandes, modelos menos detallados.
- Presupuesto: FDM es generalmente la opción más asequible, mientras que SLA y SLS pueden ser más caros.
- Propósito del modelo: ¿Es para una presentación al cliente?, un análisis estructural, o un modelo conceptual rápido?
¿Qué materiales se utilizan para imprimir modelos arquitectónicos en 3D??
El material que elijas impactará la apariencia., sentir, y durabilidad de tu modelo. He aquí un vistazo más de cerca a algunas opciones populares.:
| Material | Descripción | Pros | Contras |
|---|---|---|---|
| Estampado (Ácido poliláctico) | Termoplástico biodegradable derivado de maicena. | Fácil de usar, asequible, amplia gama de colores, bueno para modelos detallados. | Menos duradero y resistente al calor que el ABS; puede ser frágil. |
| Abdominales (Acrilonitrilo butadieno estireno) | Termoplástico común conocido por su resistencia y durabilidad.. | Más fuerte y resistente al calor que el PLA, bueno para modelos funcionales. | Propenso a deformarse durante la impresión., requiere una cama de impresión calentada. |
| Resina | Fotopolímero líquido curado con luz ultravioleta en impresoras SLA. | Resolución extremadamente alta, acabado superficial liso, ideal para detalles intrincados. | Más caro que PLA o ABS, requiere un manejo cuidadoso y un poscurado. |
| Nylon (Poliamida) | Polvo plástico resistente y duradero utilizado en impresoras SLS. | Excelente resistencia y durabilidad, ligeramente flexible, bueno para piezas estructurales. | Requiere temperaturas de impresión más altas, Puede absorber la humedad si no se almacena adecuadamente.. |
Configuración de corte e impresión
Antes de que su impresora 3D pueda comenzar a hacer su magia, necesita un conjunto detallado de instrucciones. Ahí es donde entra en juego el software de corte. Este software toma su modelo 3D y lo corta digitalmente en cientos o miles de delgadas, capas horizontales, Generar el código G que le indica a la impresora cómo moverse y dónde depositar el material para cada capa..
¿Qué es el corte en la impresión 3D??
Cortar es como crear una hoja de ruta paso a paso para su impresora 3D. Divide su complejo modelo 3D en una serie de simples, Instrucciones bidimensionales que la impresora puede seguir., capa por capa. Las opciones populares de software de corte incluyen:
- Ultimaker Cura: un gratis, Cortadora fácil de usar que es ideal tanto para principiantes como para profesionales..
- PrusaSlicer: Otra opción gratuita y de código abierto, conocido por sus funciones avanzadas y su sólido soporte comunitario.
- Simplificar 3D: Un software pago con potentes opciones de personalización., A menudo preferido por los profesionales por su control sobre las estructuras de soporte..
Dentro del software de corte, deberá ajustar varias configuraciones de impresión para optimizar el proceso de impresión. Aquí hay algunas configuraciones clave a considerar:
- Altura de capa: Esto determina el espesor de cada capa.. Una altura de capa más baja (P.EJ., 0.1milímetros) da como resultado detalles más finos y superficies más suaves pero tiempos de impresión significativamente más largos. Para modelos arquitectónicos, A menudo se utiliza una altura de capa más baja para piezas detalladas., mientras que una altura más gruesa (0.2mm o más) Se puede utilizar para impresiones más rápidas de secciones menos detalladas..
- Velocidad de impresión: Esto controla la rapidez con la que se mueve la boquilla de la impresora mientras se extruye el material.. Las velocidades más lentas generalmente dan como resultado una mejor calidad y precisión de impresión., lo cual es especialmente importante para modelos complejos.
- Soportes: Estos son temporales, Estructuras en forma de celosía que sostienen los voladizos y evitan que colapsen durante la impresión.. Su software de corte puede generar soportes automáticamente, pero también puedes ajustar manualmente su ubicación y densidad. Recordar, Los soportes deberán retirarse con cuidado durante el posprocesamiento., por lo que es una buena idea orientar su modelo para minimizar su uso siempre que sea posible.
3D Impresión del modelo
Con su modelo cortado y sus configuraciones de impresión configuradas, finalmente es hora de golpear eso “imprimir” botón! La impresora 3D ahora comenzará a construir su modelo., capa por capa, siguiendo el código G generado por el software de corte. Dependiendo del tamaño, complejidad, y altura de capa de su modelo, este proceso puede tardar desde unas pocas horas hasta varios días.
Es una buena idea vigilar su impresora, especialmente durante las primeras capas cruciales, para asegurarse de que todo se adhiera correctamente a la cama de impresión. Si notas algún problema, como deformaciones o mala adherencia, es posible que tengas que detener la impresión, ajusta tu configuración, y empezar de nuevo.
Postprocesamiento
Una vez que su modelo haya terminado de imprimir, no está del todo listo para su primer plano. La mayoría de los modelos impresos en 3D requieren cierto grado de posprocesamiento para eliminar los soportes., suavizar las superficies, y mejorar su apariencia para un acabado profesional.
¿Cómo se termina un modelo arquitectónico impreso en 3D??
A continuación se muestran algunas técnicas comunes de posprocesamiento.:
- Eliminación de soporte: Si tu modelo fue impreso con soportes, Tendrás que quitarlos con cuidado con unos alicates., cortadores al ras, u otras herramientas pequeñas. Ten paciencia y tómate tu tiempo para evitar romper partes delicadas del modelo..
- Lijado y Alisado: Lijar con papel de lija de grano fino puede ayudar a suavizar los bordes ásperos o las líneas de capa visibles.. Para impresiones PLA y ABS, También puedes usar un alisador con vapor de acetona para lograr un acabado brillante.. Esta técnica avanzada implica exponer el modelo a vapor de acetona., que derrite ligeramente la superficie exterior, creando un suave, apariencia brillante.
- Imprimación y pintura: Aplicar una imprimación para modelos de alta calidad antes de pintar ayuda a que la pintura se adhiera mejor y crea una superficie uniforme.. Luego puedes usar pinturas acrílicas con aerógrafo o pinceles finos para agregar color y detalles a tu modelo.. Finalmente, Se pueden aplicar capas transparentes para proteger la pintura y darle un aspecto pulido., aspecto profesional.
- Vinculación: Si imprimiste tu modelo en varias partes, necesitarás unirlos. Cianoacrilato (súper pegamento) o resinas líquidas especializadas se utilizan comúnmente para este propósito..
| Técnica de posprocesamiento | SLA | FDM | SLSS | CHORRO DE Aglutinante |
|---|---|---|---|---|
| Lijado | Se recomienda un lijado ligero para eliminar las marcas de soporte.. | A menudo es necesario lijar para obtener un acabado suave y eliminar las líneas de las capas.. | No es necesario lijar debido a la calidad de las piezas acabadas.. | No se requiere lijado. |
| Vinculación | La unión de los componentes SLA se realiza con superpegamento o más resina líquida.. | Los componentes FDM se pueden ensamblar utilizando adhesivos como superpegamento. | Los componentes SLS se pueden ensamblar utilizando adhesivos como superpegamento.. | Los componentes impresos con impresoras de inyección de aglutinante se pueden unir con superpegamento.. |
| Imprimación y pintura | Los componentes SLA se pueden pintar para lograr el acabado deseado.. | Los componentes FDM se pueden pintar para lograr el acabado deseado.. | Los componentes SLS se pueden pintar para lograr el acabado deseado.. | No se requiere pintura para piezas a todo color. |
Aplicaciones del mundo real y estudios de casos
3La impresión D no es sólo un concepto futurista: ya está causando sensación y aportando un valor significativo en el mundo de la arquitectura.. Exploremos algunas aplicaciones del mundo real y veamos cómo las empresas líderes están utilizando esta tecnología para su beneficio.:
Modelos conceptuales
En las primeras etapas del diseño., Los arquitectos suelen crear modelos conceptuales para explorar diferentes ideas y visualizar la forma general de un edificio.. 3La impresión D es perfecta para este propósito., ya que permite la creación rápida de prototipos e iteraciones rápidas.. Los arquitectos pueden imprimir múltiples variaciones de un diseño durante la noche y compararlas una al lado de la otra en una reunión matutina., ayudarlos a tomar decisiones informadas desde el principio.
Planificación del sitio
Comprender cómo interactúa un edificio con su entorno es crucial. Los arquitectos pueden crear modelos detallados del sitio combinando edificios impresos en 3D con mapas topográficos fresados por CNC del área circundante.. Esto les permite evaluar la relación del edificio con el paisaje., analizar la luz del sol y las sombras, y realizar ajustes para optimizar el diseño para su contexto..
Prototipos estructurales
Para elementos estructurales complejos o no convencionales, 3La impresión D se puede utilizar para crear prototipos para pruebas y análisis.. Los arquitectos pueden imprimir versiones reducidas de estructuras intrincadas, como vigas en voladizo o formas geométricas únicas, y evaluar su estabilidad y capacidad de carga.. Esto ayuda a identificar posibles desafíos estructurales mucho antes de que se conviertan en problemas costosos en una obra de construcción..
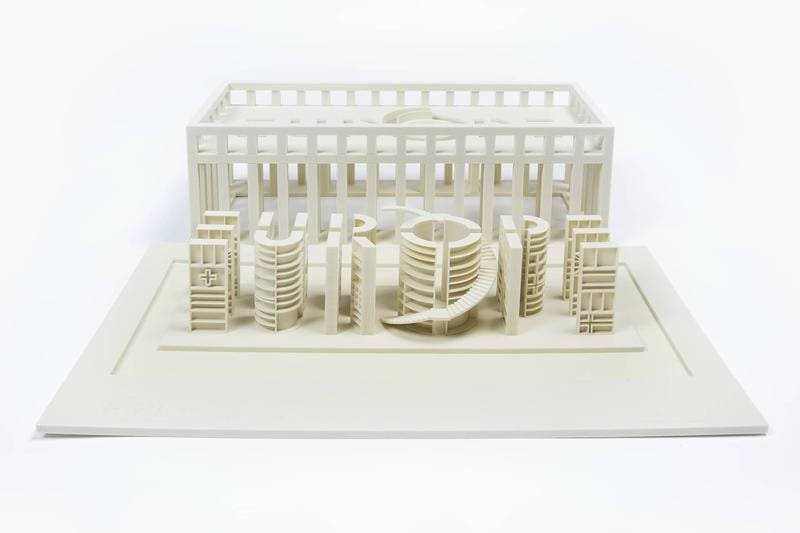
Componentes personalizados
Más allá de los modelos a escala, 3La impresión D también se puede utilizar para crear componentes reales de construcción. Piense en fachadas intrincadas, paneles decorativos, o incluso muebles personalizados. Esto abre posibilidades emocionantes para crear elementos arquitectónicos únicos y personalizados que serían difíciles o costosos de producir utilizando métodos tradicionales.. IEAAC ha usado impresoras 3D para fabricar intrincados paneles decorativos, elementos de fachada, e incluso paredes enteras.
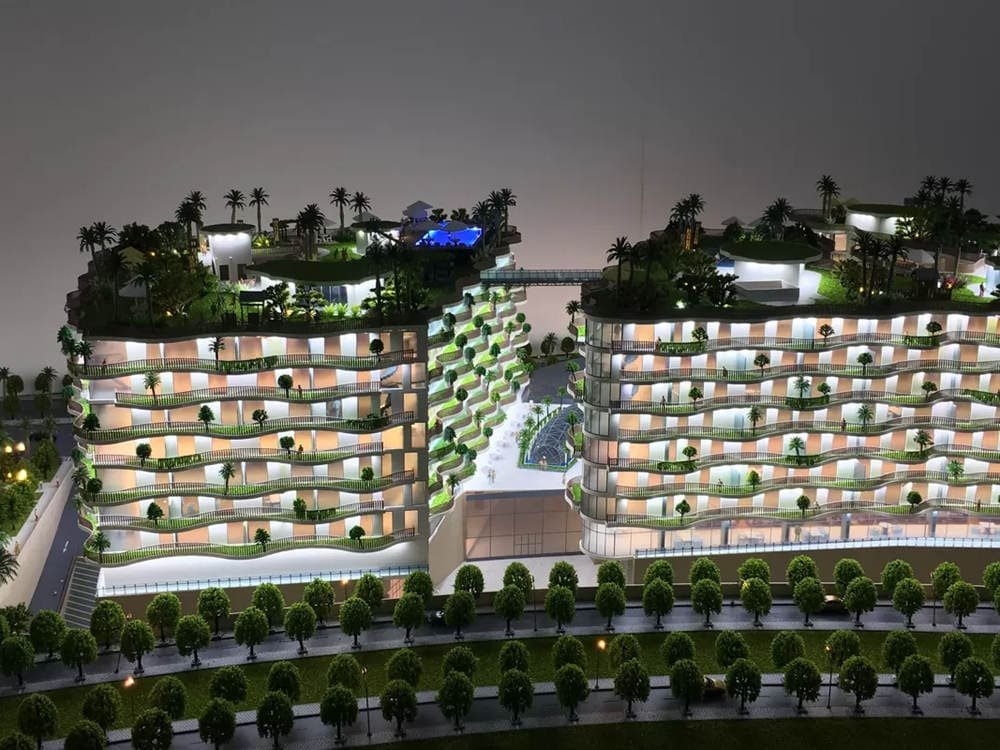
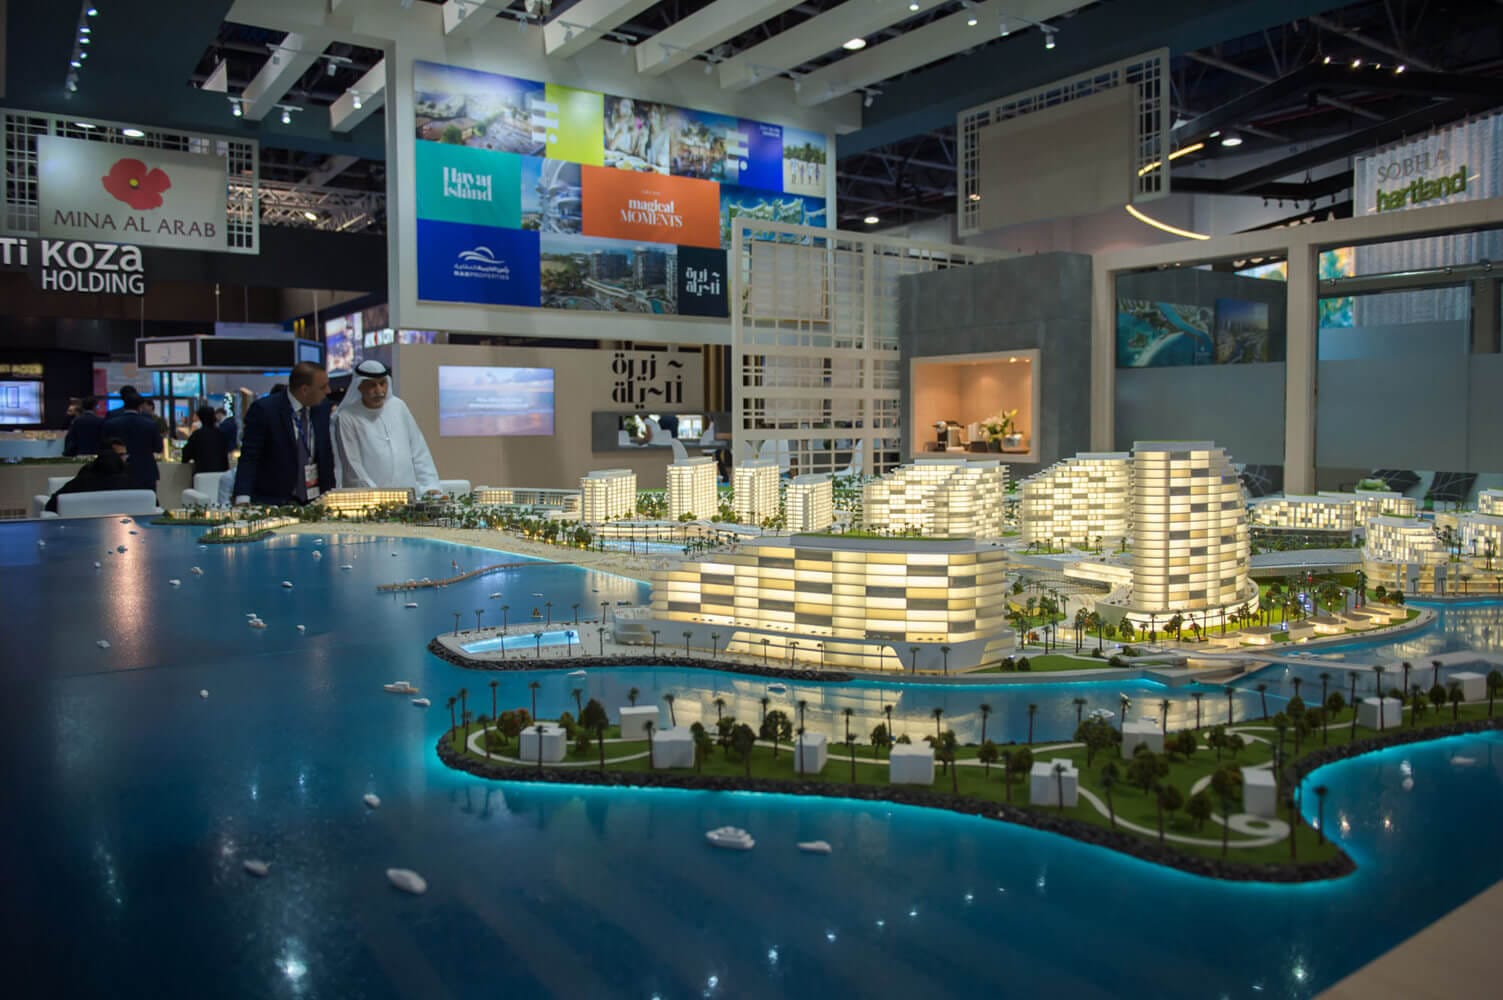
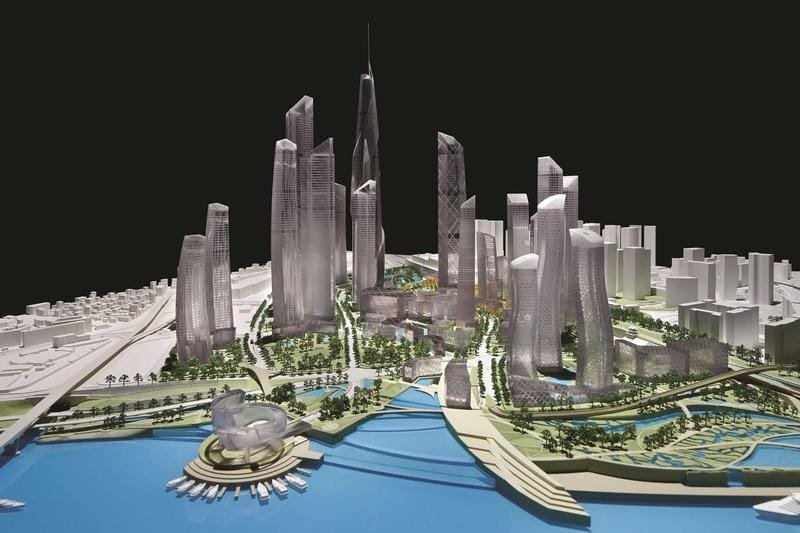
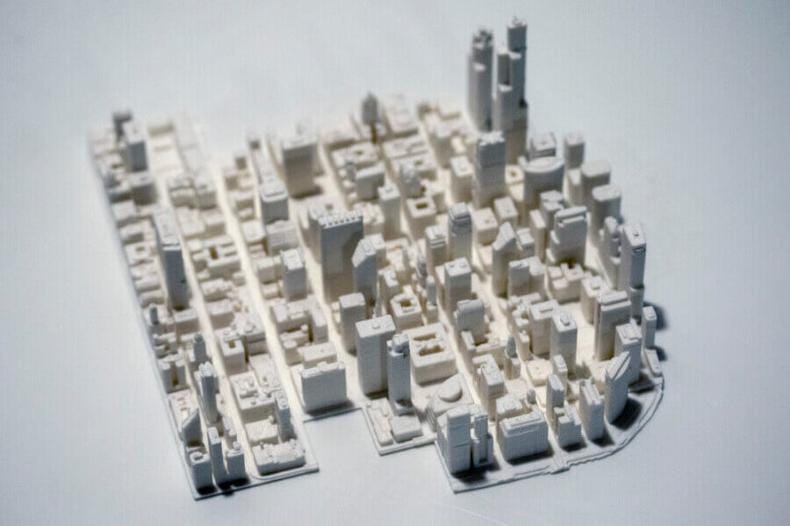
Planificación y desarrollo urbano
3D Los modelos impresos son herramientas invaluables para los planificadores y desarrolladores urbanos. Se pueden utilizar para crear modelos completos de paisajes urbanos, permitiendo a las partes interesadas visualizar el impacto de los nuevos desarrollos, Analizar el flujo de tráfico, y estudiar la relación entre edificios y espacios públicos. Estos modelos suelen ser la pieza central de consultas públicas y presentaciones de inversores..
Estudios de caso
- Sagrada Familia: Esta icónica basílica en Barcelona, Diseñado por Antoni Gaudí, ha estado en construcción durante más de un siglo. En los últimos años, 3La impresión D se ha utilizado para crear modelos complejos de las secciones restantes., Ayudar a arquitectos e ingenieros a comprender los intrincados diseños de Gaudí y planificar el proceso de construcción..
“Dada la complejidad de superficies y formas del proyecto original de Gaudí, Trabajar en 2D no tiene sentido desde el punto de vista arquitectónico.” – JODI COLL, ARQUITECTO JEFE
- Henning Larsen Arquitectos (HLA): Esta empresa con sede en Copenhague ha adoptado la impresión 3D como herramienta clave para la exploración del diseño.. Lo utilizan para crear modelos detallados de sus proyectos., permitiéndoles experimentar con diferentes formas, materiales, y configuraciones espaciales.
“Esta máquina ha creado un vínculo mucho más estrecho entre el mundo físico y el mundo digital al permitirnos imprimir elementos de color y construir modelos 3D de edificios desde el inicio del proceso.” – MORTEN STEFFENSEN, INGENIERO HLA
- Taller de construcción de Renzo Piano (RPBW): Conocidos por sus diseños innovadores., RPBW utiliza la impresión 3D para crear uniones complejas y componentes intrincados para sus modelos. Por ejemplo, imprimieron en 3D las intrincadas uniones de las columnas del modelo del Puente de San Giorgio en Génova.
El futuro de la impresión 3D en la arquitectura
Las aplicaciones de la impresión 3D en arquitectura no harán más que expandirse en los próximos años. Cubrimos este tema en profundidad en nuestro artículo., El futuro de la fabricación de modelos: Tecnología interactiva y AR. Aquí hay algunos desarrollos interesantes a los que debemos estar atentos:
Construcción a gran escala
Imagine edificios enteros impresos en 3D in situ! Esto no es ciencia ficción: ya está sucediendo. La impresión 3D de hormigón y la fabricación aditiva robótica son tecnologías emergentes que podrían revolucionar la industria de la construcción, prometiendo tiempos de construcción más rápidos, costos más bajos, y menos desperdicio. Compañías como Apis Cor y COBOD están liderando el camino en este campo.
IA y diseño generativo
Inteligencia artificial (AI) Se puede utilizar para optimizar diseños para impresión 3D., teniendo en cuenta factores como la integridad estructural, uso de materiales, y costo. Los algoritmos de diseño generativo pueden incluso crear miles de opciones de diseño completamente nuevas basadas en un conjunto específico de parámetros., empujando los límites de la creatividad arquitectónica más allá de la intuición humana.
Materiales sostenibles
A medida que aumentan las preocupaciones medioambientales, El desarrollo de materiales de impresión 3D ecológicos es cada vez más importante.. Los investigadores exploran el uso de plásticos reciclados, materiales de base biológica como el bambú y el micelio (la estructura de la raíz de los hongos), e incluso materiales innovadores como arena en impresión 3D.
Mayor accesibilidad
A medida que la tecnología de impresión 3D continúa evolucionando y madurando, Se está volviendo más asequible y accesible para una gama más amplia de arquitectos y diseñadores.. Esta democratización de la tecnología probablemente conducirá a aplicaciones aún más innovadoras y a una mayor integración de la impresión 3D en el flujo de trabajo arquitectónico diario..
Desafíos y consideraciones
Si bien la impresión 3D ofrece un potencial increíble, es importante reconocer los desafíos y limitaciones que aún existen. Superarlos con éxito suele ser cuestión de asociarse con una empresa con experiencia., un proceso que describimos en 10 Preguntas críticas para hacerle a su creador de modelos.
Limitaciones técnicas
- Limitaciones del tamaño de impresión: La mayoría de las impresoras 3D de escritorio tienen volúmenes de construcción relativamente pequeños, lo que puede ser una limitación a la hora de imprimir modelos arquitectónicos de gran tamaño. Si bien existen impresoras industriales más grandes, vienen con un precio mucho más alto.
- Resolución y calidad de la superficie: Si bien la tecnología de impresión 3D ha avanzado mucho, Las líneas de las capas y las ligeras imperfecciones aún pueden ser visibles., especialmente en modelos impresos con tecnología FDM. Lograr un acabado perfectamente liso puede requerir un posprocesamiento adicional significativo.
- Rendimiento de materiales: No todos los materiales de impresión 3D pueden replicar perfectamente las propiedades de los materiales de construcción tradicionales. Es importante considerar cuidadosamente la fuerza, durabilidad, y otras características del material elegido para garantizar que cumpla con los requisitos del proyecto..
Consideraciones económicas
- Inversión inicial: Las impresoras 3D de alta calidad capaces de producir modelos arquitectónicos detallados pueden suponer una inversión importante, especialmente para empresas más pequeñas o arquitectos individuales.
- Costos de materiales: Materiales de impresión 3D especializados, como resinas de alta resolución o filamentos de grado de ingeniería, Puede ser más caro que los materiales de modelado tradicionales..
Sostenibilidad e Impacto Ambiental
- Consumo de energía: 3La impresión D puede consumir mucha energía, particularmente para modelos grandes o complejos que requieren largos tiempos de impresión.
- Desechos materiales: Si bien la impresión 3D generalmente produce menos desperdicio que los métodos sustractivos tradicionales, Las impresiones fallidas y las estructuras de soporte aún pueden contribuir al desperdicio.. Es importante utilizar los materiales de manera responsable y explorar opciones de reciclaje cuando sea posible..
¿Cuáles son las limitaciones de la impresión 3D en arquitectura??
Aquí hay un breve resumen de los desafíos.:
| Desafío | Descripción |
|---|---|
| Limitaciones técnicas | Limitaciones en el tamaño de impresión, resolución, y las propiedades del material pueden afectar el resultado final. |
| Consideraciones económicas | Alta inversión inicial en equipos de calidad profesional y costos de materiales potencialmente más altos.. |
| Sostenibilidad | Preocupaciones por el consumo energético y los residuos plásticos de soportes e impresiones fallidas. |
| Habilidad y entrenamiento | Requiere conocimientos especializados en modelado 3D., software de corte, y funcionamiento de la impresora para lograr resultados de alta calidad. |
Habilidad y entrenamiento
- Experiencia necesaria: El uso eficaz de la impresión 3D para el modelado arquitectónico requiere conocimientos y habilidades especializados.. Los arquitectos y diseñadores deben dominar el software de modelado 3D., comprender las complejidades de las diferentes tecnologías de impresión 3D, y domine los matices del software de corte y la configuración de impresión.
- Competencia en software y hardware: Más allá del funcionamiento básico, una comprensión más profunda de la calibración de la impresora, solución de problemas, y el mantenimiento es esencial para obtener resultados consistentes y de alta calidad. Esto a menudo implica una curva de aprendizaje significativa y capacitación continua para mantenerse actualizado con los últimos avances..
Consejos para el éxito
Para aprovechar al máximo la impresión 3D para tus modelos arquitectónicos, ten en cuenta estos consejos:
- Calibre su impresora periódicamente: La calibración adecuada es la base de impresiones precisas y consistentes.
- Utilice materiales de alta calidad: La calidad de su filamento o resina puede afectar significativamente la resistencia, detalle, y finalización del resultado final.
- Optimizar la configuración de impresión: Experimente con diferentes configuraciones para encontrar la mejor combinación para su modelo y material específicos.
- Dominar las técnicas de posprocesamiento: Aprenda a eliminar soportes de manera efectiva, superficies de arena, y pinta tus modelos para conseguir un acabado profesional.
- Experimentar e iterar: No tengas miedo de probar cosas nuevas y aprender de tus errores.. La flexibilidad de la impresión 3D es su mayor fortaleza.
Conclusión
3La impresión D es una poderosa, herramienta transformadora que está cambiando fundamentalmente el campo del modelado arquitectónico. Permite a los arquitectos crear detalles, preciso, y modelos rentables con una velocidad y flexibilidad sin precedentes. Al adoptar esta tecnología, Los arquitectos pueden mejorar su proceso de diseño., mejorar la comunicación con los clientes, y traspasar los límites de la creatividad. Si bien persisten los desafíos, Los avances continuos en la tecnología de impresión 3D., materiales, y el software prometen un futuro aún más apasionante para su aplicación en arquitectura. A medida que la tecnología se vuelve más accesible y fácil de usar, Podemos esperar ver usos aún más innovadores de la impresión 3D en el diseño y la construcción de los edificios y ciudades del mañana..
Listo para llevar sus modelos arquitectónicos al siguiente nivel? Explora el mundo de la impresión 3D y descubre cómo puede revolucionar tu proceso de diseño. Ya sea que esté considerando invertir en una impresora 3D o asociarse con un proveedor de servicios de impresión 3D como FacFox, las posibilidades son infinitas. Empieza a experimentar, desatar tu creatividad, y observe cómo sus visiones arquitectónicas cobran vida con impresionantes detalles impresos en 3D! También puede consultar comunidades en línea como r/impresión 3D subreddit para conectarse con otros entusiastas, compartir consejos, y aprender de sus experiencias.