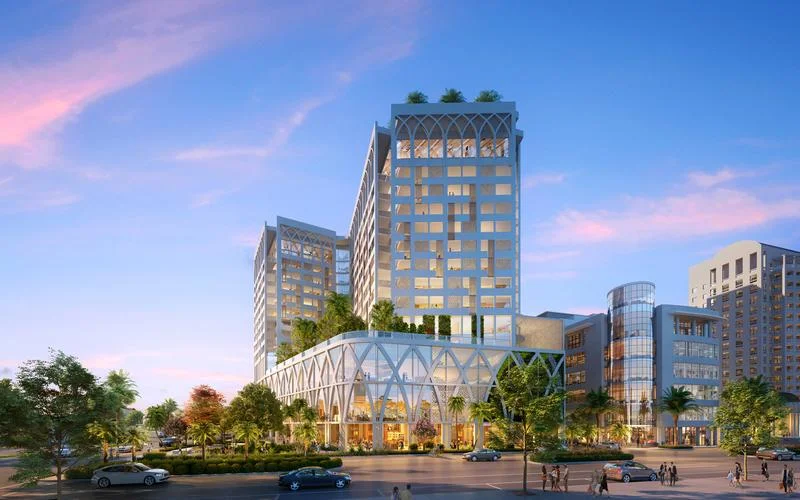
Imagine being able to hold the future in your hands – a miniature version of a building, a cityscape, or even an entire neighborhood, before a single shovel hits the ground. That’s the power of architectural massing models. They’re not just pretty miniatures; they’re crucial tools that help architects explore, ปรับแต่ง, and communicate their designs in a way that drawings alone simply can’t.
การรวมโมเดล are simplified 3D representations of buildings or groups of buildings. They focus on the big picture: the overall shape, ขนาด, and how a structure interacts with its surroundings. Think of them as the architectural equivalent of a sculptor’s initial clay sketch – a way to quickly explore form and volume before diving into the intricate details. These models are vital because they help architects make critical decisions about a building’s impact on everything from the skyline to the amount of sunlight it receives.
In this comprehensive guide, we’ll delve into the world of massing models. เราจะสำรวจว่ามันคืออะไร, why they’re so important, the different types you can create, the materials and techniques used to build them, and even take a peek into the future of this essential architectural practice. Get ready to discover how these miniature marvels shape the world around us!
สารบัญ
Understanding Massing and Its Importance
Defining Massing in Architecture
ดังนั้น, what exactly is “การรวมตัวกัน” in the architectural world? It’s all about how a building looks and feels in terms of its overall shape, ขนาด, และรูปแบบ. It’s the first impression you get when you see a building – is it tall and imposing, or low and sprawling? Does it feel solid and grounded, or light and airy? Massing is about that initial visual impact, and it’s a fundamental consideration in any architectural design.
Massing isn’t just about the outside, แม้ว่า. It also dictates how the inside spaces are arranged and how they feel. Think about a cathedral with a soaring vaulted ceiling – that’s a direct result of its massing. Or consider a cozy, low-slung house – again, the massing is defining the character of the interior spaces.
Different architectural styles throughout history have emphasized different approaches to massing. Think of the towering verticality of Gothic cathedrals, the horizontal emphasis of Prairie School houses, or the balanced symmetry of Georgian architecture. Each style uses massing to create a distinct aesthetic and functional effect.
The Role of Massing in the Design Process
Massing is one of the first things architects tackle when starting a new project. It’s like sketching out the basic outline of a drawing before adding the details. Architects use massing studies – often in the form of quick models or digital sketches – to explore a bunch of different options early in the design process. They play with:
- Overall form and volume: Is the building a single, unified block, or is it broken down into smaller, interconnected volumes?
- Spatial relationships: How do the different parts of the building relate to each other, both inside and out?
- Relationship to the environment: How does the building sit on its site? How does it interact with the surrounding buildings, ถนน, and landscape?
- Light and shadow: How will the building’s form affect the amount of sunlight it receives and the shadows it casts?
- Orientation and access: Which way should the building face? Where should the entrances be located?
This is a very fluid, back-and-forth process. Architects might create dozens of massing variations, tweaking and refining the design until they find the best solution. It’s all about exploring possibilities and making informed decisions before getting bogged down in the finer details.
Massing helps determine key aspects of a building’s design, like its overall scale, its proportions (how the height, width, and depth relate to each other), and its overall composition (how the different parts of the building fit together to create a unified whole).
Massing and Client Communication
มาดูกันเถอะ: most people aren’t trained to read architectural drawings. Trying to explain a complex design using only 2D plans and elevations can be like speaking a different language! That’s where massing models come in. They provide a clear, tangible, three-dimensional representation of the project that anyone can understand.
Imagine trying to describe the feeling of standing inside a grand, light-filled atrium. Words can only go so far. But with a massing model, you can show your client exactly what that space will be like. They can hold the model, turn it around, and get a real sense of the building’s scale and form.
This makes communication much easier and more effective. Clients can provide informed feedback, and architects can be sure that everyone is on the same page. It fosters a collaborative environment where ideas can be explored and refined together.
Types of Massing Models
Conceptual Massing Models
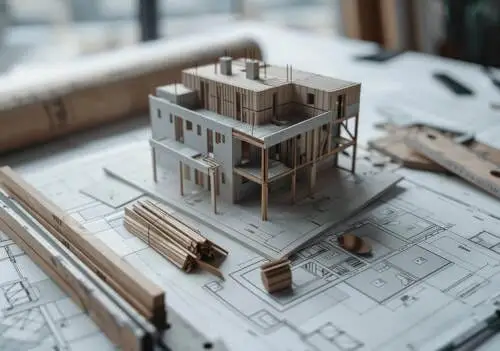
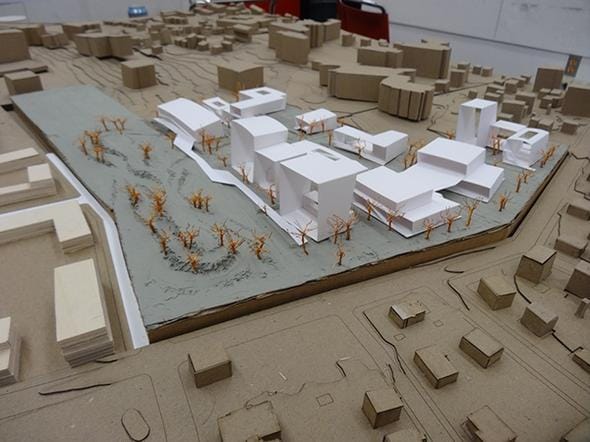
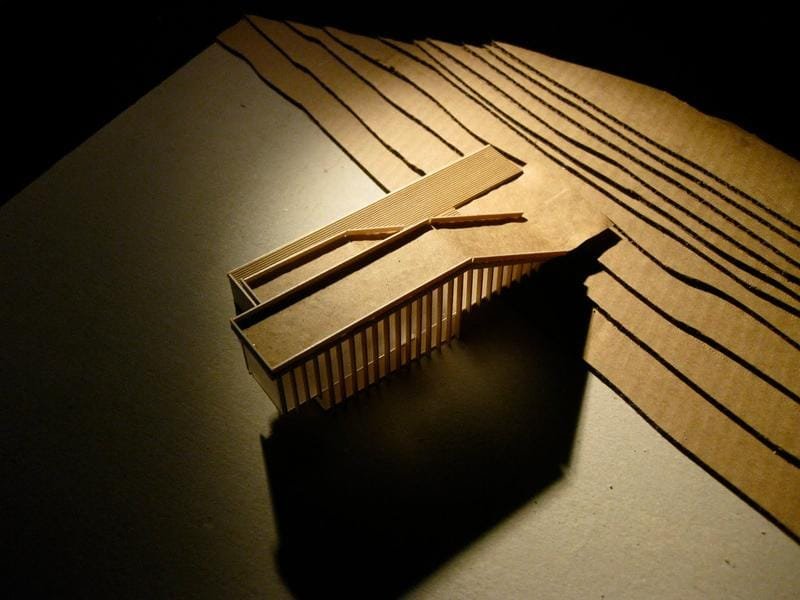
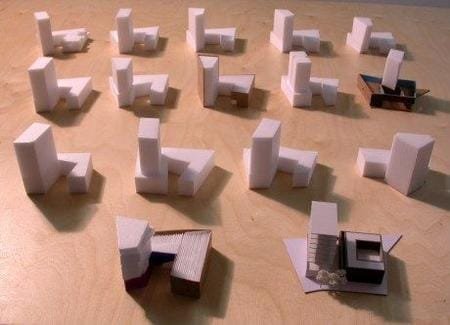
These are the simplest and most basic type of massing model. Think of them as the “rough draft” ของโลกสถาปัตยกรรม. They’re created quickly, often using inexpensive materials like foam, กระดาษแข็ง, or even clay. The goal isn’t to create a perfect replica, but rather to explore initial design ideas and get a feel for the overall form and volume of the building. They’re all about exploring the big moves – is the building a single, massive block, or is it broken down into smaller, interconnected volumes? How does it sit on the site? These models are deliberately undetailed, allowing architects to focus on the fundamental aspects of the design.
Site Context Models
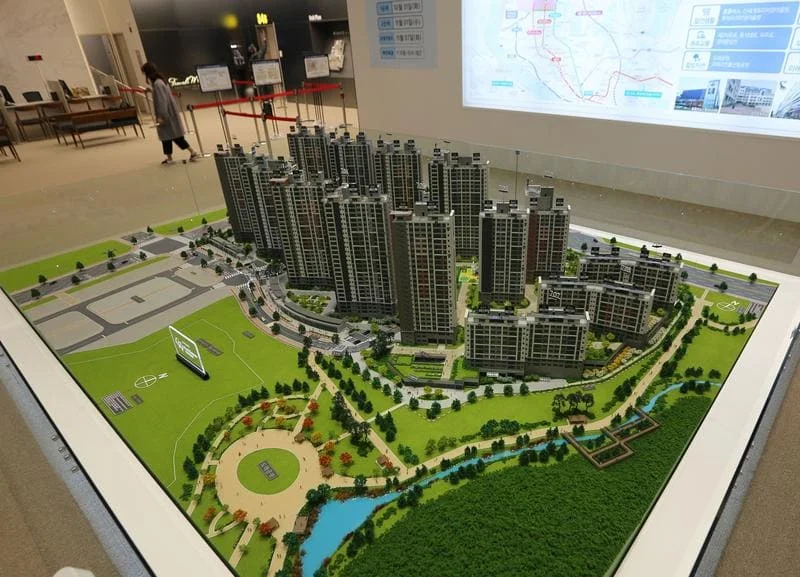
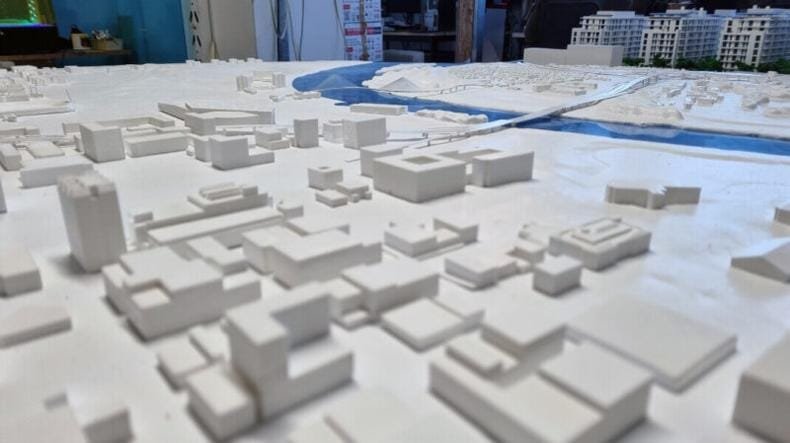
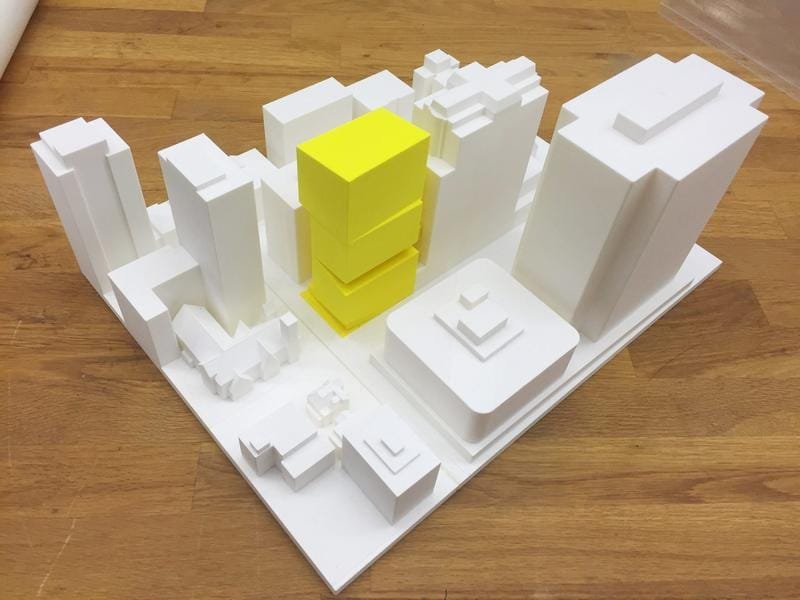
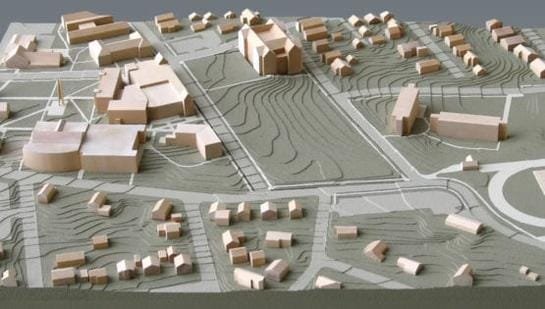
Buildings don’t exist in a vacuum! Site context models take the surrounding environment into account. They show not only the proposed building but also the neighboring structures, ถนน, ต้นไม้, and even the topography (the shape of the land). This helps architects understand how the new building will fit in with its surroundings. Will it overshadow its neighbors? Will it block important views? Will it complement the existing streetscape? Site context models are essential for analyzing the building’s impact on its environment and ensuring that it’s a good neighbor. Common scales for these models might range from 1:200 ถึง 1:1000, depending on the size of the project and the surrounding area.
Façade Massing Models
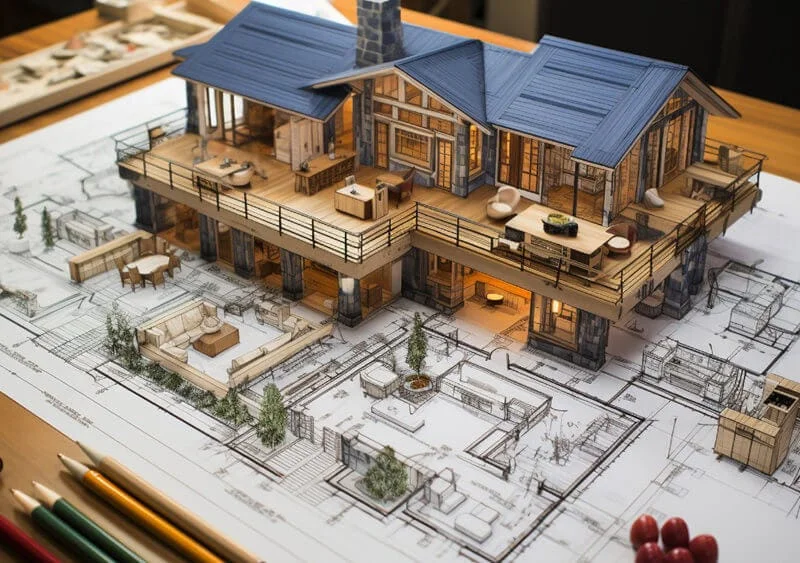
Once the overall form of the building is established, architects might create façade massing models to focus specifically on the exterior appearance. These models explore different options for the building’s “ผิว” – the materials, the placement of windows, and any other design features that affect how the building looks from the outside. They’re a great way to test different aesthetic approaches and see how they impact the overall character of the building.
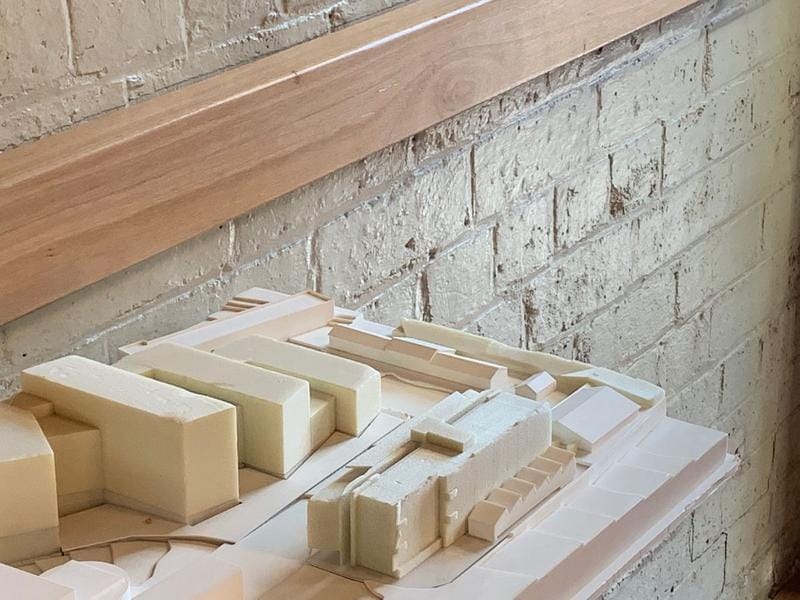
Refined Massing Models
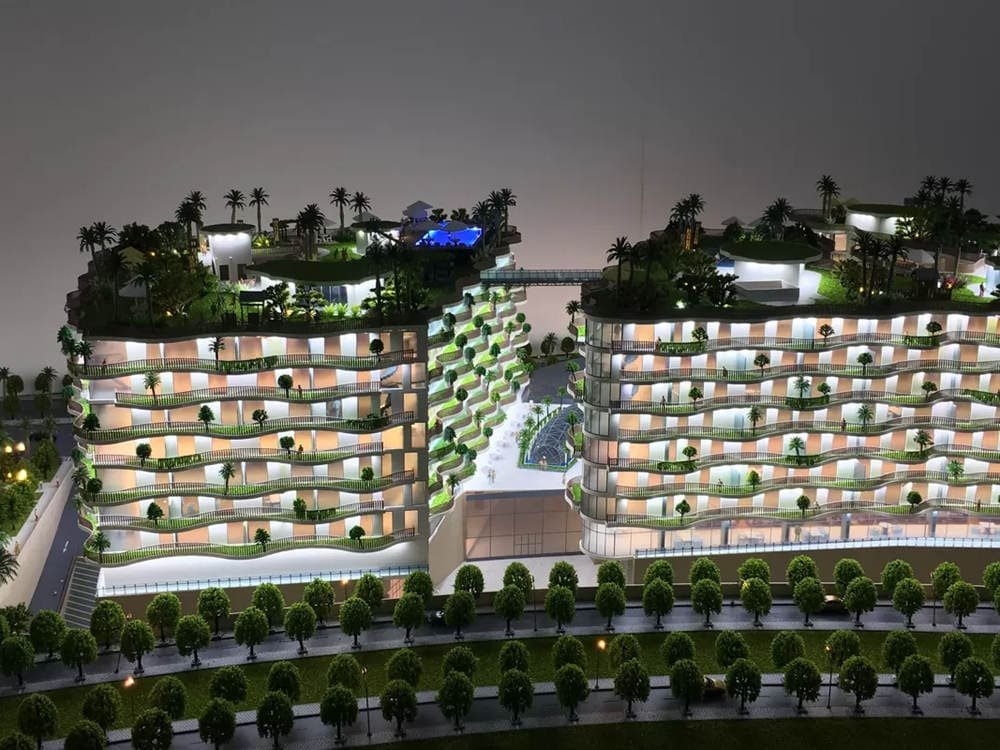
As the design progresses, massing models become more detailed. Refined massing models incorporate more information, such as floor layouts, องค์ประกอบโครงสร้าง, and even some indication of materials. These models are used to make final decisions about the building’s form and structure, and they’re often used for presentations to clients or planning boards. They strike a balance between showing the overall massing and providing enough detail to give a clear sense of the finished product.
Digital Massing Models
| ซอฟต์แวร์ | คำอธิบาย |
|---|---|
| AutoCAD | A classic for drafting and designing, it offers precise control over dimensions and geometry. |
| การทบทวน | Designed specifically for Building Information Modeling (บีไอเอ็ม), it allows you to create detailed 3D structures with associated data. |
| แรด (แรด) | Known for its versatility, Rhino is great for creating complex and organic forms, often used with the Grasshopper plugin for parametric modeling. |
| SketchUp | User-friendly and intuitive, it’s a popular choice for quick concept modeling and visualization. |
| Forma | A cloud-based platform offering conceptual design tools, including massing and environmental analysis, within a collaborative environment. |
โมเดลการวางแผน
Mass Plans
Materials and Techniques for Creating Massing Models
The tools and materials used to create massing models have evolved significantly over time. From simple blocks of wood to sophisticated digital fabrication techniques, architects have a wide range of options to choose from. Let’s explore some of the most common methods:
วัสดุแบบดั้งเดิม
เป็นเวลาหลายศตวรรษ, architects have relied on readily available materials to craft their models. These materials are often chosen for their ease of use, affordability, and ability to be quickly shaped and manipulated.
Kraft Board: The Architect’s Secret Weapon
If you’re looking for a material that’s strong, ซื้อได้, และง่ายต่อการทำงานด้วย, look no further than Kraft board. This unassuming brown cardboard is a favorite among architects for creating quick, effective massing models.
What is Kraft Board?
Kraft board is a type of thin, recycled cardboard that’s made up of multiple layers, including a corrugated inner layer. It’s surprisingly strong for its weight, and its smooth, matte surface is perfect for representing the basic form of a building. ที่ “Kraft” in the name refers to the Kraft process, a method of wood pulping that produces a particularly tough paper. ดังนั้น, it’s not just any cardboard – it’s cardboard with strength!
Why Choose Kraft Board?
- ซื้อได้: It’s one of the cheapest model-making materials you can find.
- Strong and Rigid: Despite being thin, it holds its shape remarkably well, even for larger models.
- Easy to Cut: A sharp scalpel or utility knife will slice through it cleanly.
- Unpretentious Look: The raw, recycled appearance is perfect for conceptual models, conveying a sense of “work in progress.”
Where to Find It:
One known supplier is Seawhite of Brighton, and it is often available through art supply stores that carry their products, เช่น Cass Arts.
Tips for Working with Kraft Board:
- Marking: Use a mechanical pencil with a fine lead (0.3mm H lead is recommended) for precise lines. Circle your marks lightly, as the speckled surface can make them hard to see. Erase pencil marks with a soft eraser after cutting.
- Cutting: Use a sharp scalpel or utility knife. The tough fibers in Kraft board will dull your blade quickly, so sharpen the tip frequently on fine-grit sandpaper (800-1000 grit). Cut with multiple, gentle passes rather than trying to force the blade through in one go. This will prevent crushing or tearing the edges.
- Gluing: Use a good quality PVA wood glue (like Evo-Stik or Loctite). Apply it sparingly – a little goes a long way with this absorbent material. Use solid blocks (metal or wood) as supports to ensure right angles while the glue dries.
- Direction of Corrugation: Cut walls with the corrugation running vertically (top to bottom) to minimize the visibility of the cut edges at the corners.
- Handling: The surface of Kraft board easily picks up grease from fingers. If you want to keep it looking pristine, consider wearing cotton gloves while working.
Building a Simple Box Form with Kraft Board (ทีละขั้นตอน):
- Cut the Roof: Start with the roof piece, as this will determine the overall dimensions of the model.
- Cut a Continuous Strip for the Walls: Cut a long strip of Kraft board that’s wide enough for the walls and long enough to wrap around the entire perimeter of the roof. This ensures all walls are the same height.
- Glue Two Parallel Walls: Apply glue to the edges of the roof and attach two opposite walls, using blocks to support them at right angles while the glue dries.
- Measure and Cut the Remaining Walls: Once the first two walls are set, measure the exact distance between them. Cut the remaining wall pieces to this precise measurement.
- Apply Glue to the Insert Pieces: Apply glue to the edges of the new wall pieces, rather than the existing structure. This prevents excess glue from squeezing out onto the surface.
- Insert and Level the Walls: Carefully insert the remaining wall pieces, using a flat surface to ensure they’re level with the other walls.
By building from the top down (roof first) and measuring each wall piece as you go, you’ll achieve a cleaner, more accurate model with minimal gaps.
โฟมบอร์ด (Foamcore)
โฟมบอร์ด, also known as foamcore, is another popular choice for architectural models. It consists of a layer of polystyrene foam sandwiched between two layers of paper. มันมีน้ำหนักเบา, ราคาไม่แพง, and incredibly easy to cut, making it ideal for quick conceptual models and site context models where you need to represent large areas or multiple buildings.
Advantages of Foam Board
- มีน้ำหนักเบา: Makes it easy to transport and handle, โดยเฉพาะอย่างยิ่งสำหรับรุ่นที่ใหญ่กว่า.
- Easy to Cut: A sharp knife will slice through it effortlessly.
- ซื้อได้: Readily available and relatively inexpensive.
- Smooth Surface: ช่วยให้มีความสะอาด, even surface for representing building facades.
Tips for Using Foam Board
- Cutting Use a very sharp knife and make several light passes rather than trying to cut through in one go. This will give you a cleaner edge. Consider using a metal straightedge as a guide.
- Gluing: PVA glue or hot glue works well. If using hot glue, work quickly, as it sets fast.
- การให้คะแนน: To create sharp corners or folds, score the foam board on one side (cut partially through) before bending.
ไม้บัลซา
Balsa wood is a classic material for architectural model making, และด้วยเหตุผลที่ดี. It’s incredibly lightweight, soft, and easy to carve, making it perfect for creating detailed models or representing organic forms. While it might not be the best choice for quick massing studies due to the time it takes to shape, it’s excellent for models where you want to show a higher level of detail or explore intricate curves and shapes.
Advantages of Balsa Wood
- มีน้ำหนักเบา: The lightest commercially available wood, making it ideal for large or complex models.
- Easy to Carve: Can be shaped with a sharp knife, sandpaper, or even a small saw.
- Takes Paint Well: Provides a smooth surface for painting and finishing.
Tips for using Balsa Wood
- Cutting: Use a sharp hobby knife or a fine-toothed saw for precise cuts.
- Gluing: กาวพีวีเอ, wood glue, or cyanoacrylate (super glue) all work well.
- การขัด: Sand with progressively finer grits of sandpaper to achieve a smooth finish.
- Sealing: Consider sealing the wood with a sanding sealer before painting to prevent the paint from soaking in unevenly.
กระดาษแข็ง
Beyond Kraft board, other forms of cardboard find use. Corrugated cardboard, often salvaged from boxes, is free and readily available, suitable for rough, แบบจำลองแนวคิด. แผ่นไม้อัด, a denser, smoother cardboard, offers more precision for slightly refined models.
Other Materials
Depending on the desired level of detail and the specific design, architects might also use:
- ดินเหนียว: For quickly sculpting organic forms and exploring massing concepts.
- อะคริลิค (ลูกแก้ว): For creating clean, modern-looking models, often used for representing glass or transparent elements. Can be cut with a laser cutter or scored and snapped.
- ไม้ (ประเภทต่างๆ): For more durable and detailed models, often used in combination with other materials.
เทคนิคการประดิษฐ์ดิจิทัล
The digital revolution has transformed architectural model making, offering unprecedented speed, ความแม่นยำ, and the ability to create incredibly complex forms. Here are some of the key techniques:
3D การพิมพ์
3D printing has become a game-changer for architectural modeling. It allows architects to create physical models directly from their digital designs, with a level of detail and complexity that would be impossible to achieve by hand. It’s like having a miniature factory on your desktop!
Advantages of 3D Printing
- ความเร็ว: Can produce complex models in a matter of hours.
- ความแม่นยำ: Creates highly accurate and detailed models.
- ความซับซ้อน: Can produce intricate geometries and internal structures that would be difficult or impossible to create by hand.
- Iteration: Allows for rapid prototyping and easy modification of designs.
Different 3D Printing Technologies for Massing Models
| เทคโนโลยี | How it Works | ข้อดี | ข้อเสีย | ดีที่สุดสำหรับ |
|---|---|---|---|---|
| เอฟดีเอ็ม (การสร้างแบบจำลองการทับถมแบบหลอมรวม) | Melts and extrudes thermoplastic filament, ทีละชั้น. | ซื้อได้, widely available, good for larger models. | Lower resolution, visible layer lines. | แบบจำลองแนวคิด, larger massing studies. |
| SLA (stereolithmicromography) | Uses a UV laser to cure liquid resin, ทีละชั้น. | High resolution, smooth surface finish, excellent detail. | More expensive than FDM, limited material choices. | Detailed presentation models, การออกแบบที่ซับซ้อน. |
| เอสแอลเอส (การเผาเลเซอร์แบบเลือก) | Uses a laser to fuse powder particles (usually nylon), ทีละชั้น. | Strong and durable models, no need for support structures, good for complex geometries. | More expensive than FDM and SLA, rougher surface finish. | Functional prototypes, complex internal structures. |
| Binder Jetting | Uses a printhead to selectively deposit a binding agent onto a bed of powder, ทีละชั้น. | Full-color printing capabilities, relatively fast. | Models are more fragile and porous, requires post-processing. | Visual prototypes, full-color massing models. |
Can you 3D print architectural models?
อย่างแน่นอน! 3D printing is rapidly becoming a standard tool in architectural practice.
การตัดเลเซอร์
Laser cutting is another digital fabrication technique that’s incredibly useful for architectural model making. It uses a high-powered laser beam to cut or engrave materials with extreme precision. Think of it as a super-accurate, computer-controlled cutting tool.
Advantages of Laser Cutting
- ความแม่นยำ: Creates very clean, accurate cuts and intricate details.
- ความเร็ว: Much faster than cutting by hand, especially for repetitive elements.
- Versatility: Can cut a wide range of materials, รวมถึงอะคริลิก, ไม้, กระดาษแข็ง, และแม้กระทั่งผ้าบางชนิด.
- Repeatability: Can easily reproduce the same design multiple times with perfect consistency.
Use in Massing Models
Laser cutting is particularly well-suited for creating flat components of massing models, เช่น:
- Walls and floors: Can be cut with precise dimensions and interlocking features for easy assembly.
- Site contours: Can be used to create layered terrain models, representing the topography of the site.
- Façade elements: Can be used to create intricate patterns, window frames, or other details.
วัสดุ: อะคริลิค, ไม้ (MDF, ไม้อัด, บัลซา), กระดาษแข็ง, กระดาษ, and some fabrics.
เครื่องกัดซีเอ็นซี
ซีเอ็นซี (การควบคุมเชิงตัวเลขคอมพิวเตอร์) milling is a subtractive manufacturing process. Unlike 3D printing, which adds material, CNC milling removes material from a solid block using a rotating cutting tool. It’s like a computer-controlled sculpting machine.
Advantages of CNC Milling
- Versatility: Can create a wide range of shapes, including complex 3D forms.
- Material Options: Can work with a variety of materials, รวมทั้งโฟมด้วย, ไม้, พลาสติก, and even some metals.
- ความแม่นยำ: Produces highly accurate and detailed models.
Use in Massing Models
CNC milling is particularly useful for:
- การสร้างความซับซ้อน, 3D shapes: Ideal for modeling organic forms, curved surfaces, or intricate details that would be difficult to achieve with other methods.
- Terrain models: Can be used to create highly accurate and detailed representations of the site topography.
- Solid massing models: Can be used to create solid blocks representing buildings, which can then be further refined or combined with other elements.
วัสดุ: โฟม (various densities), ไม้ (ประเภทต่างๆ), พลาสติก (อะคริลิค, PVC), and soft metals (อลูมิเนียม).
Tools and Supplies
- Cutting Mat: A self-healing cutting mat protects your work surface and provides a stable base for cutting.
- Metal Ruler: Essential for accurate measurements and straight cuts. Get a variety of lengths (15cm, 30cm, 60cm).
- Scalpel or Utility Knife: A sharp blade is crucial for clean cuts. A scalpel (like Swann-Morton No. 3 handle with 10A blades) offers excellent precision.
- Scale Ruler: Allows you to work accurately at different architectural scales (เช่น, 1:50, 1:100, 1:200). Triangular scale rulers are often clearer and easier to use than flat ones.
- Mechanical Pencil: For precise marking and drawing. A 0.3mm H lead is recommended for fine lines.
- Try Square: Used to ensure right angles, especially when assembling models. An engineer’s try square (machined steel) is a good investment.
- Glue: PVA wood glue is generally the best choice for cardboard and wood. Hot glue can be used for quick bonds, especially with foam board. Super glue (cyanoacrylate) can be useful for small parts or bonding different materials.
- Sandpaper: Various grits for smoothing edges and surfaces.
- Other Optional Tools: Depending on the materials and techniques you’re using, you might also need:
- Clamps
- Cutting pliers
- Tweezers
- Masking tape
- Paint brushes and paints
- Digital calipers (for precise measurements)
Creating a Scaled Massing Model: คำแนะนำทีละขั้นตอน
Now that you have a good understanding of the materials and tools involved, let’s walk through the process of creating a scaled massing model. While the specific steps might vary depending on the complexity of your design and the chosen materials, this general guide will provide a solid foundation:
ขั้นตอน 1: Determine the Scale
The scale of your model is the ratio between the size of the model and the size of the actual building. Choosing the right scale is crucial – it needs to be small enough to be manageable, but large enough to show the necessary detail. พิจารณา:
- The size of your project: A large urban development will require a smaller scale than a single-family house.
- The purpose of the model: A conceptual model can be at a smaller scale than a detailed presentation model.
- The size of your workspace and materials: Make sure your model will fit comfortably in your workspace and that you have materials large enough to accommodate the chosen scale.
Common Architectural Scales:
| มาตราส่วน | Meaning | การใช้งานทั่วไป |
|---|---|---|
| 1:50 | 1 unit on the model = 50 units in real life | รายละเอียดรุ่น, พื้นที่ภายใน |
| 1:100 | 1 unit on the model = 100 units in real life | แบบจำลองอาคาร, smaller site models |
| 1:200 | 1 unit on the model = 200 units in real life | Larger building models, site context models |
| 1:500 | 1 unit on the model = 500 units in real life | แบบจำลองการวางผังเมือง, large site models |
| 1:1000 | 1 unit on the model = 1000 units in real life | Large-scale urban planning models |
| 1:2000 | 1 unit on the model = 2000 units in real life | Large-scale urban planning models |
Calculating Model Dimensions:
Once you’ve chosen a scale, you’ll need to convert the real-world dimensions of your building to model dimensions. Here’s the formula:
Model Dimension = Real-World Dimension / Scale Factor
ตัวอย่างเช่น, if you’re building a model at a scale of 1:100, and a wall is 10 เมตร (1000 centimeters) long in real life, the model dimension would be:
Model Dimension = 1000 cm / 100 - 10 cm
ขั้นตอน 2: รวบรวมวัสดุและเครื่องมือ
Refer back to the materials and tools list in Section IV. Make sure you have everything you need before you start building. Nothing is more frustrating than having to interrupt your workflow to run to the store!
ขั้นตอน 3: Prepare the Base (if applicable)
- Flat Base: For relatively flat sites, a simple piece of foam board, กระดาษแข็ง, or plywood can serve as the base.
- Layered Contours: To represent changes in elevation, you can use layers of cardboard, บอร์ดโฟม, หรือวัสดุอื่น ๆ, cut to the shape of the contour lines on a topographical map. Stack the layers on top of each other to create a stepped representation of the terrain.
- CNC Milled Base: For more accurate and detailed terrain models, you can use CNC milling to carve the topography from a solid block of foam or wood.
- 3D Printed Base For more accurate and detailed terrain models, you can use 3D printing to carve the topography.
ขั้นตอน 4: Create the Building Forms
- Accuracy is Key: Take your time and be as precise as possible. Even small errors in measurement can accumulate and lead to problems later on. Use a sharp pencil, a metal ruler, and a try square to ensure accurate lines and right angles.
- Clean Cuts: Use a sharp scalpel or utility knife and make multiple, light passes rather than trying to force the blade through in one go. This will give you cleaner edges and prevent tearing or crushing the material.
- Material-Specific Techniques:
- โฟมบอร์ด: Score one side before bending to create sharp corners.
- กระดาษแข็ง: Consider the direction of the corrugation for strength and appearance.
- ไม้บัลซา: Use a fine-toothed saw or a sharp hobby knife for precise cuts.
- อะคริลิค: Score deeply and snap, or use a laser cutter.
- Creating Different Shapes: While many massing models are based on simple box shapes, you can also create cylinders (by rolling and gluing cardboard or thin plastic), pyramids (by cutting and folding triangles), and other geometric forms.
ขั้นตอน 5: Assemble the Model
- Gluing Techniques:
- กาวพีวีเอ: Apply a thin, even layer to one surface, then press the pieces together firmly. Use clamps, weights, or temporary supports to hold the pieces in place while the glue dries.
- กาวร้อน: Works quickly, but can be messy. Apply a small amount and work fast.
- Super Glue: Good for small parts or bonding different materials, but use with caution – it bonds instantly and can be difficult to reposition.
- Reinforcing Joints: For added strength, you can reinforce joints with small pieces of cardboard, ไม้, หรือพลาสติก. You can also use masking tape to temporarily hold pieces together while the glue dries.
- Creating Strong Connections: Consider using interlocking joints (like tabs and slots) for a more secure and accurate assembly, โดยเฉพาะอย่างยิ่งสำหรับรุ่นที่ใหญ่กว่า. These can be cut by hand or with a laser cutter.
- Slotted Forms: With rigid material like kraft board. You can create series of identical floor shapes and identical upright supports with slots cut so that they can interlock.
ขั้นตอน 6: Add Site Context (if applicable)
- Adding neighboring buildings: Create simple block models to represent surrounding structures.
- Representing roads and pathways: Use strips of cardboard, กระดาษ, or paint to indicate roads and walkways.
- Adding vegetation: Use model trees, foliage, or ground cover materials to represent landscaping. You can find these at hobby stores or online.
- Creating water features: Use blue-tinted plastic, เรซิน, or paint to represent water bodies.
ขั้นตอน 7: Finishing Touches (Optional)
- จิตรกรรม: Use acrylic paints to add color and texture to your model. Consider using a primer first for better adhesion and a more even finish.
- Adding Texture: Use textured materials (like sandpaper, ผ้า, or textured paints) to represent different surfaces.
- Applying Finishes: A clear coat of varnish or sealant can protect your model and give it a more polished look.
The Evolution and Future of Massing Models
From Hand-Crafted to Digital
The way architects create massing models has undergone a dramatic transformation over time. สำหรับคนรุ่น, models were painstakingly crafted by hand, using traditional materials like wood, กระดาษแข็ง, and clay. This was a time-consuming and labor-intensive process, requiring specialized skills and a steady hand. While hand-crafted models still hold a certain charm and can be valuable for exploring tactile qualities, the advent of digital technology has revolutionized the field.
The Impact of Digital Technology
| ผลกระทบ | คำอธิบาย |
|---|---|
| Increased Speed and Efficiency | 3D printing drastically reduces the time required to create models, allowing for faster design iterations. |
| Greater Precision and Complexity | Enables the creation of highly detailed and intricate models that would be difficult or impossible to achieve by hand. |
| Easier Iteration and Modification | Digital models can be easily modified and reprinted, allowing for rapid prototyping and design exploration. |
| Improved Communication | 3D printed models provide a tangible and easily understandable representation of the design, facilitating communication with clients and stakeholders. |
| Cost Reduction | While there’s an initial investment, 3D printing can reduce labor costs and material waste in the long run. |
- Speed and efficiency: Digital models can be created and modified much faster than traditional hand-crafted models.
- Precision and complexity: Digital tools allow for the creation of highly detailed and intricate models that would be difficult or impossible to achieve by hand.
- Iteration and modification: Digital models can be easily changed and updated, allowing for rapid prototyping and design exploration.
- Improved communication: Digital models and 3D printed models can be shared and viewed easily, facilitating communication and collaboration among architects, ลูกค้า, and stakeholders.
- บูรณาการ: Digital models can be seamlessly integrated with other design software, such as Building Information Modeling (บีไอเอ็ม) programs, for a more comprehensive design workflow.
Emerging Technologies
The evolution of massing models doesn’t stop with 3D printing and laser cutting. Exciting new technologies are emerging that promise to further transform the way architects design and visualize their projects.
ความเป็นจริงที่เพิ่มขึ้น (อาร์) และความเป็นจริงเสมือนจริง (VR)
Imagine being able to walk through your massing model, experiencing the space as if it were already built. That’s the promise of virtual reality (VR). By using VR headsets, architects and clients can immerse themselves in a digital model, getting a much more realistic sense of scale, สัดส่วน, และความสัมพันธ์เชิงพื้นที่. ความเป็นจริงยิ่ง (อาร์), ในทางกลับกัน, overlays digital information onto the real world. This could be used to project a digital massing model onto a physical site, allowing you to see how the building would look in its actual context.
Parametric and Algorithmic Modeling
Parametric modeling takes digital design a step further by allowing architects to create designs based on rules and parameters. Instead of manually drawing each element, you define relationships between different parts of the model. ตัวอย่างเช่น, you could create a rule that says, “If I change the height of this wall, the roof angle should automatically adjust.” This allows for incredibly rapid exploration of design variations. Change one parameter, and the entire model updates accordingly. Algorithmic modeling takes this even further, using algorithms to generate design options based on specific criteria, such as maximizing daylight or minimizing energy consumption. This opens up exciting possibilities for creating truly optimized and innovative designs.
Integration with Environmental Simulations
Digital massing models can be integrated with sophisticated simulation software to analyze how a building will perform in its environment. ซึ่งรวมถึง:
- Sunlight and shadow studies: Analyze how sunlight will hit the building at different times of day and year, helping to optimize window placement and shading devices.
- Wind flow analysis: Simulate how wind will flow around the building, identifying potential areas of high wind pressure or turbulence.
- Energy performance analysis: Estimate the building’s energy consumption based on its form, orientation, และวัสดุ.
By integrating these simulations early in the design process, architects can make informed decisions that lead to more sustainable and comfortable buildings.
Real-World Examples of Massing Models
Let’s take a look at some real-world examples of how architects and model makers are using massing models to bring their designs to life. These examples showcase the versatility of massing models and the range of materials and techniques used to create them.
Kai Tak Development in Hong Kong (มาตราส่วน: 1:2000, Size: 3500mm x 2800mm, เวลาในการผลิต: 2 เดือน)
This massive model represents the Kai Tak Development, a major urban renewal project in Hong Kong. Despite the small scale (1:2000), the model covers a huge area (nearly 10 ตารางเมตร!). It showcases the overall layout of the development, including government buildings, residential areas, commercial zones, and the historic granite wharf. The model makers used a clever combination of materials: tan blocks for the surrounding areas and translucent/brown acrylic for the Kai Tak area itself, creating a clear visual distinction. A sophisticated lighting system adds another layer of detail, with white lights tracing the coastline and warm yellow lights illuminating the road network. This model is a great example of how massing models can be used to visualize large-scale urban planning projects.
KPF Master Plan Massing Model (มาตราส่วน: 1:2000, Size: 3600mm x 2500mm, เวลาในการผลิต: 45 วัน)
Commissioned by the renowned architecture firm KPF, this model showcases a master plan with a minimalist aesthetic. The model makers used gray acrylic blocks for the non-core areas, representing the buildings as simple geometric shapes. For the core area, they used frosted translucent acrylic, allowing for a subtle glow and highlighting the more important structures. This subtle use of materials and limited detail directs the viewer’s attention to the overall form and organization of the master plan.
Taipei 101 Massing Model (มาตราส่วน: 1:1000, Size: 1400mm x 800mm, เวลาในการผลิต: 3 หลายสัปดาห์)
This model focuses on the iconic Taipei 101 tower and its surrounding area. The model makers chose timber (ไม้) as the primary material, giving the model a warm, รู้สึกเป็นธรรมชาติ. The Taipei 101 building itself is represented with its distinctive bamboo-stalk-like façade, while the surrounding buildings are simple, unadorned blocks. The most interesting feature is a detachable central building, made with white PVC for added emphasis. This building also has two interchangeable landscapes, allowing for different presentations. This model demonstrates how massing models can highlight a key building within a larger context.
Shek O Villa by Foster + คู่ค้า (มาตราส่วน: 1:100, Size: 900mm x 550mm, เวลาในการผลิต: 3 หลายสัปดาห์)
“Shek O,” ความหมาย “rocky bay,” is a picturesque peninsula in Hong Kong known for its stunning villas. This model, commissioned by Foster + คู่ค้า, represents a modern villa design. The model makers used straight-cut edge blocks to capture the clean lines of the contemporary architecture, including a dramatic swimming pool. The surrounding terrain is represented with curved contour lines, mimicking the natural topography of the peninsula. This model shows how massing models can be used to visualize individual buildings within a specific landscape.
Murray Road Massing Model (มาตราส่วน: 1:500, Size: 1000mm x 800mm, เวลาในการผลิต: 3 หลายสัปดาห์)
This model represents Murray Road in Hong Kong, a bustling area with many iconic buildings. The model includes representations of well-known structures like the Bank of China headquarters (with its distinctive diamond-shaped façade) and the Murray Building. The model makers used 3D printing to create a highly accurate representation of the terrain, eliminating the need for manual post-processing. The buildings themselves are represented with simple, clear forms, highlighting their overall massing. This model demonstrates how massing models can be used to showcase a specific urban area and its key architectural landmarks.
Nanjing Shimao G11 Project Model (มาตราส่วน: 1:200, Size: 1100mm x 650mm, เวลาในการผลิต: 20 วัน)
This project, a new landmark in Nanjing, features two high-rise office buildings and a curved podium. The model makers used a combination of 3D printing and laser cutting to create the complex forms of the podium. The office buildings, at a scale of 1:200, presented a challenge due to the intricate façade structure. The model makers successfully overcame this challenge, demonstrating their expertise in handling detailed architectural elements even at a relatively small scale. This model showcases how massing models can be used to represent complex, modern architectural designs.
Jakarta Massing Model by SOM (มาตราส่วน: 1:1000, Size: R x 1800mm, เวลาในการผลิต: 3 หลายสัปดาห์)
This model represents a transit-oriented development master plan for Jakarta, designed by the architecture firm SOM. The model makers used white PVC panels for the base and buildings, creating a clean, minimalist look. Pale-green trees were added along the roads for a touch of color and realism. The model incorporates both CNC carving (for the window frames on the diamond-shaped buildings) และการพิมพ์ 3 มิติ (for the arc-shaped building), showcasing the versatility of digital fabrication techniques. The circular base and the use of Morandi colors (muted, desaturated tones) create a harmonious and aesthetically pleasing presentation. This model exemplifies how massing models can be used to represent large-scale urban development projects with a focus on overall form and spatial relationships.
These examples illustrate the diverse range of applications for massing models, from large-scale urban planning projects to individual building designs. They also highlight the variety of materials and techniques that can be used to create effective and visually compelling models.
Challenges and Considerations
- Achieving Accuracy and Precision: Even at a simplified level, massing models need to be accurate representations of the design. Small errors in measurement or construction can accumulate and lead to significant discrepancies. Careful planning, precise measurements, and the use of appropriate tools are essential.
- Representing Complex Geometries: While massing models often focus on basic forms, some architectural designs incorporate complex curves, มุม, or organic shapes. Representing these geometries accurately in a physical model can be challenging, requiring specialized techniques like 3D printing, CNC Milling, or skilled hand-crafting.
- Choosing the Right Materials and Techniques: The choice of materials and techniques should be guided by the purpose of the model, the level of detail required, the available budget, and the skills of the model maker. There’s no one-size-fits-all solution, and the best approach will vary depending on the specific project.
- Time and Cost Constraints: Creating massing models, especially detailed ones, can be time-consuming and expensive. It’s important to factor in the time and cost of model making when planning a project and to choose materials and techniques that are appropriate for the available resources.
- ข้อจำกัดด้านวัสดุ Not all 3D printing materials can perfectly replicate the properties of traditional building materials. It’s important to carefully consider the strength, ความทน.
Addressing Sustainability
- Choose Eco-Friendly Materials: Opt for materials that are recycled, recyclable, or sustainably sourced. Consider using cardboard, ไม้บัลซ่า, or bio-based plastics instead of petroleum-based plastics.
- Minimize Waste: Plan your model carefully to minimize material waste. Use digital tools to optimize the layout of components for cutting or printing. Reuse or recycle scrap materials whenever possible.
- Consider Energy Consumption: Digital fabrication techniques like 3D printing and laser cutting can be energy-intensive. Choose energy-efficient equipment and optimize your workflow to minimize energy use.
บทสรุป
Massing models are far more than just miniature buildings. They’re powerful tools that help architects explore, ปรับแต่ง, and communicate their designs in a tangible and intuitive way. From the earliest conceptual sketches to the final presentation models, massing studies play a vital role in shaping the built environment. They allow architects to visualize the big picture – the overall form, ปริมาณ, and spatial relationships of a building – before diving into the intricate details. They facilitate communication with clients, ผู้มีส่วนได้เสีย, และประชาชน, ensuring that everyone involved has a clear understanding of the project’s vision.
ในขณะที่เทคโนโลยียังคงก้าวหน้า, the techniques and materials used to create massing models will undoubtedly evolve. We’ll see even greater integration of digital tools, virtual and augmented reality, and sophisticated simulation software. But the fundamental purpose of massing models will remain the same: to provide a crucial link between the abstract world of architectural ideas and the concrete reality of the built environment.